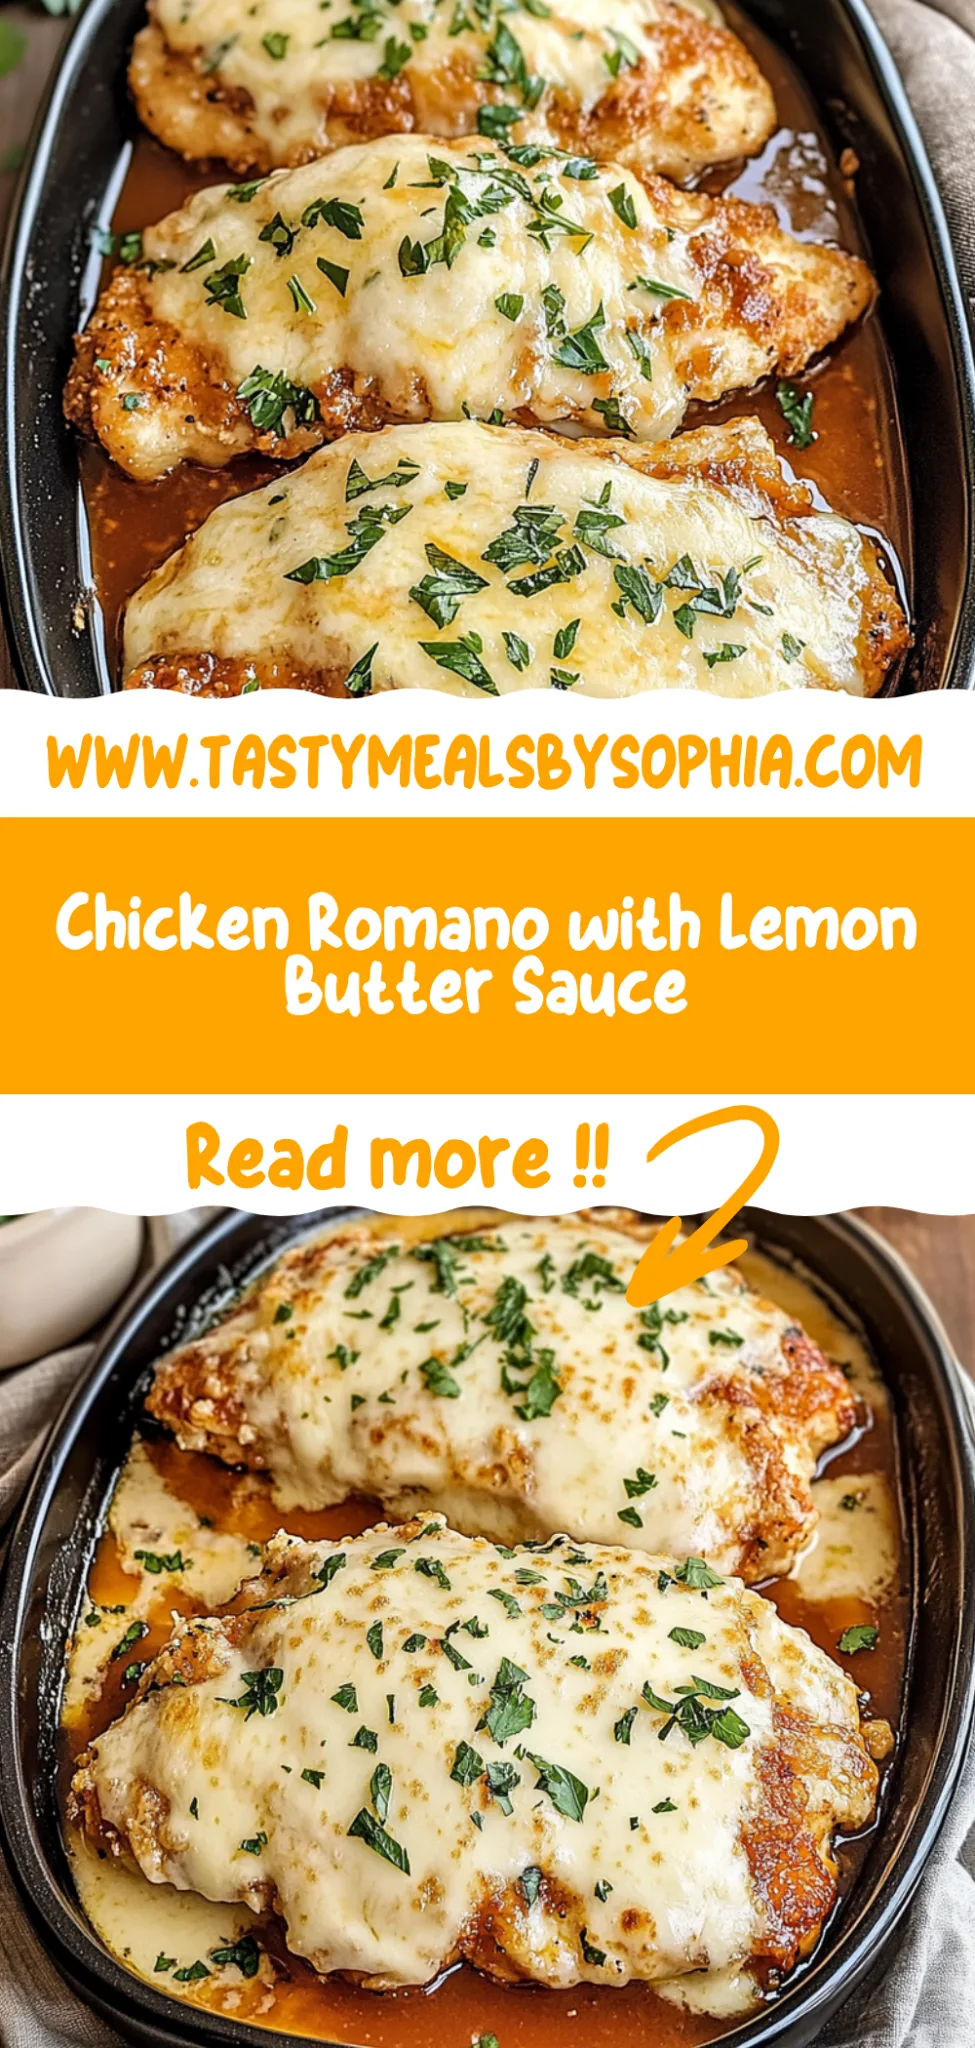
Chicken Romano: Indulgent Comfort Food at Home
I first stumbled upon Chicken Romano at a cozy little Italian restaurant tucked away in my neighborhood. The moment I took my first bite of the tender, breaded chicken slathered in that creamy Romano cheese sauce, I was hooked. It was rich, indulgent, and just made me feel good—like a warm hug on a plate! However, with the prices at restaurants these days, I couldn’t help but think how nice it would be to recreate this delightful dish at home without breaking the bank or having to put on pants to go out.
Let me tell you, perfecting my version of Chicken Romano was no walk in the park. I ended up making it five times over the course of two weeks—yes, my family had a lot of chicken for dinner! Each attempt brought its own challenges; one time, I might’ve gotten a bit too enthusiastic with the seasoning (oops!), and another time the sauce turned out more like glue than creamy goodness. But each misstep taught me something new about balancing flavors and getting that perfect coating on the chicken. Who knew cooking could be such a rollercoaster?
But after all those trials and tribulations, I can confidently say it was totally worth it. The final result is nothing short of heavenly: juicy chicken perfectly coated with a golden crust and smothered in that luscious Romano cheese sauce that’s both creamy and tangy. It’s got that great crunch from the breadcrumbs, while still being rich enough to make your taste buds dance—a true crowd-pleaser! I can’t wait for you to try this Chicken Romano; you’re going to love it as much as I do!
These Chicken Romano are…
…a true celebration of Italian flavors that will have you coming back for seconds!
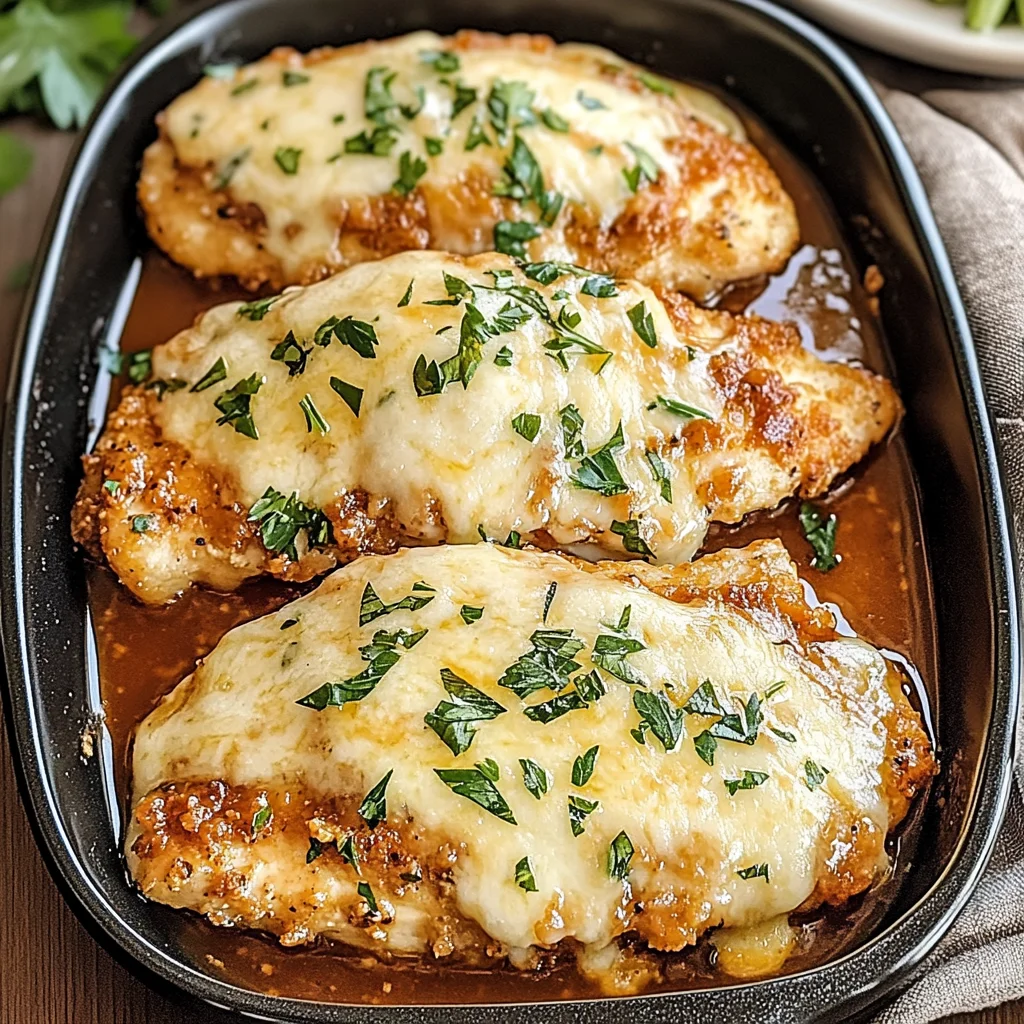
1. They deliver an irresistible creamy richness thanks to the velvety Romano cheese sauce. The combination of heavy cream and freshly grated cheese creates a luxurious coating that elevates each bite, making these Chicken Romano feel indulgent without being overly heavy.
2. Perfectly crispy exterior – each chicken breast is coated in a flavorful blend of breadcrumbs and Romano cheese, resulting in a golden-brown crust that contrasts beautifully with the tender meat inside. This crunch is achieved by frying in olive oil, which adds a subtle fruity note that enhances the overall flavor.
3. The pounding technique ensures even cooking and tenderness throughout the chicken breasts. By pounding them to an even thickness, I’ve found they cook uniformly, preventing any dry or overcooked spots while allowing for optimal absorption of the delicious sauce.
4. Incredible cost-effectiveness – this recipe allows you to create a restaurant-quality meal at home without breaking the bank. With just a few staple ingredients, including chicken breasts and pantry items, you can serve up a delightful dish that rivals any dine-out experience for a fraction of the price.
PS These Chicken Romano serve 4 generously, making them perfect for family dinners or impressing guests without too much fuss!
Ingredients for the Chicken Romano
Each ingredient in this dish plays an essential role in flavor and texture. Here’s what you’ll need:
4 pieces boneless, skinless chicken breasts (pounded to an even thickness): Provides a tender and juicy base for the dish.
1 cup all-purpose flour (for dredging): Creates a light coating that helps the breading adhere.
2 large eggs (beaten): Acts as a binding agent for the bread crumbs.
1 cup bread crumbs (preferably Italian-style): Adds a crispy texture and enhances the Italian flavor profile.
1/2 cup grated Romano cheese (for mixing with bread crumbs): Infuses a savory depth that complements the chicken.
1 teaspoon salt (to taste): Elevates all the flavors in the dish.
1 teaspoon black pepper (to taste): Provides a subtle warmth and seasoning boost.
1 cup heavy cream (for the sauce): Creates a rich and creamy base for the sauce.
1/2 cup grated Romano cheese (for the sauce): Enhances the sauce with tangy and nutty notes.
1 teaspoon garlic powder (for flavor): Introduces a fragrant, savory element to the sauce.
1 teaspoon dried parsley (for garnish): Adds a touch of color and freshness to finish off the dish.
1/4 cup olive oil (for frying): Ensures a golden, crispy crust on the chicken.
You Must Pound the Chicken. No Exceptions!
I know, I know—pounding chicken might sound like a tedious extra step, but trust me, it’s absolutely essential for this Chicken Romano. I tried skipping it once to save time, and let’s just say the results were not pretty. The chicken turned out unevenly cooked and dry, which made my creamy Romano sauce weep in disappointment. 😅
Pounding the chicken to an even thickness is crucial because it ensures that every bite cooks uniformly. Think of it like rolling out pizza dough; if you leave one part too thick, that section will be doughy while the thinner parts will burn. In Chicken Romano, an even thickness means tender, juicy chicken throughout, perfectly complementing that rich cheese sauce.
What does pounding the chicken do?
- Texture — It creates a tenderized surface that cooks more evenly, resulting in juicy chicken rather than tough bits.
- Cooking Time — Even thickness means consistent cooking time; no more waiting for one side to catch up with the other!
- Flavor Absorption — The more surface area exposed during cooking, the better the flavors meld together from your seasoning and sauce.
- Presentation — A uniform size looks much more appealing on the plate, making your dish Instagram-ready!
- Moisture Retention — Thinner pieces cook faster while retaining moisture, leading to a succulent final product.
Different pounding times
- No pounding (poor) — The chicken is unevenly cooked; some bites are dry while others are undercooked.
- 1/4 inch thick (fair) — Better than nothing! The chicken cooks more evenly but may still have some tougher pieces.
- 1/2 inch thick (good) — Perfectly cooked through with great texture; still juicy but could use a little more tenderness.
- 3/4 inch thick (excellent) — Ideal! This thickness maximizes tenderness while ensuring the chicken stays moist and flavorful.
Don’t skip pounding the chicken—it’s non-negotiable! The most common mistake people make is not getting it thin enough or skipping this step altogether. Trust me, I’ve been there! A few whacks with a meat mallet will change your Chicken Romano game forever!
How to make Chicken Romano
Are you ready to see how straightforward it is to make the Chicken Romano of your dreams??
1. PREPARE CHICKEN
Start with the basics to ensure your chicken is perfectly seasoned and ready for breading!
Preheat – Preheat the oven to 375°F (190°C). This will ensure that your chicken cooks thoroughly and evenly once it’s in the oven.
Pound – Pound the chicken breasts to an even thickness. This step is crucial for consistent cooking; uneven pieces can result in some parts being overcooked while others remain underdone.
Season – Season the chicken with salt and pepper. This simple seasoning enhances the flavor, giving each bite a delicious kick.
HANDY TIPS
- Use a meat mallet or rolling pin to pound the chicken; this helps tenderize it as well!
- If you have time, let the seasoned chicken sit for about 10 minutes before proceeding; this allows the flavors to penetrate better.
2. BREADING PROCESS
Get ready for that delicious crunchy coating that makes Chicken Romano so irresistible!
Set up – Set up a breading station: place flour in one dish, beaten eggs in another, and a mixture of bread crumbs and Romano cheese in a third. This organized setup speeds up the process and minimizes mess.
Dredge – Dredge each chicken breast in flour, dip in eggs, and coat with the bread crumb mixture. Make sure each piece is fully coated for maximum crunch and flavor.
HANDY TIPS
- Use Italian-style breadcrumbs for an authentic flavor boost!
- For extra cheesy goodness, mix in a little more grated Romano cheese into the breadcrumb mixture.
3. FRY CHICKEN
It’s time to fry up those beautifully breaded chicken breasts until they are golden brown and crispy!
Heat – In a skillet, heat olive oil over medium heat. The oil should shimmer but not smoke; adjust heat as necessary to maintain this temperature.
Fry – Fry the breaded chicken breasts until golden brown, about 4-5 minutes per side. Look for that perfect golden hue as an indicator they are ready to flip!
Transfer – Transfer the fried chicken to a baking dish. This will prepare them for their next step in the oven!
HANDY TIPS
- Avoid overcrowding the skillet; fry in batches if necessary so that each piece has room to brown evenly.
- Keep an eye on your timing — you want that crispy crust without burning!
4. MAKE SAUCE
Create a creamy sauce that adds richness to your chicken!
Combine – In a saucepan, combine heavy cream, garlic powder, and Romano cheese. Stir continuously over medium heat until everything is well mixed and the cheese melts into a smooth sauce. This should take about 4-5 minutes — be patient!
Pour – Pour the sauce over the chicken in the baking dish, ensuring each piece is generously covered.
HANDY TIPS
- If you prefer a thicker sauce, let it simmer longer while stirring frequently.
- Feel free to add fresh herbs like basil or thyme for an extra pop of flavor!
5. BAKE
Now we bake everything together for a warm, bubbly finish!
Bake – Bake in the preheated oven for 15-20 minutes, until the chicken is cooked through and the sauce is bubbly around the edges. You’ll know it’s ready when you see bubbling goodness and smell that delightful aroma!
Garnish – Garnish with dried parsley before serving for that final touch of color and flavor.
HANDY TIPS
- Use an instant-read thermometer — chicken should reach an internal temperature of 165°F (75°C) when done.
- For added texture, broil for an extra minute or two after baking for a slightly crispy top!
Make these once, and I wager they will invade your dreams every night too! – Nagi x
FAQ – Chicken Romano
🍗 How long will leftovers keep in the fridge?
Leftovers of Chicken Romano can be stored in an airtight container in the refrigerator for about 3 to 4 days. However, I recommend consuming them within the first 2 days for best quality, as the creamy sauce may start to separate after that. On day 3, you can expect it to be about 97% as good as when freshly made, but by day 4, it could drop to around 85%. Always check for any off smells or changes in texture before consuming!
⏲️ Can I skip pounding the chicken breasts?
No, you cannot skip pounding the chicken breasts! Pounding them to an even thickness is essential for ensuring they cook evenly. If some parts are thicker than others, you might end up with dry areas while waiting for thicker parts to cook through. I’ve tested this numerous times and found that even a slight difference can impact your final dish. So grab that meat mallet and get pounding!
❄️ Can I freeze Chicken Romano?
Absolutely! You can freeze Chicken Romano before baking it. To do this, follow all steps up to pouring the sauce over the chicken and then cover it tightly with plastic wrap and aluminum foil. It will keep well in the freezer for up to 2 months. When you’re ready to enjoy it, thaw it overnight in the fridge before baking. Just remember that freezing may slightly alter the texture of the sauce, so don’t be alarmed if it seems a bit different when you bake it!
🌾 Is there a gluten-free option for this recipe?
Yes, you can make Chicken Romano gluten-free! Substitute all-purpose flour with gluten-free flour, and use gluten-free bread crumbs instead of regular ones. Many brands offer suitable options now, and I’ve tested a few types myself — just make sure they’re seasoned since flavor plays a big role in this dish! The result is still deliciously satisfying without sacrificing taste.
🧀 What can I use instead of Romano cheese?
If you can’t find Romano cheese or prefer something different, Parmesan cheese is a great alternative! It has a similar flavor profile but is milder. For a sharper taste, Pecorino Romano is an excellent choice as well — just keep in mind it’s saltier than typical Romano cheese, so adjust your salt accordingly when mixing with bread crumbs or sauce.
🔥 Why do I need to fry the chicken before baking?
Frying the chicken before baking helps achieve that golden-brown crust that’s both crispy and flavorful. The frying process seals in moisture and gives you that beautiful texture contrast once baked with the creamy sauce on top. Trust me; I’ve tested multiple methods here! Baking alone can leave you with less desirable results — mushy and sad chicken isn’t what we’re aiming for!
🌿 Can I add vegetables or other ingredients to this dish?
Yes! You can definitely customize your Chicken Romano by adding sautéed spinach or mushrooms right into the sauce for an extra veggie boost. Just cook them down nicely before pouring over the chicken. Alternatively, if you’re feeling adventurous, try adding sun-dried tomatoes or olives for a Mediterranean twist — they’ll elevate your dish beautifully. Go wild; your taste buds will thank you!
Troubleshooting
I will continue to add more to this Troubleshooting section as I start seeing questions coming through from people who have made the recipe.
Troubleshooting tips
“My chicken breasts are too thick and not cooking through! 😩”
- One possible cause is that you didn’t pound your chicken breasts to an even thickness, which can lead to uneven cooking. Pounding helps them cook uniformly, so make sure they’re about 1 inch thick.
- Another reason could be frying at too low a temperature, causing the outside to brown while the inside remains undercooked. Ensure your oil is hot enough (around 350°F/175°C) before adding the chicken.
I bet they were still YUM though!
“My breading didn’t stick and ended up falling off! 😭”
- This often happens if you skip the flour dredge or don’t fully coat the chicken in egg before breading. The flour helps create a sticky surface for the egg and breadcrumbs.
- If you used wet chicken straight from washing, that can also prevent a good bond. Pat your chicken dry with paper towels before starting the breading process.
I bet they were still YUM though!
“Why is my sauce too runny? 🤔”
- A common issue is undercooking or not allowing enough time for the sauce to thicken properly after adding the heavy cream and Romano cheese. Make sure you give it enough time over medium heat until it reaches your desired consistency.
- If you used low-fat cream instead of heavy cream, that could also result in a thinner sauce, as it doesn’t thicken as well. Stick with heavy cream for best results!
I bet they were still YUM though!
“My chicken came out too dark on the outside but undercooked inside! 🔥”
- This can happen if your oil is too hot when frying. If it’s smoking or bubbling vigorously, it’s likely too hot; aim for medium heat to achieve a golden brown without burning.
- Another reason could be if you crowded the pan while frying, which lowers the temperature of the oil and can lead to uneven cooking and browning. Fry in batches if needed!
I bet they were still YUM though!
Chicken Romano
Ingredients
Method
- Preheat the oven to 375°F (190°C). Pound the chicken breasts to an even thickness.
- Season the chicken with salt and pepper.
- Set up a breading station: place flour in one dish, beaten eggs in another, and a mixture of bread crumbs and Romano cheese in a third.
- Dredge each chicken breast in flour, dip in eggs, and coat with the bread crumb mixture.
- In a skillet, heat olive oil over medium heat. Fry the breaded chicken breasts until golden brown, about 4-5 minutes per side.
- Transfer the fried chicken to a baking dish.
- In a saucepan, combine heavy cream, garlic powder, and Romano cheese. Cook over medium heat until the cheese melts and the sauce thickens.
- Pour the sauce over the chicken in the baking dish.
- Bake in the preheated oven for 15-20 minutes, until the chicken is cooked through and the sauce is bubbly.
- Garnish with dried parsley before serving.