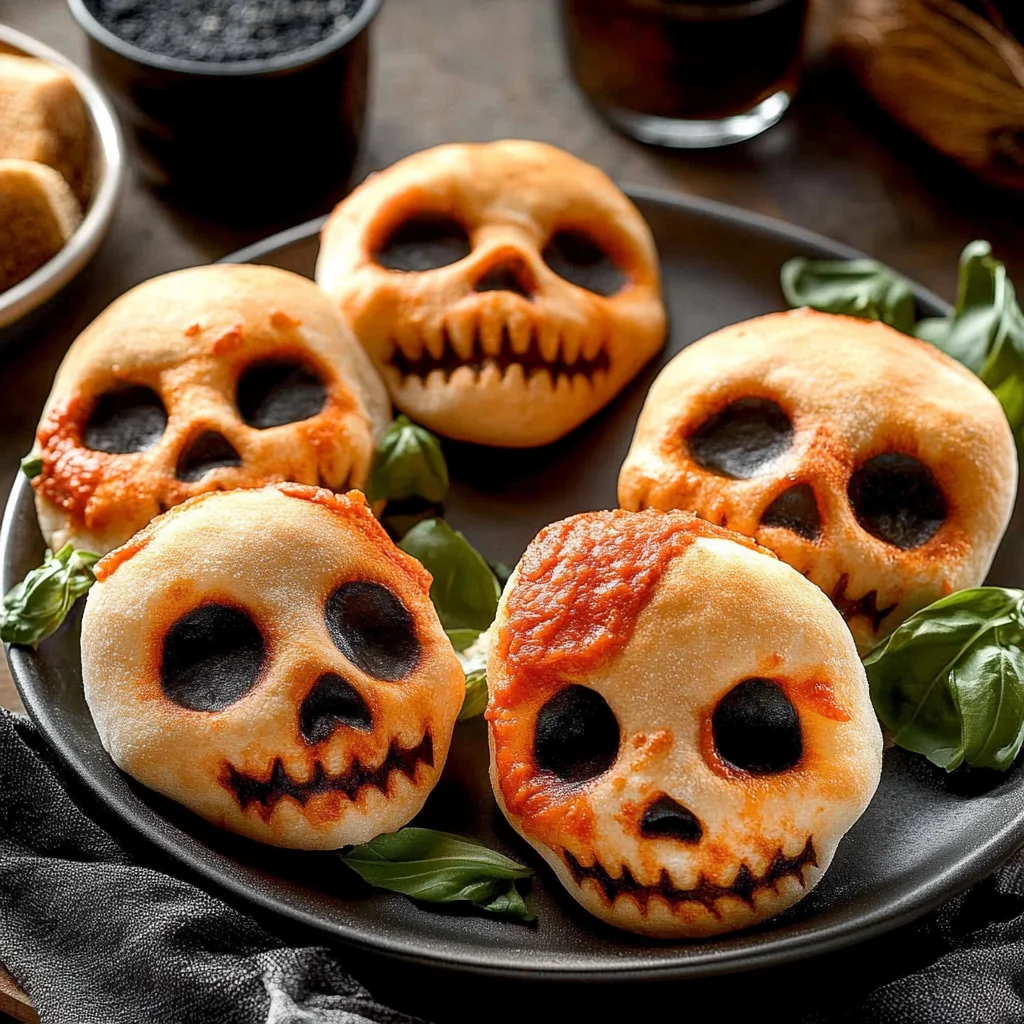
Cheesy Halloween Pizza Skulls: Spookily Delicious Fun
When I first stumbled upon the idea of Cheesy Halloween Pizza Skulls at a quirky little pizzeria in town, I couldn’t help but be captivated. The moment I saw those adorable, skull-shaped pizzas oozing with gooey cheese and vibrant toppings, I knew I had to recreate them at home. Not only did they look delightfully spooky, but let’s be honest — they’re also a whole lot cheaper than ordering from that trendy spot every time my craving for Halloween-themed treats kicks in! Plus, who doesn’t love a good DIY project that you can impress your friends with?
My journey to perfect the Cheesy Halloween Pizza Skulls was a bit more convoluted than I anticipated. After three kitchen disasters involving dough that refused to rise and cheese that somehow ended up in places it shouldn’t have (seriously, how does cheese migrate?), I finally started to get the hang of it. With each attempt, I aimed to balance the ideal crust: crispy on the outside yet soft enough to hold all that cheesy goodness without collapsing like a haunted house under pressure. Let’s just say my family has had their fair share of not-so-spooky pizza nights!
But oh boy, was it worth it! The final result is nothing short of magical — these cheesy skulls are a delightful combination of crispy edges and a warm, melty center overflowing with your favorite toppings. They’re not just spooky; they’re downright delicious with a flavor profile that’ll make your taste buds dance like ghouls at midnight! Trust me, once you pull these out at your Halloween party, they’re going to steal the show. So grab your ingredients and let’s get cooking — these Cheesy Halloween Pizza Skulls are waiting for you to bring them to life!
These Cheesy Halloween Pizza Skulls are… the ultimate spooky treat that will steal the show at any Halloween gathering!
1. They deliver an irresistible cheesy goodness thanks to the generous filling of mozzarella cheese. As it melts within the skull-shaped crust, every bite bursts with gooey flavor that assures your taste buds are in for a thrilling ride with each delicious morsel.
2. Perfectly pillowy texture – the dough achieves a fantastic balance of soft and slightly chewy. By allowing the instant yeast to do its magic with warm water, we create a delightful rise that results in a tender crust, making them easy to bite into while still holding all that scrumptious filling.
3. Simple yet effective technique – using warm water at approximately 110°F activates the instant yeast efficiently, ensuring a quick rise without lengthy proofing times. This approach not only saves you time but also ensures that the dough is light and airy, making these pizza skulls a breeze to prepare.
4. Incredible value – making these Cheesy Halloween Pizza Skulls at home is far more economical than purchasing similar themed treats from a bakery or restaurant. With basic ingredients like all-purpose flour and instant yeast, you can whip up an impressive batch that’s both satisfying and budget-friendly!
PS These pizza skulls are about palm-sized, making them perfect for little hands to grab, or for adults to enjoy as a fun party snack!
Ingredients for the Cheesy Halloween Pizza Skulls
Each ingredient in this dish plays an essential role in flavor and texture. Here’s what you’ll need:
Dough
2 cups all-purpose flour (plus extra for dusting): Provides structure and chewiness to the pizza skulls.
1 packet instant yeast: Helps the dough rise, creating a light and airy texture.
1 teaspoon salt: Enhances the overall flavor of the dough.
1 teaspoon sugar: Fuels the yeast for better rising and adds a hint of sweetness.
3/4 cup warm water (about 110°F): Activates the yeast, ensuring a perfect rise.
Filling
1 cup mozzarella cheese (shredded): Melts beautifully for that gooey, cheesy experience.
1/2 cup pepperoni (sliced): Adds a savory, spicy kick that complements the cheese.
1/4 cup green bell pepper (diced): Contributes a fresh crunch and vibrant color.
1/4 cup black olives (sliced): Offers a briny contrast that enhances the pizza’s flavor.
Toppings
1/2 cup pizza sauce: Serves as a flavorful base that ties all ingredients together.
1/4 cup parmesan cheese (grated): Adds a nutty richness and depth to each bite.
1 teaspoon Italian seasoning: Infuses an aromatic blend of herbs that elevate the dish.
Knead the Dough for 5 Minutes. No Skipping!
I get it — kneading dough can feel like a workout you didn’t sign up for! I tried skimping on this step to save time, but trust me, every minute of kneading is worth it. My first batch was a chewy mess, and I learned the hard way that shortcuts don’t pay off.
Kneading is essential because it develops gluten in the dough, creating that delightful stretchy texture we all love in pizza. Think of it like giving your dough a good massage; it helps build strength and structure, which is crucial for those spooky skulls to hold their shape and keep the cheesy goodness inside. Without adequate kneading, your dough will be flatter than my attempts at making conversations with strangers at Halloween parties!
What does kneading do?
- Texture — Kneading creates gluten strands that give the dough elasticity and chewiness, resulting in a satisfying bite.
- Shape retention — Properly kneaded dough holds its shape when molded into skulls, preventing them from flattening during baking.
- Even cooking — The uniform consistency from kneading ensures that each bite cooks evenly, so no cold cheese surprises here!
- Air incorporation — Kneading helps trap air bubbles in the dough, leading to a soft, airy interior once baked.
- Flavor development — The process enhances the flavor by activating yeast and allowing for better fermentation, which adds depth to your pizza skulls.
Different kneading times
- 1 minute (poor) — Barely mixes the ingredients; results in dense and tough pizza skulls that could double as doorstops!
- 3 minutes (okay) — Dough is somewhat combined but lacks elasticity; still chewy but not as light or fluffy.
- 5 minutes (good) — Ideal! The dough is smooth and elastic, setting you up for success with perfectly shaped skulls.
- 7 minutes or more (great) — Extra kneading improves texture even more but may lead to overworking if you’re not careful; find that sweet spot!
Just remember: under-kneaded dough will lead to flat pizzas that won’t impress anyone at your Halloween bash.
The most common mistake? Rushing this step! If you skip or skimp on kneading, you’ll end up with sad little skulls that lack structure and chew. Don’t do it! Give your dough the love it deserves.
How to make Cheesy Halloween Pizza Skulls

Are you ready to see how straightforward it is to make the Cheesy Halloween Pizza Skulls of your dreams??
1. PREPARE THE DOUGH
Let’s kick things off by making a simple yet delicious dough that will be the foundation of your spooky creations!
1. Combine – In a mixing bowl, combine the flour, yeast, salt, and sugar. Gradually add the warm water while mixing until a cohesive dough starts to form. The warmth of the water (about 110°F) helps activate the yeast, which is crucial for a nice rise!
2. Knead – Turn the dough onto a floured surface and knead for about 5 minutes until it becomes smooth and elastic. This step develops the gluten, giving your pizza skulls that perfect chewy texture! Place your kneaded dough in a greased bowl, cover it with a cloth, and let it rise for 30 minutes in a warm spot until it doubles in size.
HANDY TIPS
- Use a kitchen thermometer to ensure your water is at the right temperature for activating the yeast.
- If your dough is sticky, sprinkle in a little extra flour while kneading—it should be tacky but not overly wet!
2. ASSEMBLE THE PIZZA SKULLS
Now comes the fun part—shaping and filling your skulls with cheesy goodness!
3. Preheat – Preheat your oven to 400°F (200°C). This temperature will give you perfectly crispy pizza crusts!
4. Roll & Cut – On a lightly floured surface, roll out the dough to about 1/4 inch thick. Using a skull-shaped mold or cookie cutter, cut out skull shapes from the dough. Make sure to keep an eye on your shapes; they should be consistent so they bake evenly!
5. Fill – Place half of the skulls on a baking sheet lined with parchment paper. Fill each skull with mozzarella cheese, pepperoni slices, diced bell pepper, and black olives for that delightful mix of flavors!
6. Top & Seal – Spoon some pizza sauce on top of each filled skull, then sprinkle with grated parmesan cheese and Italian seasoning for an extra flavor kick. Cover these with the remaining skull shapes and press down on the edges firmly to seal them well—nobody likes leakage during baking!
HANDY TIPS
- For an even cheesier experience, feel free to mix in other favorite fillings like mushrooms or cooked sausage!
- If you find any holes while sealing, patch them up with small pieces of leftover dough.
3. BAKE
Time to bring those spooky skulls to life in the oven!
7. Bake – Bake in your preheated oven for about 15 minutes or until they are golden brown and puffed up beautifully—your kitchen will smell heavenly! Let them cool slightly before serving; patience is key here!
HANDY TIPS
- Keep an eye on them during baking; every oven is different so they may bake slightly faster or slower than expected.
- If you want extra crunchiness, turn on the broiler for an additional minute at the end—just watch them closely!
Make these once, and I wager they will invade your dreams every night too! – Nagi x
FAQ – Cheesy Halloween Pizza Skulls
🥳 Can I make these pizza skulls in advance?
Absolutely! You can prepare the dough ahead of time and store it in the refrigerator. Just follow these steps:
- After kneading, place the dough in a greased bowl, cover it tightly with plastic wrap, and refrigerate for up to 24 hours.
- When ready to use, let the dough come to room temperature (about 30 minutes) before rolling it out.
If you assemble the skulls and want to bake later, keep them covered in the fridge for up to 4 hours. Just remember, they might need an extra minute or two in the oven!
❄️ Can I freeze the pizza skulls?
Yes, you can freeze these spooky delights! To do this:
- Assemble your pizza skulls and place them on a baking sheet in a single layer.
- Freeze until solid, then transfer them to a freezer-safe bag or container for up to 3 months.
To bake from frozen, preheat your oven and add an extra 5 minutes to the baking time. Just be aware that they may not puff up quite as much as fresh ones!
🌾 Can I make these gluten-free?
Definitely! To make gluten-free Cheesy Halloween Pizza Skulls, I recommend using a 1: 1 gluten-free flour blend that contains xanthan gum. Here’s what to keep in mind:
- Follow the same measurements — 2 cups of the gluten-free flour blend should work perfectly.
- The texture might be slightly different; expect a denser crumb but still delicious!
Just remember: do not skip the rising step—it’s crucial for texture!
🔄 What can I substitute for mozzarella cheese?
If you’re looking to change things up, there are several options for mozzarella substitutes:
- Cheddar cheese: Offers a sharper flavor but melts beautifully.
- Vegan cheese: If you need a dairy-free option, go for your favorite brand that melts well.
- Ricotta cheese: For a creamier filling (pair it with some grated parmesan for flavor).
Just keep in mind that each will bring its own unique taste and texture!
⏱️ Why do I need to let the dough rise?
Letting the dough rise is essential because it allows yeast to ferment and produce carbon dioxide gas, making your pizza skulls fluffy and light. Without this step, you’ll end up with dense little skulls that resemble bricks more than delicious treats. Trust me—I tested this recipe multiple times (like ten!) and found that skipping this step made a world of difference.
🍕 How long will leftovers last?
If you have any pizza skulls left after your Halloween party (which is unlikely but possible!), they can last in the fridge for about 3 days, maintaining about 90% of their original yumminess.
- Store them in an airtight container to keep them from drying out.
To reheat, pop them back in a 350°F (175°C) oven for about 10 minutes until warmed through—crispy on the outside again!
🎃 Can I customize the fillings?
Absolutely! This recipe is super versatile. Here are some ideas:
- Vegetables: Add spinach, mushrooms, or even jalapeños if you like it spicy!
- Meats: Swap pepperoni for sausage or cooked chicken pieces.
- Cheese variety: Mix different cheeses like gouda or feta for added flavor complexity!
Feel free to get creative—October is all about spooktacular fun!
Troubleshooting
I will continue to add more to this Troubleshooting section as I start seeing questions coming through from people who have made the recipe.
Troubleshooting tips
“My pizza skulls came out too flat! 😩”
- Your dough may not have risen enough due to insufficient proofing time. The yeast needs time to activate and create air pockets, which helps the dough rise.
- You might have rolled your dough out too thin. Aim for about 0.5 cm (0.2 inches) thickness to maintain a good shape while baking.
- I bet they were still YUM though!
“The edges of my pizza skulls split during baking! 😱”
- You may not have sealed the edges properly before baking. Make sure to press down firmly when sealing the two halves together so they stay intact.
- If your dough is too wet, it can lead to splitting as it expands in the oven. Try adding a bit more flour during kneading next time.
- I bet they were still YUM though!
“My crust turned out too hard and dry! 😢”
- Over-kneading your dough can result in a tough texture, so stick to the recommended 5 minutes of kneading for a soft crust.
- If you baked them too long, even an extra minute can make a difference! Keep an eye on them towards the end of baking.
- I bet they were still YUM though!
“The tops of my pizza skulls are unevenly browned! 🔥”
- Your oven temperature might be uneven; try rotating the baking sheet halfway through cooking for more even browning.
- If you crowd the baking sheet with too many skulls, they won’t bake evenly. Ensure there’s enough space between each one!
- I bet they were still YUM though!
Cheesy Halloween Pizza Skulls
Ingredients
Method
- In a mixing bowl, combine flour, yeast, salt, and sugar. Gradually add warm water and mix until a dough forms.
- Knead the dough on a floured surface for about 5 minutes until smooth. Place in a greased bowl, cover, and let rise for 30 minutes.
- Preheat the oven to 400°F (200°C). Roll out the dough and cut into skull shapes using the mold.
- Place half of the skulls on a baking sheet. Fill each with mozzarella, pepperoni, bell pepper, and olives.
- Top with pizza sauce, sprinkle with parmesan and Italian seasoning, then cover with the remaining skulls. Seal the edges.
- Bake in the preheated oven for 15 minutes or until golden brown. Let cool slightly before serving.