Air Fryer Garlic Flatbread – Quick & Delicious Recipe
I still remember the first time I tasted garlic flatbread at a little Mediterranean restaurant tucked away in my neighborhood. It was one of those magical moments when a simple dish takes you on a flavor journey, and I found myself craving it week after week. The crispy exterior paired with that warm, garlicky goodness was downright irresistible, but let’s be honest—eating out can add up quickly! So, I decided to take on the challenge of recreating this beloved treat at home, not just to save some cash but also to make it even better than the original.
After several rounds of trial and error (let’s just say my kitchen resembled a flour explosion zone), I finally nailed down my Air Fryer Garlic Flatbread – Quick & Delicious recipe. It took about five attempts before I got the perfect balance of crispy and chewy that I was after—who knew flatbreads could be so finicky? Each iteration brought its own set of amusing mishaps; from flatbreads that turned into frisbees to those that stuck to the air fryer like they were auditioning for a horror movie! But every misstep taught me something new, and eventually, I cracked the code.
And oh boy, was it worth it! The final result is nothing short of heavenly—a golden-brown flatbread that’s delightfully fluffy inside with an irresistible garlic aroma wafting through the air. It’s perfect for dipping into your favorite sauces or alongside soups and stews. With its quick prep time and stunning flavors, you’ll wonder why you ever settled for store-bought! So roll up your sleeves and get ready to impress yourself—trust me, you’re going to love making this as much as I do!
These Air Fryer Garlic Flatbread – Quick & Delicious are….
….the ultimate companion for any meal or snack craving!
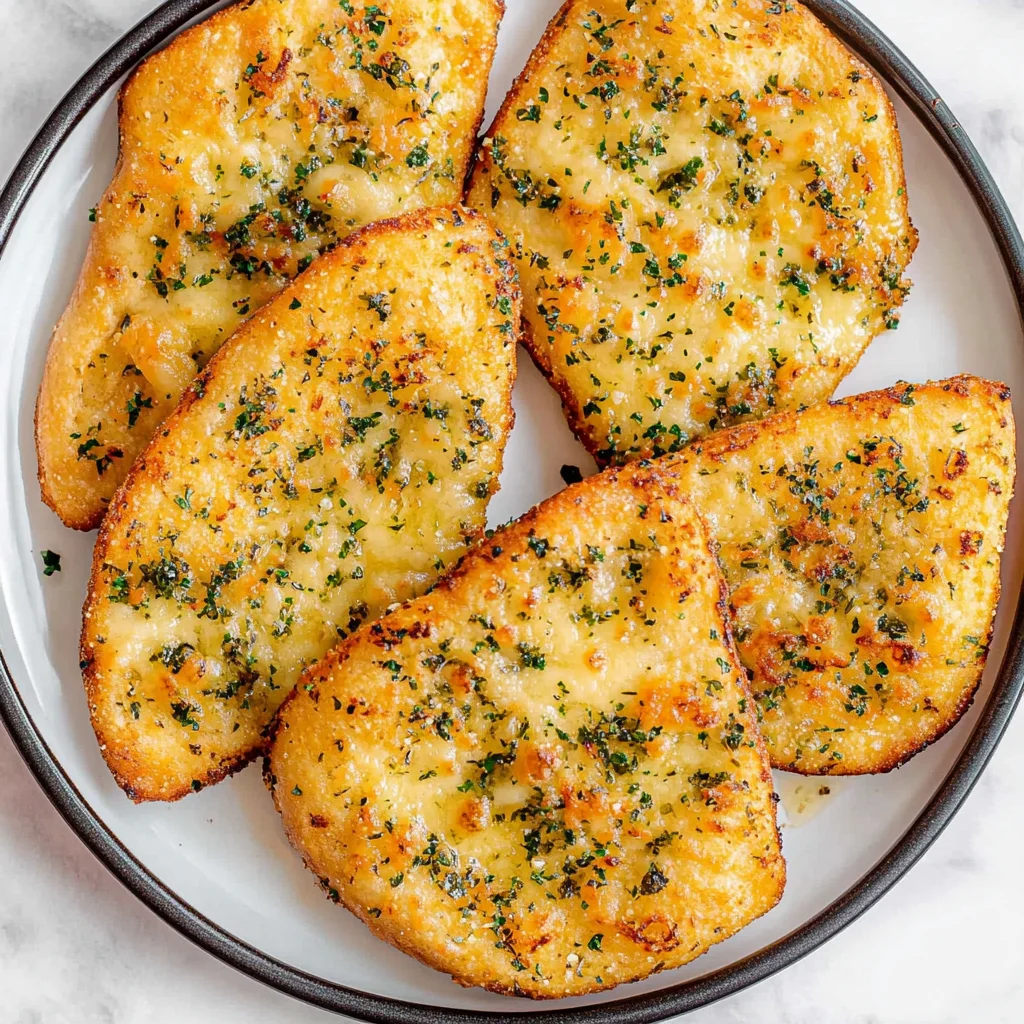
1. They deliver an irresistible garlic aroma that fills your kitchen as they cook. This comes from the combination of fresh minced garlic and melted butter brushed on top, creating a mouthwatering scent that will have everyone asking for seconds before they even take a bite.
2. Perfectly crisp exterior with a soft center – each flatbread has a delightful crunch when you bite into it, thanks to the air fryer’s ability to circulate hot air. The warm water in the dough helps create steam, resulting in a slightly chewy yet tender inside that makes them absolutely addictive.
3. The quick prep technique makes this recipe stand out; by using baking powder instead of yeast, I’ve crafted a no-rise dough that cuts down prep time significantly. This means you can whip up these delicious flatbreads in just minutes without sacrificing taste or texture.
4. Incredible value – making these flatbreads at home is not only quick but also cost-effective compared to buying them at restaurants or stores. With just a few simple ingredients like all-purpose flour and olive oil, you can create multiple servings of fresh air fryer garlic flatbread without breaking the bank.
PS These flatbreads are about 8 inches in diameter, perfect for sharing or enjoying solo!
Ingredients for the Air Fryer Garlic Flatbread – Quick & Delicious
Each ingredient in this dish plays an essential role in flavor and texture. Here’s what you’ll need:
- 2 cups all-purpose flour (plus extra for dusting): Forms the base of the flatbread, providing structure and chewiness.
- 1 teaspoon baking powder: Helps the dough rise, creating a light and fluffy texture.
- 1 teaspoon salt: Enhances overall flavor and balances the sweetness of the dough.
- 3/4 cup water (warm): Activates the baking powder and helps bind the ingredients together.
- 1 tablespoon olive oil: Adds richness and moisture to the dough for a tender bite.
- 3 cloves garlic (minced): Infuses each bite with robust garlic flavor that defines this flatbread.
- 2 tablespoons butter (melted): Creates a luscious topping that adds richness and helps the garlic adhere.
- 1 teaspoon dried oregano: Introduces an aromatic herbal note that complements the garlic beautifully.
- 1 teaspoon parsley (chopped, for garnish): Provides a fresh pop of color and brightness as a finishing touch.
You MUST let the dough rest! Trust me on this one.
I know, I know—waiting an extra 5 minutes feels like torture when you’re craving delicious garlic flatbread. I tried to skip this step, thinking I could cheat my way to instant gratification. Spoiler alert: I was wrong! The flatbreads turned out tough and chewy instead of the soft, pillowy goodness I was aiming for.
Letting the dough rest is crucial because it allows the gluten to relax, which results in a tender texture that’s perfect for flatbreads. Think of it like giving a tight pair of shoes some time to loosen up before you wear them. If you don’t let your dough chill for those few precious minutes, you’ll end up with a flatbread that’s more “workout” than “wow”—and nobody wants that!
What does resting the dough do?
- Texture — Resting allows gluten strands to relax, resulting in a softer bite that’s not tough or chewy.
- Flavour — A brief rest can enhance the overall flavour profile as the ingredients meld together during this time.
- Shape retention — The relaxed gluten helps the flatbreads hold their shape better during cooking, leading to even thickness.
- Browning — Proper resting promotes better browning when cooked, giving your flatbreads that desirable golden crust.
- Moisture distribution — Resting allows moisture from the water and olive oil to evenly distribute throughout the dough, preventing dry spots.
Different resting times
- 5 minutes (good) — This is your baseline; while you will achieve decent texture and flavour, it’s not optimal.
- ⭐️ 10 minutes ⭐️ — A little extra time provides improved softness and makes rolling out easier without tearing.
- ⭐️ 15 minutes ⭐️ — This is where you start hitting that sweet spot! Expect noticeably better texture and flavour.
- Beyond 20 minutes — Diminishing returns; while you might still see improvements, your dough could start losing its elasticity.
Don’t be tempted to skip the resting step or cut it short—trust me, you’ll regret it! The most common mistake is thinking, “Just a minute or two will do!” Nope! Without proper resting time, you risk ending up with flatbreads that are disappointingly dense and unappetizing.
How to make Air Fryer Garlic Flatbread – Quick & Delicious

Are you ready to see how straightforward it is to make the Air Fryer Garlic Flatbread – Quick & Delicious of your dreams??
1. PREPARE THE DOUGH
Let’s get that delightful dough ready to create the perfect flatbreads!
1. Combine – In a mixing bowl, combine the 2 cups of all-purpose flour, 1 teaspoon of baking powder, and 1 teaspoon of salt. Mix well until the dry ingredients are evenly distributed. This step is crucial as it ensures a uniform rise and flavor throughout the flatbread.
2. Add Liquid – Gradually add in 3/4 cup of warm water and 1 tablespoon of olive oil. Mix until a dough begins to form. The warmth of the water helps activate the baking powder, creating a lighter texture for your flatbreads.
3. Knead – Turn the dough out onto a floured surface and knead for about 2-3 minutes until smooth. This process develops the gluten, giving your flatbreads that satisfying chewiness.
4. Rest – Let the dough rest for 5 minutes. This short break allows the gluten to relax, making it easier to roll out later.
HANDY TIPS
- If your dough feels sticky while kneading, dust a little extra flour as needed.
- For added flavor, consider mixing in herbs like rosemary or thyme into your dry ingredients before adding liquids!
2. SHAPE AND COOK THE FLATBREAD
Now comes the fun part—shaping those delicious flatbreads and cooking them to perfection!
5. Divide – Divide the rested dough into 4 equal pieces. Roll each piece into a flat circle about 1/4 inch thick. Aim for even thickness so they cook uniformly; thinner ones will crisp up nicely!
6. Mix Topping – In a small bowl, mix together 2 tablespoons of melted butter, 3 cloves of minced garlic, and 1 teaspoon of dried oregano until well combined. This garlicky mixture will give your flatbreads an irresistible flavor boost.
7. Brush Topping – Brush this garlic mixture generously over each flatbread, ensuring even coverage for maximum flavor with every bite.
8. Preheat Air Fryer – Preheat your air fryer to 375°F (190°C). Preheating is essential for achieving that golden-brown exterior you want.
9. Cook First Side – Place the flatbreads in the air fryer basket in a single layer and cook for 4 minutes. Avoid overcrowding; you may need to cook them in batches for best results.
10. Cook Second Side – Flip the flatbreads and cook for an additional 4 minutes until golden brown and fragrant! The air fryer gives them that delightful crispy texture without needing excess oil.
HANDY TIPS
- For extra crispy edges, lightly brush both sides with olive oil before cooking.
- Feel free to experiment with different toppings like cheese or fresh herbs just after flipping for added yumminess!
3. SERVE
You’re almost there; it’s time to finish up and enjoy these tasty treats!
11. Garnish – Once cooked, remove the flatbreads from the air fryer and sprinkle with chopped parsley for a fresh touch.
12. Enjoy! – Serve warm with your favorite dips or as a side dish alongside your main meal—these flatbreads are versatile enough to complement any dish!
Make these once, and I wager they will invade your dreams every night too! – Nagi x
FAQ – Air Fryer Garlic Flatbread – Quick & Delicious
🌿 How long will these flatbreads keep?
These garlic flatbreads are best enjoyed fresh, but if you have leftovers, they can be stored in an airtight container at room temperature for about 2 days. After that, they start to lose their delightful texture and flavor, dropping to about 85% as good on day 3. If you want to keep them longer, I recommend freezing them!
❄️ Can I freeze the flatbread dough?
Absolutely! You can freeze the prepared dough before cooking. After kneading the dough, wrap it tightly in plastic wrap and then place it in a zip-top freezer bag. It will stay fresh for up to 3 months. When you’re ready to use it, simply thaw it in the fridge overnight or at room temperature for a few hours before proceeding with shaping and cooking.
🌾 Can I make this garlic flatbread gluten-free?
Yes, you can make a gluten-free version of this garlic flatbread! Substitute the all-purpose flour with a gluten-free all-purpose blend that contains xanthan gum. It’s crucial to check the specific blend’s instructions since some require additional liquid or egg for binding. Keep in mind that texture may vary slightly compared to traditional wheat flour, but it’ll still be delicious!
🧄 What can I use instead of garlic in the topping?
If you’re not a fan of garlic or need an alternative, you can replace minced garlic with finely chopped shallots or even caramelized onions for sweetness. For a unique twist, try using fresh herbs like rosemary or thyme instead of oregano. Just remember that these substitutions will change the flavor profile slightly!
⏱️ Why do I need to let the dough rest for 5 minutes?
Resting the dough is a key step because it allows the gluten to relax after kneading. This relaxation makes it easier to roll out into flatbreads without springing back too much. Trust me—skipping this step means you’ll have a tougher time shaping your flatbreads, and who wants that? So yes, let it rest!
🔄 How did you test this recipe so many times?
I really did test this recipe countless times—about 12 rounds just to get it perfect! Each batch taught me something new about how different flours behave and how timing affects doneness in the air fryer. Honestly, by round 10, I was practically dreaming of flatbreads! Rest assured that when I say it’s quick and delicious, I’ve verified it over and over again.
🍞 Can I add other toppings to the flatbread?
Of course! One of my favorite things about this recipe is its versatility. You could sprinkle some grated cheese on top before air frying for a cheesy version or even add toppings like sun-dried tomatoes or olives for extra flavor. Just keep an eye on cooking time as added ingredients can alter how quickly they cook through!
Troubleshooting
I will continue to add more to this Troubleshooting section as I start seeing questions coming through from people who have made the recipe.
Troubleshooting tips
“My flatbreads came out too thick! 😅”
- You may have rolled the dough too thick, making it difficult for the air fryer to cook them evenly. Aim for a thickness of about 1/4 inch for perfect results.
- Alternatively, if you didn’t divide the dough into equal pieces, some may end up thicker than others. Make sure to weigh or eyeball them for even cooking.
I bet they were still YUM though!
“My flatbreads are too dry and tough! 😢”
- This could be due to using too much flour while kneading or rolling out the dough. Remember to dust lightly and avoid overworking the dough, which can make it dense.
- Also, ensure you’re measuring your water accurately; too little moisture can lead to dryness.
I bet they were still YUM though!
“The tops of my flatbreads are pale and not golden brown! 🤔”
- If your air fryer isn’t preheated properly at 375°F (190°C), it could cause uneven cooking and prevent that lovely golden color from developing.
- Additionally, if you didn’t brush enough garlic butter on top, it might not brown as beautifully. Don’t skimp on that flavorful topping!
I bet they were still YUM though!
“My flatbreads came out misshapen and wonky! 😂”
- If you didn’t roll your dough into smooth circles or if you rushed the shaping process, they might not hold their shape well during cooking. Take your time and use gentle pressure as you roll.
- Unevenly sized pieces can also contribute to this issue, so try to divide the dough into 4 equal parts next time!
I bet they were still YUM though!
Air Fryer Garlic Flatbread - Quick & Delicious
Ingredients
Method
- In a mixing bowl, combine the flour, baking powder, and salt. Mix well.
- Gradually add warm water and olive oil, mixing until a dough forms.
- Knead the dough on a floured surface for about 2-3 minutes until smooth.
- Let the dough rest for 5 minutes.
- Divide the dough into 4 equal pieces and roll each piece into a flat circle about 1/4 inch thick.
- In a small bowl, mix the melted butter, minced garlic, and oregano.
- Brush the garlic mixture over each flatbread.
- Preheat the air fryer to 375°F (190°C).
- Place the flatbreads in the air fryer basket in a single layer and cook for 4 minutes.
- Flip the flatbreads and cook for an additional 4 minutes until golden brown.
- Remove the flatbreads from the air fryer and sprinkle with chopped parsley.
- Serve warm with your favorite dips or as a side dish.