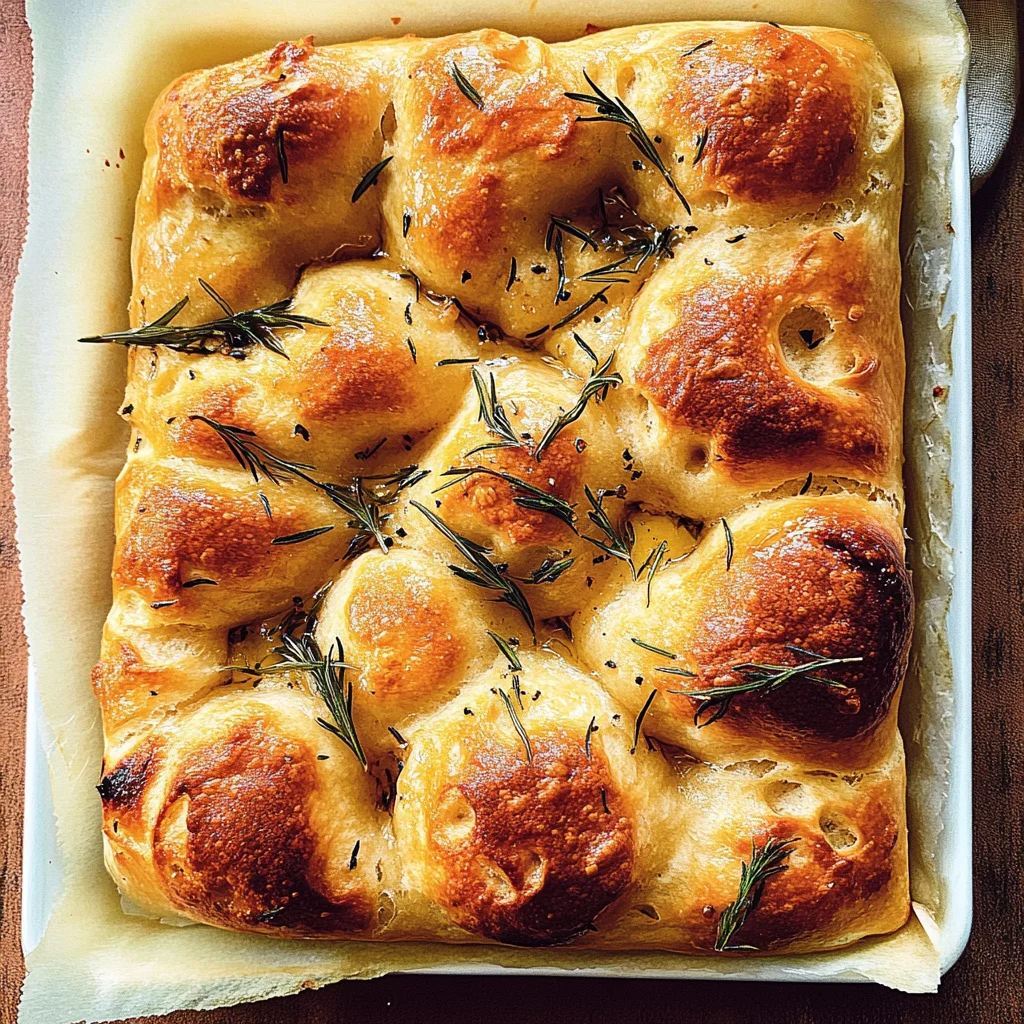
Same Day Focaccia: Easy and Deliciously Addictive Recipe
I still remember the first time I tasted focaccia at a little Italian café tucked away in my neighborhood. The moment I bit into that golden, crusty bread, topped with fragrant herbs and a drizzle of olive oil, I was hooked. It was so deliciously addictive that I found myself craving it almost daily. So, when I decided to recreate that magic at home, I had two goals: make it easier than the original and save some cash while doing it. After all, who wouldn’t want to indulge in freshly baked focaccia without breaking the bank?
Let me tell you, perfecting this Same Day Focaccia was no walk in the park. I went through what felt like an endless cycle of flour and yeast—about five attempts later, I finally started to see the light at the end of the tunnel. Each iteration was a lesson learned; sometimes it was too dense, other times too dry, and let’s not even talk about that one batch that looked like a pancake! But hey, every flop just brought me closer to achieving that fluffy interior and crispy exterior that had danced in my dreams.
And after all those trials (I think my kitchen might still be recovering), I’ve finally nailed it! The result is a focaccia that’s both quick and easy to make in just a few hours—perfect for any meal or snacking straight from the pan. With its airy texture and rich flavor infused with olive oil and herbs, it’s become a staple in my home. Honestly, once you try this Same Day Focaccia, you’ll wonder how you ever lived without it! So roll up your sleeves and dive into this delicious adventure—I promise you won’t regret it!
These Same Day Focaccia are…
…a game changer in the world of homemade bread, delivering mouthwatering flavors and incredible textures that will impress everyone at your table!
1. They offer an irresistibly aromatic flavor thanks to the infusion of fresh rosemary and a sprinkle of sea salt. The combination elevates the bread beyond just basic dough, creating a savory experience that tantalizes your taste buds from the moment it bakes in the oven.
2. Perfectly chewy texture – with a golden crust and soft, airy interior. Achieved by using warm water to activate the yeast, this focaccia rises beautifully, resulting in a delightful contrast between the crispy exterior and fluffy inside that is simply addictive.
3. Simple technique – utilizing just one rise time makes this focaccia incredibly approachable for any home baker. By allowing the dough to rest for only a few hours, you unlock its full potential without lengthy waiting periods, making it feasible for last-minute meals or gatherings.
4. Exceptional value – homemade focaccia comes at a fraction of the cost compared to store-bought or restaurant versions. With basic ingredients like all-purpose flour and yeast readily available, you can whip up this delectable bread anytime without breaking the bank or sacrificing quality.
PS This focaccia is meant to be shared! It yields enough for a generous side to any meal or to enjoy on its own with olive oil and balsamic vinegar for dipping.
Ingredients for the Same Day Focaccia
Each ingredient in this dish plays an essential role in flavor and texture. Here’s what you’ll need:
Dough
2 cups all-purpose flour (plus more for dusting): Provides structure and a chewy texture to the focaccia.
1 cup warm water (around 110°F): Activates the yeast and helps create a soft dough.
1 packet active dry yeast: Essential for leavening, giving the bread its airy rise.
1 teaspoon sugar (to activate yeast): Feeds the yeast, ensuring a good rise and enhancing flavor.
1 teaspoon salt: Balances flavors and strengthens the dough structure.
2 tablespoons olive oil (plus more for drizzling): Adds richness and moisture, resulting in a tender crumb.
Toppings
1 tablespoon sea salt (for sprinkling): Enhances the overall flavor with a delightful crunch.
2 tablespoons fresh rosemary (chopped): Infuses aromatic notes that elevate the bread’s taste.
- 2 tablespoons olive oil (for drizzling on top): Creates a golden crust and enhances flavor with richness.
You Must Let the Dough Rise. No Exceptions!
I tried to skip this step, I really did. I thought, “Who has time to let dough rise when you’re hungry for focaccia?” But alas, after several attempts and some very flat, sad bread, I learned the hard way that there’s no shortcut here. Trust me on this one; you want your dough to rise!
When it comes to bread-making, allowing the dough to rise is crucial for developing that light and airy texture we all crave. The yeast in our warm water mixture needs time to work its magic — it’s like a mini party happening in your bowl! This fermentation process creates carbon dioxide bubbles that expand and give the focaccia its signature fluffiness. Without this step, you’ll end up with dense and chewy bread instead of the soft, pillowy delight you’re aiming for.
What does letting the dough rise do?
- Texture — The rise allows gluten to develop properly, resulting in a light and airy focaccia instead of a dense brick.
- Flavor — As the yeast ferments, it produces compounds that enhance the overall flavor profile of the bread, giving it that deliciously complex taste.
- Color — A good rise contributes to better browning during baking, making your focaccia visually appealing with a golden crust.
- Moisture — Proper rising helps retain moisture within the dough, ensuring your focaccia stays soft rather than becoming dry and crumbly.
- Shelf Life — Bread that has risen adequately tends to have a longer shelf life as the fermentation process helps create a more stable structure.
Different rising times
- 30 minutes (average) — This will get you a decent focaccia but expect it to be denser than ideal; not bad if you’re in a hurry!
- 1 hour (good) — The minimum recommended time; results in improved texture and flavor compared to 30 minutes but could still use more time.
- 1 hour 30 minutes (very good) — A happy medium where you start seeing significant improvements in both fluffiness and taste.
- 2 hours or longer (best) — Optimal rising time for maximum flavor and texture development; your focaccia will be light and airy with an irresistible crust.
Don’t even think about skipping the rising time! The most common mistake is underestimating how much time your dough needs to rise. If you rush this crucial step, you’ll end up with a disappointing loaf that’s dense and bland. Trust me; it’s just not worth it!
How to make Same Day Focaccia

Are you ready to see how straightforward it is to make the Same Day Focaccia of your dreams??
1. PREPARE THE DOUGH
Let’s kick things off by creating the perfect dough base!
1. COMBINE – In a mixing bowl, combine warm water (around 110°F), sugar, and active dry yeast. Let this mixture sit for about 5 minutes until it becomes frothy. This step is crucial as it activates the yeast, ensuring your focaccia will rise beautifully!
2. MIX – Now, add in the all-purpose flour, salt, and olive oil to the yeast mixture. Stir everything together until a dough begins to form; it should start pulling away from the sides of the bowl.
3. KNEAD – Lightly dust your work surface with flour and knead the dough for about 5 minutes until it’s smooth and elastic. This develops gluten which gives the focaccia its delightful chewy texture.
HANDY TIPS
- For best results, ensure your water is warm but not hot; too hot can kill the yeast!
- If you find your dough too sticky, don’t hesitate to sprinkle a bit more flour while kneading.
2. FIRST RISE
Now it’s time to let that dough work its magic!
4. PLACE – Transfer the kneaded dough into a lightly greased bowl, covering it with plastic wrap or a damp kitchen towel. Allow it to rise in a warm place for about 1 hour, or until it has doubled in size. This first rise is vital for flavor development!
HANDY TIPS
- Want to speed up rising? Place your covered bowl in an oven that’s been preheated to 200°F (then turned off) — just keep an eye on it!
3. SHAPE AND SECOND RISE
Let’s get this dough ready for baking!
5. PREHEAT – Preheat your oven to 425°F (220°C). This ensures it’s nice and hot when you’re ready to bake!
6. GREASE – Grease a baking sheet generously with olive oil; this will help create those lovely crispy edges on your focaccia.
7. TRANSFER & STRETCH – Carefully transfer the risen dough onto the prepared baking sheet and gently stretch it out to fit the pan’s dimensions without tearing it.
8. COVER – Cover the stretched dough again and let it rise for another 30 minutes. This second rise helps create that airy texture we love.
HANDY TIPS
- If your kitchen is cooler, consider letting it rise longer; just keep an eye on that delightful puffiness!
4. ADD TOPPINGS AND BAKE
The final touches before diving into deliciousness!
8. DIMPLE – Using your fingers, dimple the surface of the dough all over — this not only creates visual appeal but also helps hold onto toppings.
9. DRIZZLE & SPRINKLE – Drizzle olive oil generously over the top then sprinkle with sea salt and freshly chopped rosemary for that aromatic flavor.
10. BAKE – Bake in your preheated oven for about 20 minutes or until golden brown and fragrant throughout! You’ll know it’s done when it’s beautifully puffed up and has that enticing golden crust.
HANDY TIPS
- Don’t want rosemary? Feel free to experiment with other herbs or toppings like garlic or olives!
5. COOL AND SERVE
Almost there—just a few moments of patience!
10. REMOVE & COOL – Once baked, remove from the oven and let cool for a few minutes on a wire rack before slicing into glorious pieces of focaccia goodness.
Make this focaccia once, and I bet you’ll be hooked forever! It’s an easy recipe that can elevate any meal—perfectly fluffy inside with a crispy crust outside! Enjoy every bite of this simple yet divine bread experience! – Nagi x
FAQ – Same Day Focaccia
🌱 Can I make this focaccia gluten-free?
Yes, you can make gluten-free focaccia using a 1: 1 gluten-free flour blend. I’ve tested this with brands like Bob’s Red Mill and King Arthur Flour, and both produced a lovely result! Just keep in mind that the texture might be slightly different—gluten-free flours tend to yield a more crumbly bread. For best results, add a teaspoon of xanthan gum to help with the structure. Enjoy the flexibility!
⏲️ How long does focaccia last?
Homemade focaccia will stay fresh for up to 3 days at room temperature, stored in an airtight container or wrapped tightly. After day 1, I’d rate it about 90% as good—it starts to lose its soft texture but still tastes delightful. For longer storage, consider freezing; it retains about 80% quality when thawed.
❄️ Can I freeze focaccia?
Absolutely! To freeze your focaccia, let it cool completely after baking, then wrap it tightly in plastic wrap followed by aluminum foil to prevent freezer burn. It can be stored for up to 3 months. When you’re ready to enjoy it again, simply thaw it at room temperature for a few hours or pop it in the oven at 350°F (175°C) for about 10-15 minutes to warm it through and revive that crusty exterior.
🥖 Can I substitute ingredients in this recipe?
Certainly! If you’re out of olive oil, melted butter works well as a substitute for flavor, or you can use vegetable oil if you’re looking for something more neutral. For the toppings, feel free to swap rosemary with other herbs like thyme or oregano depending on your preference. Just remember—whatever you swap should complement the bread without overpowering it!
👩🍳 Why do I need to let the dough rise twice?
The two-rise process is crucial for developing flavor and texture in your focaccia. The first rise allows the yeast to ferment and produce gases that create those lovely air pockets we all love in bread. The second rise gives the dough time to relax, ensuring it’s easier to stretch out without springing back. Trust me—I’ve made this mistake before by skipping it and regretted every chewy bite!
🔄 Can I add toppings besides rosemary and sea salt?
Definitely! This recipe is super versatile when it comes to toppings. You could add caramelized onions, cherry tomatoes, olives, or even cheese on top before baking for an extra layer of flavor. You could also sprinkle some garlic powder along with the sea salt for a tasty twist! Just don’t overload it too much—balance is key!
🕒 Do I really need warm water for activating yeast?
Yes! Using warm water (around 110°F/43°C) is essential for activating the yeast properly; it’s like giving them a nice warm bath so they can get started on their work quickly. If the water is too hot (above 130°F/54°C), you risk killing the yeast, which means no rise and no fluffy focaccia! So stick with that cozy temperature—your yeast will thank you!
Troubleshooting
I will continue to add more to this Troubleshooting section as I start seeing questions coming through from people who have made the recipe.
Troubleshooting tips
“My focaccia came out too flat! 😢”
- Your dough may not have risen properly during the first rise. This can happen if the water wasn’t warm enough (ideally around 110°F) to activate the yeast effectively.
- You might have also added too much flour while kneading, leading to a denser dough that doesn’t hold its shape well.
I bet it still tasted delicious though!
“The crust of my focaccia is too tough! 😩”
- If you over-kneaded your dough, it could develop too much gluten, resulting in a tough texture rather than the light and airy focaccia we’re aiming for.
- Another possible cause could be baking at too high of a temperature or for too long, causing the crust to harden.
But hey, it still made a great dipping bread, right?
“My focaccia looks pale and undercooked! 🤔”
- This could happen if your oven wasn’t fully preheated before baking. A hot oven ensures that the dough cooks quickly and gets that beautiful golden color.
- Additionally, if you didn’t dimple the surface properly before baking, it may not have allowed enough steam to escape for even cooking.
I’m sure it was still fluffy and tasty inside!
“My focaccia has an uneven top and looks wonky! 🤪”
- Not stretching the dough evenly on the baking sheet can lead to uneven thickness, which results in an uneven rise during baking.
- If you let your dough rise in a drafty area or weren’t able to cover it adequately, this could also contribute to a wonky appearance.
No worries—looks aren’t everything; I bet it was still packed with flavor!
“The bottom of my focaccia burned while the top stayed pale! 🔥”
- If your baking sheet was placed too close to the heating element in your oven, it can cause the bottom to cook faster than the top.
- Make sure your baking sheet isn’t too thin either; thin sheets don’t distribute heat evenly, leading to burning!
At least you had some crispy edges that were probably quite tasty!
Same Day Focaccia
Ingredients
Method
- In a mixing bowl, combine warm water, sugar, and yeast. Let it sit for 5 minutes until frothy.
- Add flour, salt, and olive oil to the yeast mixture. Stir until a dough forms.
- Knead the dough on a floured surface for about 5 minutes until smooth.
- Place the dough in a lightly greased bowl, cover with plastic wrap, and let it rise in a warm place for 1 hour.
- Preheat the oven to 425°F (220°C).
- Grease a baking sheet with olive oil. Transfer the dough to the sheet and stretch it to fit.
- Cover and let it rise for another 30 minutes.
- Dimple the surface of the dough with your fingers, drizzle with olive oil, and sprinkle with sea salt and rosemary.
- Bake in the preheated oven for 20 minutes or until golden brown.
- Remove from the oven and let cool for a few minutes before slicing.