Turkey and Stuffing Roll Ups: A Cozy Twist on Tradition
I first stumbled upon the idea for these Turkey and Stuffing Roll Ups during a particularly ambitious Thanksgiving dinner where I decided to take a classic dish and give it a fresh twist. I was flipping through an old cookbook when I saw a photo of stuffed turkey rolls that looked both comforting and sophisticated. The combination of flavors and textures immediately sparked my imagination, but let’s be honest — the price tag at the fancy restaurant down the street was enough to make my wallet scream. So, I took on the challenge of recreating this delightful dish at home, determined to make it tastier and way more budget-friendly.
After what felt like a mini cooking Olympics (complete with more flops than I’d like to admit), I finally nailed the perfect Turkey and Stuffing Roll Ups after about five attempts. Each iteration was a hilarious adventure filled with mishaps — I once accidentally rolled too much stuffing in one and ended up with a turkey burrito that could’ve fed a family of four! My goal was to get that ideal balance between juicy turkey, savory stuffing, and just the right amount of seasoning, so every bite would be as comforting as a warm hug on a chilly day.
The payoff? Absolutely worth it! These Turkey and Stuffing Roll Ups turned out to be not only delicious but also incredibly easy to whip up for any weeknight meal or holiday feast. They boast a perfect blend of tender turkey with crispy edges, enveloping scrumptious stuffing that brings all those cozy flavors together. You’ll love how they hold up in the fridge too — if there are any leftovers! I can’t wait for you to dive into this recipe; trust me, it’s going to become your new favorite way to enjoy turkey!
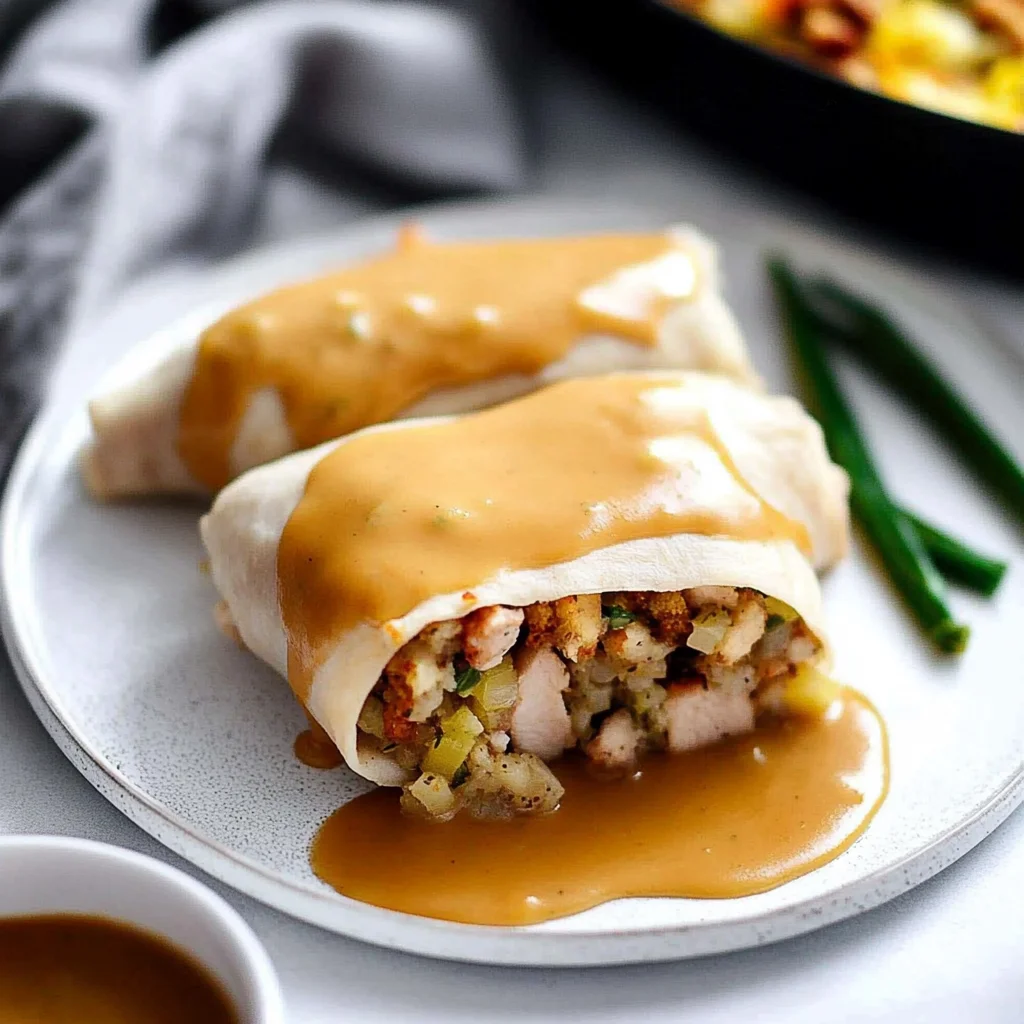
These Turkey and Stuffing Roll Ups are….
….the ultimate comfort food that brings together the best of Thanksgiving flavors in a fun, handheld package!
1. They deliver an incredible savory depth with a rich blend of turkey and spices. The combination of lean ground turkey, garlic powder, and onion powder creates a mouthwatering aroma that fills your kitchen, making these roll ups feel like a warm hug on a plate.
2. Delightfully tender texture – each bite is a perfect balance of soft turkey and moist stuffing enveloped in melted cheese. The gentle rolling technique ensures that the stuffing stays intact while baking, resulting in a dish that’s both satisfying to chew and easy to enjoy.
3. A key technique for flavor infusion involves mixing the prepared stuffing with shredded cheese before rolling it up. This step not only enhances the overall taste but also ensures that every bite is packed with cheesy goodness, elevating these Turkey and Stuffing Roll Ups above standard casseroles.
4. They offer excellent value for your time and money, as they can be made with affordable ingredients you likely already have on hand. With just one pound of turkey and two cups of stuffing, this recipe is not only budget-friendly but also yields enough to feed a crowd or provide delicious leftovers for days.
PS These Turkey and Stuffing Roll Ups are generous in size! They’re perfect for sharing or enjoying as hearty individual servings that will keep everyone satisfied.
Ingredients You’ll Need
Each ingredient in this dish plays an essential role in flavor and texture. Here’s what you’ll need:
1 pound ground turkey (lean): Provides a rich, savory base that keeps the roll ups hearty.
2 cups prepared stuffing (store-bought or homemade): Adds a comforting, seasoned element that binds the flavors together.
1 cup shredded cheese (cheddar or mozzarella): Melts beautifully to create a creamy, indulgent layer of flavor.
1 teaspoon garlic powder: Infuses the dish with aromatic depth and enhances the overall taste.
1 teaspoon onion powder: Contributes sweetness and complexity to the filling.
1 teaspoon salt: Elevates all the flavors, ensuring a well-seasoned dish.
1/2 teaspoon black pepper: Adds a subtle kick and balances the richness of the other ingredients.
1 can cream of mushroom soup (10.5 oz): Acts as a creamy sauce that brings moisture and umami to the roll ups.
- 1/2 cup milk: Thins out the soup for a smooth, velvety consistency that envelops each bite.
You Must Mix the Turkey Filling Well. No Half-Measures!
I have to confess: I tried to take a shortcut and just give the turkey mixture a quick stir. Spoiler alert: it didn’t work! The first batch was a dry, sad mess of uneven flavors. So, trust me when I say that thoroughly mixing the filling is non-negotiable for achieving that delicious flavor harmony we all crave in these Turkey and Stuffing Roll Ups.
When you mix the ground turkey, stuffing, and seasonings well, you’re ensuring every bite is packed with flavor. Think of it like making a great meatloaf or burger—if you don’t combine everything properly, you’ll end up with some bites that taste like plain turkey and others that are overwhelmed by spices. The goal here is to create a beautifully balanced filling where the flavors meld together seamlessly!
What does mixing the turkey filling do?
- Flavor integration: Mixing thoroughly ensures that every ingredient—ground turkey, stuffing, garlic powder, onion powder, salt, and pepper—blends together perfectly, leading to a cohesive taste throughout.
- Texture uniformity: A well-mixed filling results in an even texture; no one wants a mouthful of dry turkey followed by a pocket of soggy stuffing!
- Moisture retention: Combining the ingredients properly helps lock in moisture during baking, preventing those roll ups from becoming dry.
- Consistent seasoning: When mixed well, seasoning distributes evenly throughout the mixture, ensuring each bite bursts with flavor.
- Better binding: The combination of ingredients creates a more cohesive filling that holds together better when rolled up—no one wants their roll ups falling apart in the baking dish!
Different mixing times
- 1 minute (poor) — Ingredients are barely combined; some areas may taste bland while others are overly seasoned.
- 2–3 minutes (good) — Decent integration but still pockets where flavors don’t fully blend; texture remains uneven.
- 4–5 minutes (very good) — Well combined! Most flavors are integrated, but there’s still room for improvement in moisture retention.
- ⭐️ 6–8 minutes⭐️ — Perfectly mixed! The filling is flavorful and cohesive, making for juicy roll ups that hold their shape beautifully.
Be warned: skimping on the mixing time is the most common mistake people make when preparing this dish. Don’t just give it a quick stir and walk away; take those extra minutes to mix until everything is fully integrated! Your taste buds will thank you later.
How to make Turkey and Stuffing Roll Ups

Are you ready to see how straightforward it is to make the Turkey and Stuffing Roll Ups of your dreams??
1. PREPARE THE FILLING
Let’s get that delicious filling ready to roll!
1. COMBINE – In a large mixing bowl, combine the ground turkey, prepared stuffing, garlic powder, onion powder, salt, and black pepper. Mix until well combined, ensuring all the ingredients are evenly distributed for maximum flavor in every bite.
2. PREHEAT – Preheat your oven to 350°F (175°C). This temperature is perfect for baking the roll ups to tender perfection.
HANDY TIPS
- 💡 TIP: If you’re using store-bought stuffing, opt for a herbed variety for an extra flavor boost!
- ⚠️ Remember, the mixture should be well-blended; this way, each roll up will taste equally delicious.
2. ASSEMBLE THE ROLL UPS
Time to shape these tasty morsels!
3. ROLL – Take a portion of the turkey mixture and roll it into a log shape. Aim for about the size of your palm; this ensures even cooking and a delightful bite.
4. PLACE – Place the roll ups seam-side down in a greased baking dish. Make sure they fit snugly but not crammed together—this helps them cook evenly.
HANDY TIPS
- 💡 TIP: If you find it difficult to form logs, slightly dampen your hands with water; this prevents sticking!
- ❓ Why does this matter? Because shaping them evenly ensures they bake uniformly, resulting in perfectly cooked roll ups.
3. PREPARE THE SAUCE
Let’s create that creamy goodness that ties everything together!
5. MIX – In a small bowl, mix the cream of mushroom soup with milk until smooth. You want it creamy but pourable; this will help keep the roll ups moist during baking.
6. POUR – Pour the sauce over the roll ups in the baking dish, ensuring each one is coated beautifully.
HANDY TIPS
- 💡 TIP: For an added depth of flavor, consider adding a pinch of thyme or rosemary to the sauce—it complements turkey wonderfully!
- ⚠️ Don’t skimp on pouring enough sauce over each roll up; this keeps them juicy while baking.
4. BAKE
The moment we’ve all been waiting for!
7. COVER – Cover the baking dish with aluminum foil and bake in the preheated oven for 25 minutes. This helps steam them so they stay moist and tender.
8. REMOVE AND SPRINKLE – After 25 minutes, remove the foil and sprinkle shredded cheese on top of each roll up. Bake for an additional 5 minutes, or until the cheese is melted and bubbly—a glorious sight!
HANDY TIPS
- 💡 TIP: For extra cheesy goodness, use a mix of cheddar and mozzarella—cheddar gives sharpness while mozzarella adds stretch!
- ❓ Why does covering with foil matter? It traps steam that helps cook the turkey thoroughly without drying out.
Now you’ve got yourself a plateful of scrumptious Turkey and Stuffing Roll Ups! These delightful bundles are sure to impress anyone at your dinner table—and they come together in just 45 minutes! Make these once, and I wager they will invade your dreams every night too! – Nagi x
FAQ – Turkey and Stuffing Roll Ups
🥡 How long will these roll ups keep in the fridge?
These Turkey and Stuffing Roll Ups can be stored in the refrigerator for up to 3 days. After that, the quality starts to decline significantly – I’d say they’re about 85% as good on day 4 and 70% on day 5. To store them, simply place them in an airtight container. Just remember, the cream of mushroom soup can change texture over time, so it’s best enjoyed fresh!
⏳ Do I need to let the filling cool before assembling?
No, you don’t have to let the filling cool before rolling it up! In fact, I find it easier to work with when it’s slightly warm. However, if you make the filling too hot to handle, waiting a few minutes is wise. Just ensure that you mix everything thoroughly while it’s warm for a more flavorful bite!
❄️ Can I freeze these roll ups for later?
Absolutely! You can freeze the assembled but unbaked roll ups for up to 2 months. Just wrap them tightly in plastic wrap and then foil or store them in a freezer-safe bag. When you’re ready to bake, just thaw them overnight in the fridge and bake according to the instructions, adding a few extra minutes to ensure they’re heated through.
🌾 Are there any gluten-free options for this recipe?
Yes! You can easily make these Turkey and Stuffing Roll Ups gluten-free by using gluten-free stuffing and ensuring that your cream of mushroom soup is also gluten-free (many brands offer this). Just double-check the labels on your ingredients to be safe. You’ll still get all that delicious flavor without compromising your dietary needs!
🔄 Can I substitute ground turkey with another meat?
Definitely! While I love using ground turkey for its lean quality, you can substitute it with ground chicken or even lean beef if you prefer. Just keep in mind that different meats might alter the flavor slightly. If you’re using a fattier meat like beef, consider adjusting the seasoning since it may not need as much salt.
🤔 Why do I need to cover the baking dish with foil while baking?
Covering the baking dish with foil helps trap steam inside during the initial baking time, which keeps the roll ups moist and ensures they cook evenly. If you skip this step, you may end up with dry roll ups. Trust me – I’ve tried both ways, and foil is definitely my friend here!
😅 How many times did you test this recipe?
Oh boy…let’s just say I lost count after ten! I wanted to get these roll ups just right because they are such a comforting dish. Each time taught me something new – from perfecting the sauce consistency to finding out how much cheese is just enough (spoiler: there’s no such thing as too much cheese!). So yes, rest assured this recipe is tested and approved multiple times over!
Troubleshooting
I will continue to add more to this Troubleshooting section as I start seeing questions coming through from people who have made the recipe.
Troubleshooting tips
“My roll ups turned out flat! 😩”
- You might have used too little filling for each roll up, which caused them to flatten out during baking. Aim for a portion that’s about the size of a golf ball when rolling them into logs.
- Another possibility is that the ground turkey was too wet, making it difficult for the roll ups to hold their shape. Make sure your stuffing is well-drained if it’s homemade, or choose a firmer store-bought variety.
- I bet they were still YUM though!
“The inside of my roll ups is dry and crumbly! 😟”
- If you overcooked the turkey, it can dry out. Ground turkey is lean, so keep an eye on your bake time and check for doneness around 25 minutes.
- Using too much stuffing compared to turkey can also lead to dryness since the stuffing absorbs moisture. Be sure to balance your mixture with equal parts turkey and stuffing.
- I bet they were still YUM though!
“My sauce was way too thick! 😳”
- If you didn’t add enough milk while mixing your cream of mushroom soup, it can turn out too thick. Make sure you’re using the full ½ cup of milk to achieve a smooth consistency.
- Additionally, if you let the sauce sit for too long before pouring it over the roll ups, it may thicken even more. Mix it right before using!
- I bet they were still YUM though!
“The cheese on top didn’t melt properly! 🔥”
- If your oven wasn’t preheated fully before baking, it can prevent the cheese from melting evenly. Always wait until your oven reaches 350°F (175°C) before putting in the roll ups.
- Another reason could be that the cheese was added too early in the baking process or that you covered it tightly with foil, trapping steam instead of allowing it to melt nicely.
- I bet they were still YUM though!
Turkey and Stuffing Roll Ups
Ingredients
Method
- In a large mixing bowl, combine ground turkey, prepared stuffing, garlic powder, onion powder, salt, and black pepper. Mix until well combined.
- Preheat the oven to 350°F (175°C).
- Take a portion of the turkey mixture and roll it into a log shape. Repeat until all the mixture is used.
- Place the roll ups seam-side down in a greased baking dish.
- In a small bowl, mix the cream of mushroom soup with milk until smooth.
- Pour the sauce over the roll ups in the baking dish.
- Cover the baking dish with aluminum foil and bake in the preheated oven for 25 minutes.
- Remove the foil and sprinkle shredded cheese on top. Bake for an additional 5 minutes, or until the cheese is melted and bubbly.