Easy Baked Salmon Sushi Cups: Your New Favorite Appetizer
I first stumbled upon the idea for these Easy Baked Salmon Sushi Cups during a late-night craving for sushi, mixed with a little too much scrolling through social media. I came across a trendy sushi shop that served these adorable little cups, and I was instantly smitten. Not only were they visually stunning, but they also offered a fun twist on traditional sushi—no chopsticks required! I knew I had to recreate this dish at home, not just to satisfy my cravings but also because who doesn’t love an excuse to make something delicious without breaking the bank?
After several attempts (okay, maybe more than several—I stopped counting after five), I finally nailed down the perfect recipe for my Easy Baked Salmon Sushi Cups (Viral Recipe). Each iteration was a bit of a comedy show: one batch turned out way too dry, another had rice that could’ve qualified as cement! But with each test, I learned something new about balancing flavors and textures, striving for that ideal combination of crispy edges and tender salmon filling. Let’s just say my kitchen looked like a sushi battlefield by the time I was done.
But oh boy, was it worth it! The final result is nothing short of glorious—these baked cups are bursting with flavor and have that perfect blend of crunchy and creamy textures that’ll have you reaching for seconds (or thirds!). The savory salmon mingles beautifully with the lightly seasoned rice, and trust me, the presentation is a total showstopper. So grab your ingredients and get ready to impress your friends or just treat yourself—you won’t regret diving into these delightful bites!
These Easy Baked Salmon Sushi Cups (Viral Recipe) are….
….the perfect blend of sushi goodness and fun, bite-sized delight!
1. They offer an incredible umami explosion from the savory salmon filling, enhanced by soy sauce and sesame oil. This delightful combination brings a depth of flavor that dances on your palate, making each bite exciting and satisfying.
2. Irresistible texture – each cup features a crunchy nori shell that contrasts beautifully with the tender salmon filling. The baked sushi rice acts as a soft, chewy base, providing a delightful balance that enhances the overall eating experience.
3. The sushi rice perfection achieved by cooling it down after cooking ensures that it holds its shape perfectly during baking. This step is crucial because it prevents the rice from becoming mushy, allowing for those lovely little cups to maintain their structure and showcase the delicious filling.
4. A fantastic value option — these Easy Baked Salmon Sushi Cups are not only simple to make but also cost-effective compared to dining out for sushi. With just a handful of ingredients like cooked sushi rice and fresh salmon, you can whip up a batch at home without breaking the bank.
PS These sushi cups are bite-sized wonders that yield about 12 servings, making them ideal for sharing at gatherings or enjoying as a snack!
Ingredients for the Easy Baked Salmon Sushi Cups (Viral Recipe)
Each ingredient in this dish plays an essential role in flavor and texture. Here’s what you’ll need:
- 1 cup cooked sushi rice (cooled): Provides a sticky base that holds everything together.
- 2 sheets nori (cut into small squares): Adds a unique umami flavor and wraps around the filling.
- 1 tablespoon rice vinegar: Enhances the sushi rice with a subtle tang.
- 1 tablespoon sugar: Balances flavors and adds a hint of sweetness to the rice.
- 1 teaspoon salt: Elevates the overall taste and complements the other ingredients.
- 1 pound salmon fillet (skinless): Offers rich, buttery flavor and protein to the filling.
- 2 tablespoons soy sauce: Introduces savory depth and enhances the salmon’s natural taste.
- 1 teaspoon sesame oil: Imparts a nutty aroma and richness to the filling.
- 1 teaspoon ginger (grated): Adds warmth and spice that brightens the flavor profile.
- 1 clove garlic (minced): Contributes aromatic depth and complexity to the filling.
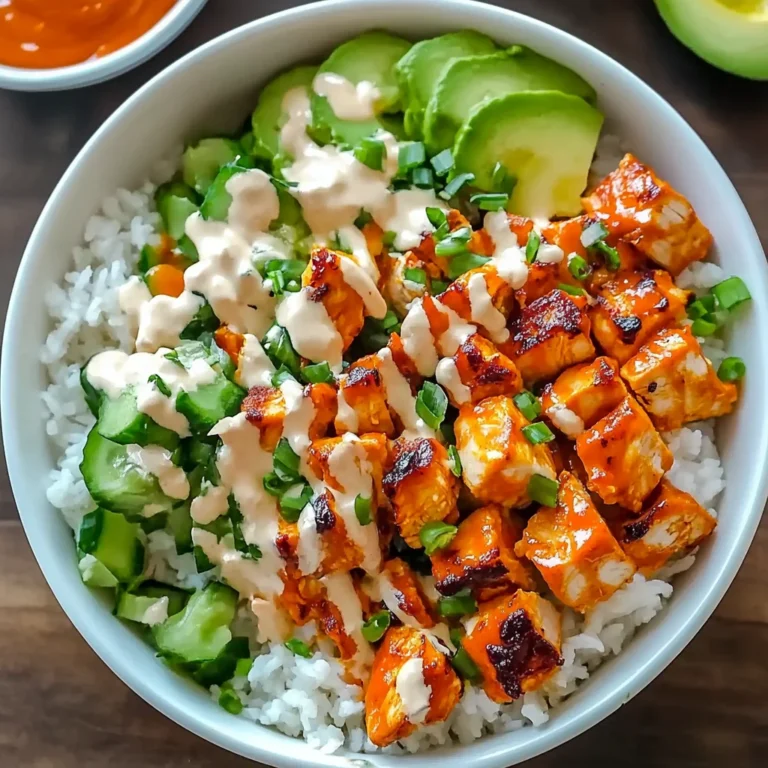
- 1 avocado sliced: Brings creamy texture and freshness, balancing the savory elements.
- 2 tablespoons green onions (chopped): Provides a crisp bite and bursts of onion flavor.
- 1 tablespoon sesame seeds (for garnish): Adds crunch and visual appeal to each cup.
- 1 tablespoon wasabi (optional): Offers a zesty kick for those who enjoy extra heat.
You Must Prepare the Sushi Rice Properly. No Shortcuts!
I have to confess, I tried to take a shortcut with the sushi rice when making these Easy Baked Salmon Sushi Cups. I thought, “Surely, I can skip the vinegar and sugar!” Spoiler alert: I was wrong. The flavor fell flat, and it just wasn’t the same scrumptious experience as when I followed the original method. So trust me on this one; don’t skip this step!
Now, let’s get into why this technique is non-negotiable. Preparing the sushi rice with rice vinegar, sugar, and salt is akin to seasoning a dish; it elevates everything! This mixture not only enhances the flavor but also gives the rice that signature slightly sticky texture that binds beautifully in your nori cups. Imagine trying to assemble sushi without properly seasoned rice—yikes! It’s the glue that holds these delightful bites together.
What does preparing sushi rice do?
- Flavor enhancement — The combination of vinegar, sugar, and salt adds a nuanced sweetness and tang that lifts the overall taste of your sushi cups.
- Texture improvement — Properly seasoned sushi rice becomes slightly sticky yet fluffy, allowing each bite to hold its shape while being easy to eat.
- Visual appeal — The glossy finish from the vinegar makes your sushi cups look more appetizing and professional.
- Binding agent — Seasoned rice acts like glue, keeping the salmon filling intact within the nori shell instead of crumbling apart.
- Authenticity — Following this traditional preparation method gives your sushi cups an authentic taste reminiscent of real sushi.
Different sushi rice preparation times
- Immediate mixing (okay) — You can technically mix everything together right after cooking, but you’ll miss out on deeper flavor integration.
- 15 minutes resting time (good) — Letting it sit for 15 minutes allows flavors to meld somewhat, but still lacks that full punch.
- 30 minutes resting time (better) — A half-hour rest ensures flavors mingle nicely; it’s starting to get closer!
- 1 hour resting time (best) — This is my sweet spot! The ultimate balance of flavor and texture is achieved here for those perfect little cups.
Be warned: The most common mistake is skipping or skimping on mixing in the rice vinegar, sugar, and salt properly. If you don’t do this right, your sushi cups will lack flavor and cohesion. Trust me; it’s not worth it!
How to make Easy Baked Salmon Sushi Cups (Viral Recipe)

Are you ready to see how straightforward it is to make the Easy Baked Salmon Sushi Cups (Viral Recipe) of your dreams??
1. PREPARE THE SUSHI RICE
Let’s start with the foundation of our sushi cups – the rice!
1. COMBINE – In a mixing bowl, combine the cooked sushi rice, rice vinegar, sugar, and salt. Mix well until all ingredients are evenly dispersed through the rice. This will give your sushi rice that signature flavor profile!
2. PREHEAT – Preheat the oven to 375°F (190°C). This step is crucial as it ensures your salmon cooks perfectly while you prepare the rest of the components.
HANDY TIPS
- Use short-grain rice for an authentic sushi texture.
- If your rice is still warm, it might be a little sticky; let it cool completely for easier assembly later!
2. PREPARE THE SALMON FILLING
Now onto that delicious salmon filling that takes these sushi cups to another level!
3. MIX – In a bowl, mix the salmon fillet with soy sauce, sesame oil, ginger, and garlic. Ensure the salmon is coated evenly with the mixture; this is where all those umami flavors come together!
4. BAKE – Place the salmon mixture on a baking sheet and bake for 15-20 minutes or until cooked through and flaky. You want it to turn a lovely opaque color—this indicates it’s ready!
HANDY TIPS
- For even cooking, cut your salmon into smaller chunks before mixing with other ingredients if you prefer quicker results!
- Don’t forget to keep an eye on it towards the end of cooking; overcooked salmon can dry out quickly.
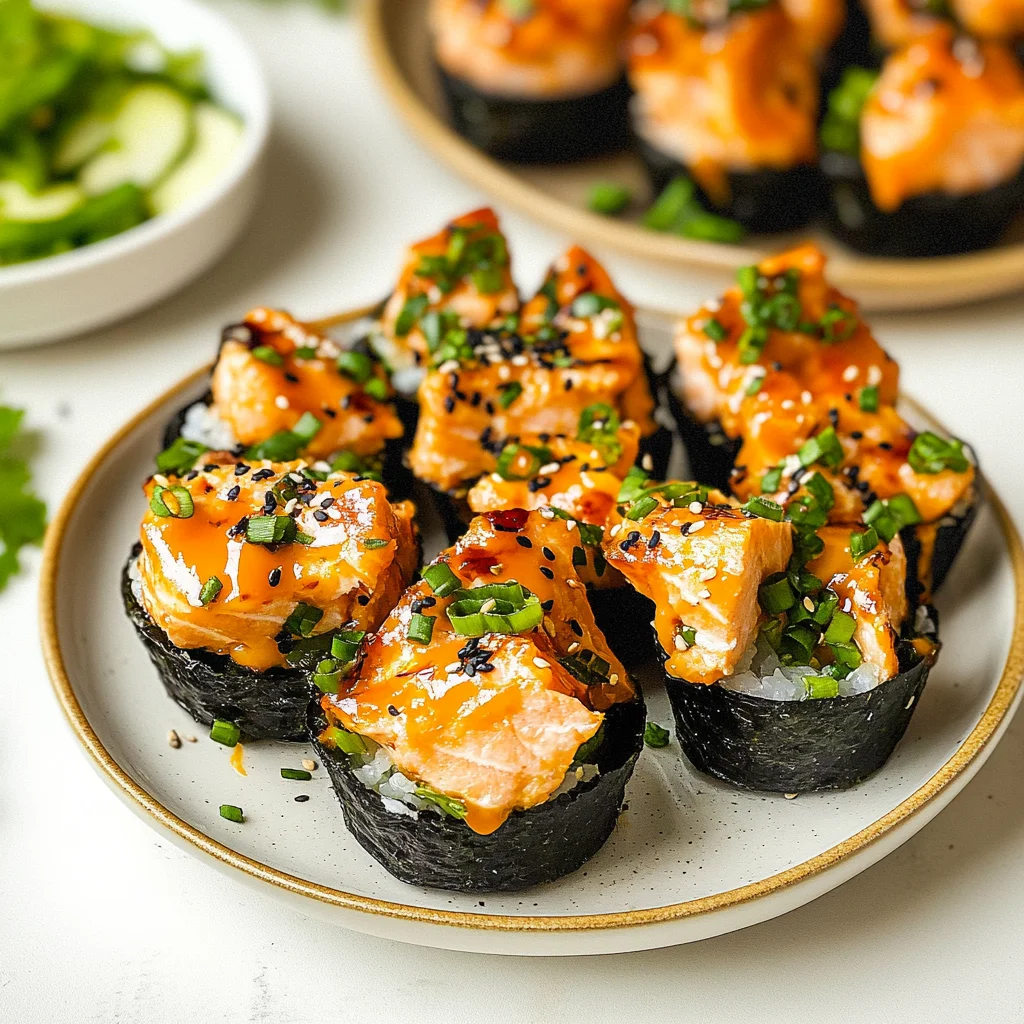
3. ASSEMBLE THE SUSHI CUPS
Time to bring everything together in these delightful little cups!
5. GREASE – Grease a muffin tin thoroughly; this will help you remove the sushi cups easily once baked. Then press a square of nori into each cup to form a shell, gently molding it so it fits snugly against the sides.
6. FILL – Fill each nori cup with a spoonful of sushi rice, followed by a generous piece of baked salmon on top. Make sure not to overfill; you want them bite-sized!
7. TOP – Finally, top with avocado slices, chopped green onions, and sprinkle sesame seeds for that perfect finishing touch!
HANDY TIPS
- For extra crunch, toast your sesame seeds lightly before garnishing!
- Experiment with different toppings like thinly sliced radishes or pickled ginger for added flavor.
4. SERVE
The moment you’ve been waiting for – time to dig in!
8. Serve warm with wasabi on the side if desired for those who enjoy a spicy kick!
Make these once, and I wager they will invade your dreams every night too! – Nagi x
FAQ – Easy Baked Salmon Sushi Cups (Viral Recipe)
🥡 How long will these sushi cups keep?
The Easy Baked Salmon Sushi Cups are best enjoyed fresh, but if you have leftovers, they can be stored in an airtight container in the refrigerator. They will maintain about 85% quality on day 1 and roughly 70% on day 2. After that, the nori may become soggy and the salmon will start to lose its freshness. I recommend consuming them within 48 hours for the best taste and texture!
⏲️ Can I prepare the sushi rice ahead of time?
Yes, you can prepare the sushi rice up to a day in advance! Just make sure to let it cool completely before storing it in an airtight container in the fridge. When you’re ready to assemble your sushi cups, take it out and allow it to come back to room temperature for optimal flavor and texture. Don’t skip this step, as warm rice holds together better when pressed into the nori cups.
❄️ Can I freeze these sushi cups?
I don’t recommend freezing the assembled sushi cups because the nori becomes rubbery when thawed. However, you can freeze the baked salmon filling separately. Place it in an airtight container or freezer bag. It can last up to 3 months in the freezer. To use, simply thaw it overnight in the fridge and reheat before assembling your sushi cups.
🌱 Can I make these sushi cups gluten-free?
Absolutely! To make gluten-free sushi cups, you’ll need to use gluten-free soy sauce (often labeled tamari). All other ingredients in this recipe are naturally gluten-free, so you’re set! Just double-check your nori packaging as well to ensure there are no added ingredients containing gluten.
🍣 Can I substitute salmon with another protein?
Yes, you can substitute salmon with other proteins like shredded cooked chicken or even tofu for a vegetarian option! If using tofu, make sure to press it well to remove excess moisture before marinating it in soy sauce and sesame oil. Cooking times may vary depending on what protein you choose—just ensure it’s cooked through before assembling your sushi cups.
🔥 Why do I need to mix rice vinegar, sugar, and salt into my sushi rice?
Mixing rice vinegar with sugar and salt enhances the flavor of your sushi rice—this is essential for achieving that classic sushi taste! The vinegar adds a slight tang that balances out the richness of the salmon while sugar brings a hint of sweetness. Trust me; after testing various ratios dozens of times, this blend is unbeatable!
🥑 What toppings can I add besides avocado?
While avocado adds creaminess and flavor, there are plenty of other toppings you can experiment with! Some popular choices include:
- Thinly sliced radishes for crunch
- Pickled ginger for a zesty kick
- Sriracha mayo for spice
- Cucumber slices for freshness
Feel free to get creative with your toppings based on what you enjoy or have on hand!
Troubleshooting
I will continue to add more to this Troubleshooting section as I start seeing questions coming through from people who have made the recipe.
Troubleshooting tips
“My sushi cups were too flat and not holding their shape! 😩”
- This could be because you didn’t press the nori squares firmly enough into the muffin tin, causing them to lose shape during baking. Make sure to really mold the nori into the cups so they hold their form!
- Another reason might be that your sushi rice was too cold when you filled the cups; warm rice helps it stick better. Just a little extra pressing next time will do the trick!
- I bet they were still YUM though!
“My baked salmon turned out dry and overcooked! 😭”
- If your salmon was in the oven for too long, it can easily dry out, especially if your fillet was thinner than expected. Use a thicker cut of salmon or check for doneness around the 15-minute mark.
- Also, if your oven runs hot, this can lead to quicker cooking times. An oven thermometer is a great investment for precision!
- I bet they were still YUM though!
“My sushi rice turned out too sticky and gooey! 🤦♀️”
- This often happens if you didn’t let the cooked sushi rice cool enough before mixing in the vinegar, sugar, and salt. The heat makes it clump together more than desired.
- Alternatively, if you used too much water while cooking your rice initially, it could also lead to that sticky texture. Aim for a 1:1 ratio of rice to water for best results!
- I bet they were still YUM though!
“The nori cups went all soggy after baking! 😱”
- This can occur if you filled the nori cups with hot or very moist ingredients without letting them cool down first. Make sure the salmon is just slightly warm when assembling.
- Additionally, leaving them uncovered after baking can cause condensation to form. Cover them lightly with foil if you’re serving them later — just not too tightly!
- I bet they were still YUM though!
Easy Baked Salmon Sushi Cups (Viral Recipe)
Ingredients
Method
- In a mixing bowl, combine the cooked sushi rice, rice vinegar, sugar, and salt. Mix well and set aside.
- Preheat the oven to 375°F (190°C).
- In a bowl, mix the salmon fillet with soy sauce, sesame oil, ginger, and garlic.
- Place the salmon mixture on a baking sheet and bake for 15-20 minutes or until cooked through.
- Grease a muffin tin and press a square of nori into each cup to form a shell.
- Fill each nori cup with a spoonful of sushi rice, followed by the baked salmon.
- Top with avocado slices, green onions, and sesame seeds.
- Serve warm with wasabi on the side if desired.