Hot Italian Sub Sliders: Cheesy and Satisfying Delight
I first stumbled upon the idea of Hot Italian Sub Sliders during a late-night food binge while scrolling through my favorite food blogs. I’d just finished an unforgettable meal at this quirky little Italian deli that had a reputation for their drool-worthy sandwiches. The moment I bit into one of their sliders, with its gooey cheese and perfectly spiced meats, I knew I had to recreate it at home. Not only did I want to save a few bucks, but I also craved the satisfaction of making something that could rival my new favorite indulgence.
Let me tell you, perfecting these sliders was no walk in the park. After what felt like endless trials (I think I lost count after five attempts), I finally nailed down the recipe. Each version was slightly different—I experimented with everything from the types of Italian meats to the ratios of cheese and peppers. Let’s just say there were some questionable flavor combinations that ended up being more “what was I thinking?” than “wow, this is amazing!” But through all those missteps, my determination kept me going because I knew how incredible these Hot Italian Sub Sliders could be.
And oh boy, was it worth it! The final result is nothing short of spectacular—deliciously warm and cheesy sliders that are bursting with flavor from the savory Italian meats and vibrant peppers. They’ve got that perfect balance of gooeyness and crunch that makes every bite a delight, and they’re just as impressive for game day as they are for casual get-togethers. So grab your friends or just treat yourself, because you’re going to love making (and devouring) these sliders as much as I do!
These Hot Italian Sub Sliders are…
…an irresistible party pleaser that will have everyone coming back for more!
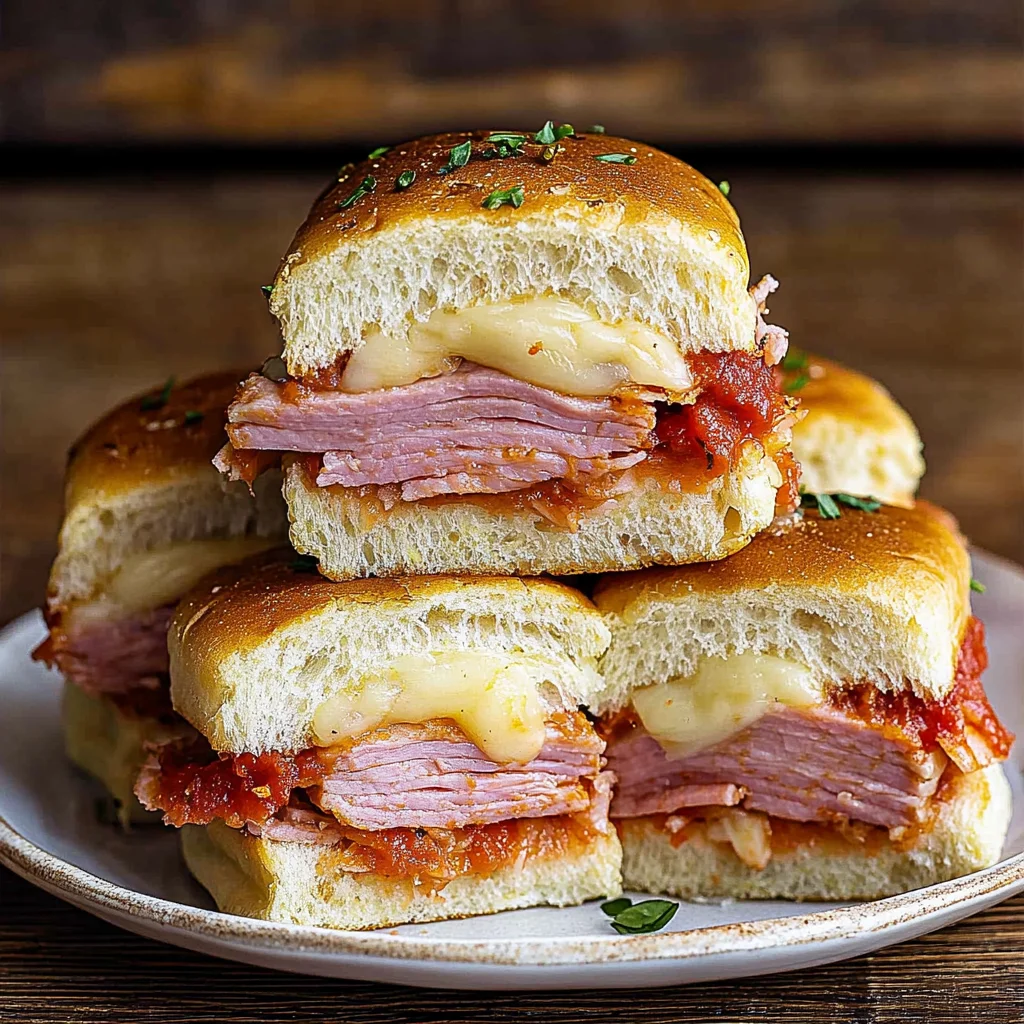
1. They deliver an explosion of Italian flavors with every bite, thanks to the combination of salami, ham, and provolone cheese. The savory meats intermingle beautifully, creating a rich taste profile that’s enhanced by the tangy banana peppers, making these sliders truly unforgettable.
2. Perfectly gooey texture — each slider features a warm, melted cheese layer nestled between soft and fluffy rolls. The contrast of the slight crust from baking with the tender insides ensures a delightful chew that keeps you reaching for another slider.
3. Elevated technique — brushing the rolls with olive oil before baking adds an extra layer of golden crispness to the sliders. This simple step not only enhances the visual appeal but also locks in moisture, ensuring that every slider remains juicy and flavorful.
4. Incredible value — making these Hot Italian Sub Sliders at home is far more economical than ordering from a restaurant. With just a handful of affordable ingredients like sliced meats and cheese, you can whip up a delicious platter that serves a crowd without breaking the bank.
PS These sliders are best served warm and fresh out of the oven for maximum cheesy goodness!
Ingredients for the Hot Italian Sub Sliders
Each ingredient in this dish plays an essential role in flavor and texture. Here’s what you’ll need:
12 count slider rolls (preferably soft and fluffy): These provide a pillowy base that holds all the delicious fillings together.
6 oz sliced salami (or pepperoni): Adds a savory, rich flavor that embodies classic Italian taste.
6 oz sliced ham (or capicola): Brings a hint of sweetness and depth to each bite.
6 oz sliced provolone cheese (or mozzarella): Melts beautifully to create a creamy, cheesy layer.
1 cup banana peppers (sliced): Introduces a tangy kick that balances the richness of the meats.
1/2 cup marinara sauce (for dipping): Offers a flavorful dip that enhances the overall experience.
1 tbsp olive oil (for brushing): Helps achieve a golden, crispy top while adding subtle richness.
1 tsp Italian seasoning (optional): Infuses extra aromatic herbs for an authentic Italian flair.
You must preheat the oven. No shortcuts!
I get it — preheating the oven sounds like a tedious step that can feel like it’s just adding time to your cooking. Trust me, I tried to skip this part thinking it wouldn’t make a huge difference. Spoiler alert: I was wrong! My sliders ended up unevenly cooked and less satisfying than when I did it right. So, take my word for it, don’t skip this crucial step!
Preheating the oven is essential because it ensures that your Hot Italian Sub Sliders bake evenly right from the start. Think of it like warming up your car on a chilly morning; driving off too soon means you’re in for a bumpy ride! An adequately heated oven allows the cheese to melt perfectly, the meats to warm through, and the rolls to achieve that golden-brown crust we all crave.
What does preheating do?
- Even cooking — A preheated oven guarantees that heat is distributed evenly, so every slider gets that perfect warmth throughout.
- Optimal melting — The provolone cheese melts beautifully when the oven’s hot from the get-go, ensuring gooey, cheesy goodness in every bite.
- Crispier tops — Preheating helps achieve that golden-brown crust on top of the sliders without overcooking the insides.
- Faster baking time — Starting with a hot oven reduces overall baking time, keeping your sliders from drying out or becoming tough.
- Enhanced flavors — Proper heat helps meld the flavors of salami, ham, and banana peppers together more effectively as they cook.
Different preheating times
- No preheat (poor) — The sliders will bake unevenly; some parts may be cold while others are overcooked.
- 10 minutes (acceptable) — A decent start; you’ll get some melting but not enough color on the tops.
- 15 minutes (good) — Better melting and browning for a more appealing slider; still not optimal.
- 20 minutes or more (best) — Perfectly heated for even cooking and excellent texture; sliders come out warm and inviting!
Don’t even think about skipping the preheating! The most common mistake is assuming that just because you’re baking something quick like sliders, you can bypass this step. Trust me—your patience will pay off with cheesy perfection instead of sad, soggy sandwiches!
How to make Hot Italian Sub Sliders

Are you ready to see how straightforward it is to make the Hot Italian Sub Sliders of your dreams??
1. PREPARE THE SLIDERS
Let’s get those sliders ready for a cheesy, meaty delight!
Bold action label
1. Preheat – Preheat the oven to 350°F (175°C). This ensures that your sliders cook evenly and come out perfectly warm and melty.
2. Slice – Slice the slider rolls in half horizontally and place the bottom halves in a baking dish. Make sure to use soft and fluffy rolls for that perfect texture!
3. Layer – Layer the salami, ham, provolone cheese, and banana peppers evenly over the bottom halves of the rolls. This combination of flavors will meld beautifully when baked.
4. Top – Place the top halves of the rolls on top, creating little sandwiches that are going to be irresistible!
HANDY TIPS
- Roll choice – Opting for soft and fluffy slider rolls makes all the difference in achieving that mouthwatering texture.
- Layering fun – Feel free to mix up the meats or cheeses if you’re feeling adventurous; capicola instead of ham or mozzarella can add a nice twist!
2. BAKE THE SLIDERS
It’s time to bake these beauties until they’re golden brown!
Bold action label
5. Mix – In a small bowl, mix the olive oil and Italian seasoning. Brush this mixture generously over the top of the rolls. This will give them a lovely flavor and golden finish as they bake.
6. Cover – Cover the baking dish with aluminum foil and bake for 15 minutes. The foil will help keep moisture in, ensuring your sliders stay soft!
7. Uncover & Bake – Remove the foil and bake for an additional 5 minutes, or until the tops are golden brown. You’ll know they’re done when they’re fragrant and have that irresistible color.
HANDY TIPS
- Cheese meltiness – If you want extra oozy cheese, consider adding a few more slices inside before baking!
- Seasoning levels – Feel free to adjust or skip the Italian seasoning if you prefer a simpler flavor profile; just don’t forget that olive oil brush!
3. SERVE
The moment we’ve all been waiting for—let’s plate those sliders!
Bold action label
8. Cool & Slice – Remove from the oven and let cool for a few minutes before slicing into individual sliders. This cooling time helps set everything together so they don’t fall apart when you serve them.
9. Dunk & Enjoy – Serve warm with marinara sauce for dipping! The tangy flavor of marinara pairs perfectly with these savory sliders.
HANDY TIPS
- Dipping sauce options – Besides marinara, try serving with ranch or garlic aioli for an extra flavor kick!
- Serving size – These sliders are perfect as appetizers; consider making two trays if you’re expecting a crowd—they’re bound to disappear fast!
Making these Hot Italian Sub Sliders is an absolute treat that combines warm, gooey cheese with zesty meats and peppers—all tucked between fluffy rolls! Trust me, once you make them once, you’ll be dreaming about them every game day! – Nagi x
FAQ – Hot Italian Sub Sliders
❄️ Can I make these sliders ahead of time?
Yes, you can definitely prepare these sliders ahead of time! Assemble the sliders without baking them, then cover tightly with plastic wrap and refrigerate for up to 24 hours before baking. When you’re ready to serve, simply preheat your oven and bake as directed. If they’ve been in the fridge, you might want to add an extra 5 minutes to the baking time to ensure they’re heated through and the cheese is melty.
🥪 What if I want to make these sliders gluten-free?
To make these delicious sliders gluten-free, you’ll need to swap out the slider rolls for a gluten-free alternative. There are many brands available that offer gluten-free slider buns that are soft and fluffy. Just ensure they’re fresh; stale gluten-free bread can be a bit crumbly. Additionally, check that your sliced meats and cheese are certified gluten-free as some processed products may contain hidden gluten.
⏰ How long do leftovers last in the fridge?
These sliders keep well in the fridge for about 3 days. However, they will start to lose their quality after the first day—around 97% as good on day one, but by day three, I’d say they drop down to about 80%. To reheat, pop them back in the oven at 350°F (175°C) for about 10-15 minutes until warmed through—this helps crisp up the tops again!
🔄 Can I substitute ingredients in this recipe?
Absolutely! You can customize these sliders based on your preferences or what you have on hand. For example:
- Meats: Swap salami for pepperoni or use capicola instead of ham.
- Cheese: Provolone can easily be replaced with mozzarella or even a sharp cheddar for a different flavor profile.
- Peppers: If banana peppers aren’t your thing, try roasted red peppers or jalapeños for some heat.
❓ Why do I need to brush olive oil on top before baking?
Brushing olive oil mixed with Italian seasoning on top of the rolls serves two important purposes:
1. It adds a beautiful golden-brown color while baking, making them visually appealing.
2. The oil also enhances flavor and helps create a slight crispiness on top, which contrasts perfectly with the gooey cheese and savory fillings inside. Trust me; skipping this step could lead to sad-looking sliders!
🥶 Can I freeze these sliders?
Yes! These Hot Italian Sub Sliders freeze beautifully. After assembling them but before baking, wrap each slider tightly in plastic wrap and then store them in a freezer bag or airtight container. They’ll last up to 3 months in the freezer. When you’re ready to enjoy them, thaw them overnight in the fridge before baking them as directed—no need to worry about sogginess if done right!
🧀 How do I know when my cheese is melted properly?
You’ll know your cheese is perfectly melted when it’s bubbly and slightly golden on top—this usually happens during those last few minutes of uncovered baking. Keep an eye on it; over-baking can lead to rubbery cheese! In my experience, aiming for that lovely stretch when you pull apart a slider is key—trust me, it’s worth watching closely!
Troubleshooting
I will continue to add more to this Troubleshooting section as I start seeing questions coming through from people who have made the recipe.
Troubleshooting tips
“My sliders came out too dry! 😭”
- You might have overbaked them. If you left them in the oven past the recommended time, the heat can dry out the meats and cheese, making the sliders less enjoyable.
- Another reason could be that your rolls were not soft enough. Using slider rolls that are stale or too firm will result in a drier texture after baking.
I bet they were still YUM though!
“The top of my sliders is way too dark! 🔥”
- If you baked them with the foil on for too long, it can trap heat and cause uneven browning. Make sure to follow the instructions for removing the foil after 15 minutes!
- Also, if your oven runs hot, you might need to adjust the temperature slightly lower next time to avoid burning.
I bet they were still YUM though!
“My sliders are all wonky and falling apart! 🤦♀️”
- This can happen if you didn’t layer your ingredients evenly. If one side has too much salami or banana peppers, it can cause instability when slicing.
- Additionally, make sure to use fresh, fluffy slider rolls that hold together well; stale rolls tend to crumble more easily under pressure.
I bet they were still YUM though!
“The cheese didn’t melt properly! 😕”
- If your provolone (or mozzarella) cheese was too thickly sliced, it may not have had enough time to melt during baking. Try slicing it thinner next time for a gooey texture.
- You might also want to consider covering your sliders with foil for a bit longer before removing it, which helps create steam for better melting.
I bet they were still YUM though!
Hot Italian Sub Sliders
Ingredients
Method
- Preheat the oven to 350°F (175°C).
- Slice the slider rolls in half horizontally and place the bottom halves in a baking dish.
- Layer the salami, ham, provolone cheese, and banana peppers evenly over the bottom halves of the rolls.
- Place the top halves of the rolls on top.
- In a small bowl, mix the olive oil and Italian seasoning. Brush the mixture over the top of the rolls.
- Cover the baking dish with aluminum foil and bake for 15 minutes.
- Remove the foil and bake for an additional 5 minutes, or until the tops are golden brown.
- Remove from the oven and let cool for a few minutes before slicing into individual sliders.
- Serve warm with marinara sauce for dipping.