the best Baked Italian Sub Sandwich: Cheesy Delight at Home
I’ve always been a sucker for a good Italian sub sandwich, especially those cheesy, meaty creations you find at local shops that seem to pack a flavor punch in every bite. On one particularly lazy Sunday, I had an intense craving for that melty goodness but didn’t want to venture out in my PJs. It hit me—why not recreate the experience at home? It was a challenge I set for myself, not just to satisfy my craving but also to see if I could elevate it beyond what I’d had before, all while keeping it easy and cost-effective.
After a few weeks of tinkering in the kitchen (and yes, a couple of epic sandwich fails that resulted in more mess than magic), I finally landed on what I can confidently call the best Baked Italian Sub Sandwich. It took me about five attempts to get the balance of meats and cheeses just right, playing with various seasonings until my taste buds danced with joy instead of confusion. Let’s just say there were moments when I wondered if I should stick to ordering takeout instead of attempting gourmet sandwiches at home!
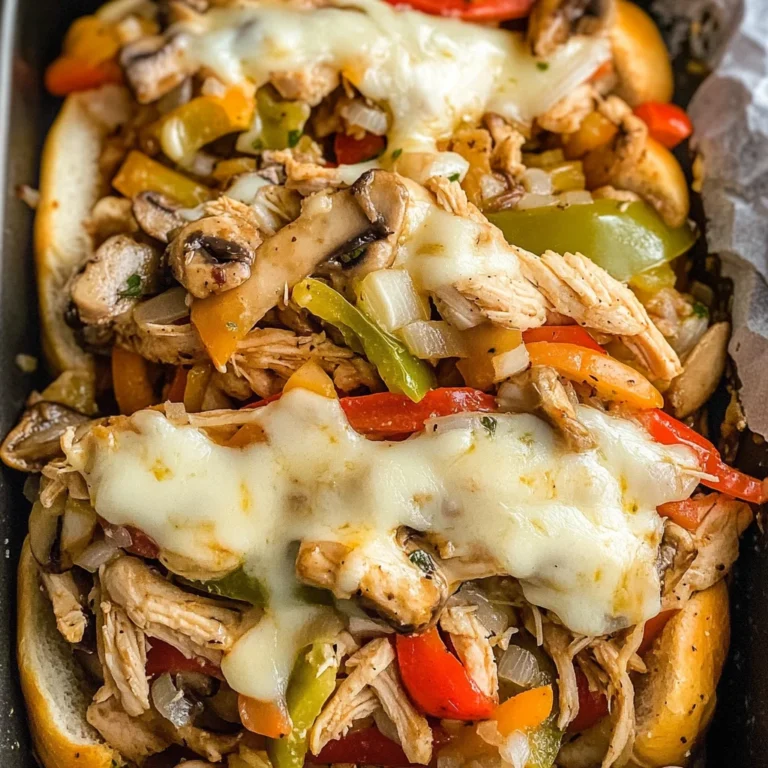
But oh boy, was it worth every bit of trial and error! The final result is nothing short of spectacular—a deliciously hearty baked Italian sub sandwich loaded with layers of savory meats, gooey cheese, and an explosion of flavor from my secret blend of spices. Each bite has that perfect melt-in-your-mouth texture with a crispy crust that holds everything together beautifully. Trust me, this is the kind of sandwich that’ll make your taste buds sing and leave you coming back for seconds. So grab your apron and let’s dive into making this masterpiece—you won’t regret it!
These The Best Baked Italian Sub Sandwich are….
….the ultimate comfort food that will have you coming back for seconds!
1. They deliver an explosive flavor profile with a delightful medley of meats and cheeses. The combination of salami, ham, and pepperoni creates a rich, savory experience that’s elevated by the melted provolone and mozzarella—each bite is a flavor-packed journey that captures the essence of classic Italian subs.
2. Irresistible texture – each sandwich features a crispy crust with a soft, chewy interior. Baking the sub rolls allows them to develop that perfect golden-brown exterior while keeping the insides fluffy, giving you that satisfying contrast in every mouthful.
3. The layering technique makes all the difference in this recipe. By splitting the rolls lengthwise and toasting them before adding the fillings, I achieve that ideal balance of heat distribution and moisture retention, ensuring every ingredient melds together beautifully without getting soggy.
4. They offer incredible value for money—making these at home costs a fraction of what you’d pay at a deli or sandwich shop. With simple ingredients readily available at any grocery store, you can whip up these deliciously hearty sandwiches for friends and family without breaking the bank.
PS These sandwiches are generously sized and perfect for sharing! They’re sure to be the star of your next meal gathering.
Ingredients for The Best Baked Italian Sub Sandwich
Each ingredient in this dish plays an essential role in flavor and texture. Here’s what you’ll need:
4 rolls Italian sub rolls: These provide the perfect sturdy base for all the delicious fillings.
4 oz Salami (Sliced): Adds a rich, savory flavor that complements the other meats.
4 oz Ham (Sliced): Brings a mild sweetness and hearty texture to the sandwich.
4 oz Pepperoni (Sliced): Offers a spicy kick that elevates the overall taste profile.
4 oz Provolone cheese (Sliced): Melts beautifully while adding a creamy, tangy layer of flavor.
4 oz Mozzarella cheese (Shredded): Contributes a gooey texture that binds all the ingredients together.
1 cup Lettuce (Shredded): Provides a refreshing crunch that balances the richness of the meats and cheeses.
1 medium Tomato (Sliced): Adds juiciness and a burst of freshness to each bite.
1 medium Red onion (Thinly sliced): Introduces a sharpness that enhances the overall flavor complexity.
2 tbsp Italian dressing: Infuses the sandwich with zesty herbs and tangy notes for extra depth.
1 tsp Oregano (Dried): Delivers an aromatic essence that evokes classic Italian cuisine.
1 tsp Garlic powder: Imparts a warm, savory flavor that rounds out the seasoning mix.
- 1 tsp Crushed red pepper flakes (Optional): Adds a touch of heat for those who enjoy a spicy kick.
Preheating the oven is non-negotiable. Trust me!
I know, I know—preheating the oven adds an extra step and a few minutes to your sandwich-making process. I tried to skip it once, thinking I could just pop the sandwiches in right away. Spoiler alert: it was a disaster! The cheese didn’t melt properly, and the bread ended up sad and soggy. Lesson learned, friends!
Preheating your oven to that perfect 375°F (190°C) is essential for achieving that crispy exterior while keeping the inside warm and gooey. Think of it like warming up before a workout; your body needs that time to get ready, just like your oven needs to be at the right temperature to transform those ingredients into a heavenly baked Italian sub sandwich.
What does preheating do?
- Even Cooking — Ensures that every part of the sandwich cooks evenly, so you won’t end up with cold spots in your melted cheese or lukewarm meats.
- Crispier Bread — A hot oven helps achieve that golden-brown crust on your Italian sub rolls, making them delightfully crisp rather than chewy.
- Melted Cheese Perfection — The heat from the preheated oven melts the provolone and mozzarella beautifully, creating that ooey-gooey texture we crave in a baked sandwich.
- Enhanced Flavors — The initial blast of heat intensifies the flavors of the seasoned ingredients, giving your sandwich a more robust taste throughout.
- Time Efficiency — While it may seem like an extra step, having your oven preheated means you can bake immediately without waiting for it to come up to temperature—saving valuable minutes when you’re hungry!
Different preheating times
- No preheat (poor) — You’ll end up with a soggy sandwich where cheese barely melts and bread doesn’t crisp up at all—yikes!
- 5 minutes (okay) — Better than nothing, but you’ll still miss out on optimal warmth and texture; bread will be soft instead of crisp.
- 10 minutes (good) — A decent start; you’ll notice some meltiness in the cheese and slight browning of the bread.
- 15 minutes (great) — Perfectly warmed up; this is what gets you that ideal combo of gooey cheese and crispy rolls!
- 20 minutes or longer (excellent) — You risk overdoing it, where everything might get too brown or dry out slightly—find that sweet spot!
Just remember: skipping this step is a surefire way to ruin your delicious creation. Don’t think you can cut corners here; trust me, I’ve been there and learned my lesson! Preheat that oven like your life depends on it—because let’s be honest, it kind of does when it comes to these sandwiches!
How to make The Best Baked Italian Sub Sandwich

Are you ready to see how straightforward it is to make the The Best Baked Italian Sub Sandwich of your dreams??
1. PREPARE THE OVEN
Start by creating the perfect environment for your sandwiches to bake!
1. Preheat – Preheat the oven to 375°F (190°C). This temperature ensures that the bread becomes warm and slightly crispy while the cheese melts beautifully, creating that gooey, irresistible texture we all love.
2. ASSEMBLE THE SANDWICHES
Time to build those delicious layers of flavor!
2. Layer – On each Italian sub roll, layer the salami, ham, and pepperoni evenly. Starting with the meats allows their flavors to meld together as they heat up, ensuring every bite is packed with savory goodness.
3. Top – Next, top with provolone and mozzarella cheese. The combination of these two cheeses adds a delightful creaminess and stretchiness that elevates your sub to another level!
4. Add Veggies – Add shredded lettuce, tomato slices, and red onion on top. These fresh ingredients add crunch and brightness that perfectly balance the richness of the meats and cheeses.
5. Drizzle – Drizzle Italian dressing over the vegetables for an extra punch of flavor that ties everything together nicely.
6. Sprinkle – Finally, sprinkle with oregano, garlic powder, and crushed red pepper flakes if desired. These seasonings enhance the overall taste profile — why not give your sandwich that added zing? ❓ Why does this matter? Because they bring a delightful aroma and depth of flavor!
HANDY TIPS
- For extra crispiness, consider lightly toasting your sub rolls before adding the fillings.
- Feel free to customize your meat selection; turkey or roast beef could also work well!
- If you prefer a milder sandwich, omit or reduce the crushed red pepper flakes.
3. BAKE THE SANDWICHES
Now it’s time to let the oven work its magic!
7. Wrap – Wrap each assembled sandwich in aluminum foil and place them on a baking sheet. Wrapping them helps keep moisture in while allowing the cheese to melt beautifully without drying out the bread too quickly.
8. Bake – Bake in the preheated oven for 15 minutes or until the cheese is melted and the bread is warm. You’ll know they’re ready when you catch a whiff of those savory aromas filling your kitchen!
4. SERVE
It’s time for everyone’s favorite part—digging in!
9. Unwrap & Serve – Remove from the oven, unwrap, and slice in half if desired. Serve hot so that everyone can enjoy that gooey cheese right away!
With just a few simple steps, you’ve created a hearty meal that’s bursting with flavor! Make these once, and I wager they will invade your dreams every night too! – Nagi x
FAQ – The Best Baked Italian Sub Sandwich
🥪 How long will these sandwiches keep in the fridge?
These baked Italian sub sandwiches can be stored in the refrigerator for up to 3 days. However, I found that their quality diminishes slightly each day—about 97% as good on day 1, 90% on day 2, and around 85% by day 3. To store them properly, wrap each sandwich tightly in plastic wrap or foil before placing them in an airtight container. This helps maintain their moisture and flavor!
⏲️ Can I skip preheating the oven?
No, you cannot skip preheating the oven! I tested these sandwiches extensively, and starting with a preheated oven ensures that the bread gets warm and crispy while the cheese melts to perfection. If you put them in a cold oven, you’ll end up with soggy bread and unappetizing results—definitely not what we’re aiming for here!
❄️ Can I freeze these sandwiches for later?
Absolutely! You can freeze the assembled but unbaked sandwiches. Just wrap each one tightly in plastic wrap and then aluminum foil to prevent freezer burn. They can be frozen for up to 3 months. When you’re ready to enjoy them, thaw them in the refrigerator overnight and then bake as per the instructions—just add a couple of extra minutes if baking from thawed.
🌾 Can I make this recipe gluten-free?
Yes, you can! To make these baked Italian subs gluten-free, simply substitute the Italian sub rolls with gluten-free rolls. Look for ones that are sturdy enough to hold all those delicious fillings without falling apart. Just ensure that all your meats, cheeses, and condiments are also certified gluten-free. Happy eating without sacrificing flavor!
🔄 What can I substitute for provolone cheese?
If provolone cheese isn’t your favorite or you can’t find it, you can easily substitute it with mozzarella or even gouda for a different flavor profile. Both options melt well and will still provide that creamy texture we love in our subs. Remember though: whatever cheese you choose should complement the other ingredients without overpowering them.
🤔 Why do we sprinkle oregano and garlic powder on top?
Sprinkling oregano and garlic powder on top serves two purposes: it adds an extra layer of flavor and enhances aroma while baking! These seasonings infuse into both the bread and filling as they cook, creating a deliciously fragrant experience when you unwrap your sandwich. Trust me; it’s worth that little extra step for maximum taste!
🍅 Can I add extra vegetables or toppings?
Definitely! Feel free to customize your baked Italian sub by adding extra veggies like bell peppers or olives for added crunch and flavor. You could also consider topping them with fresh basil or a sprinkle of parmesan before baking for an additional flavor boost. Personalizing your sandwich makes it even more satisfying—after all, it’s your meal!
Troubleshooting
I will continue to add more to this Troubleshooting section as I start seeing questions coming through from people who have made the recipe.
Troubleshooting tips
“My sandwiches came out too flat! 😩”
- You might not have used enough filling. If you skimped on the salami, ham, or pepperoni, there won’t be enough substance to keep the rolls from flattening during baking.
- Not wrapping them tightly in aluminum foil could also lead to a flat result, as they need that support to hold their shape while baking.
- I bet they were still YUM though!
“The cheese didn’t melt properly and was rubbery! 🧀”
- If you left the sandwiches in the oven for too long, or if your oven temperature was too high, the cheese can overcook and become rubbery instead of gooey.
- Also, using shredded mozzarella that is too dry can result in a less melty texture. Make sure you’re using fresh cheese for best results!
- I bet they were still YUM though!
“My bread turned out too crunchy! 😬”
- Baking for longer than 15 minutes or at a higher temperature can cause the bread to harden instead of keeping a nice soft texture.
- Additionally, if your rolls were already stale before baking, they might not soften up as expected while heating.
- I bet they were still YUM though!
“The inside was warm but the outside looked pale! 🤔”
- If your oven wasn’t preheated properly before placing the sandwiches inside, it can lead to uneven cooking and less browning.
- Wrapping the sandwiches too loosely might also prevent them from getting that golden exterior since steam will trap moisture inside.
- I bet they were still YUM though!

The Best Baked Italian Sub Sandwich
Ingredients
Method
- Preheat the oven to 375°F (190°C).
- On each Italian sub roll, layer the salami, ham, and pepperoni evenly.
- Top with provolone and mozzarella cheese.
- Add shredded lettuce, tomato slices, and red onion on top.
- Drizzle Italian dressing over the vegetables.
- Sprinkle with oregano, garlic powder, and crushed red pepper flakes if desired.
- Wrap each assembled sandwich in aluminum foil and place them on a baking sheet.
- Bake in the preheated oven for 15 minutes, or until the cheese is melted and the bread is warm.
- Remove from the oven, unwrap, and slice in half if desired. Serve hot.