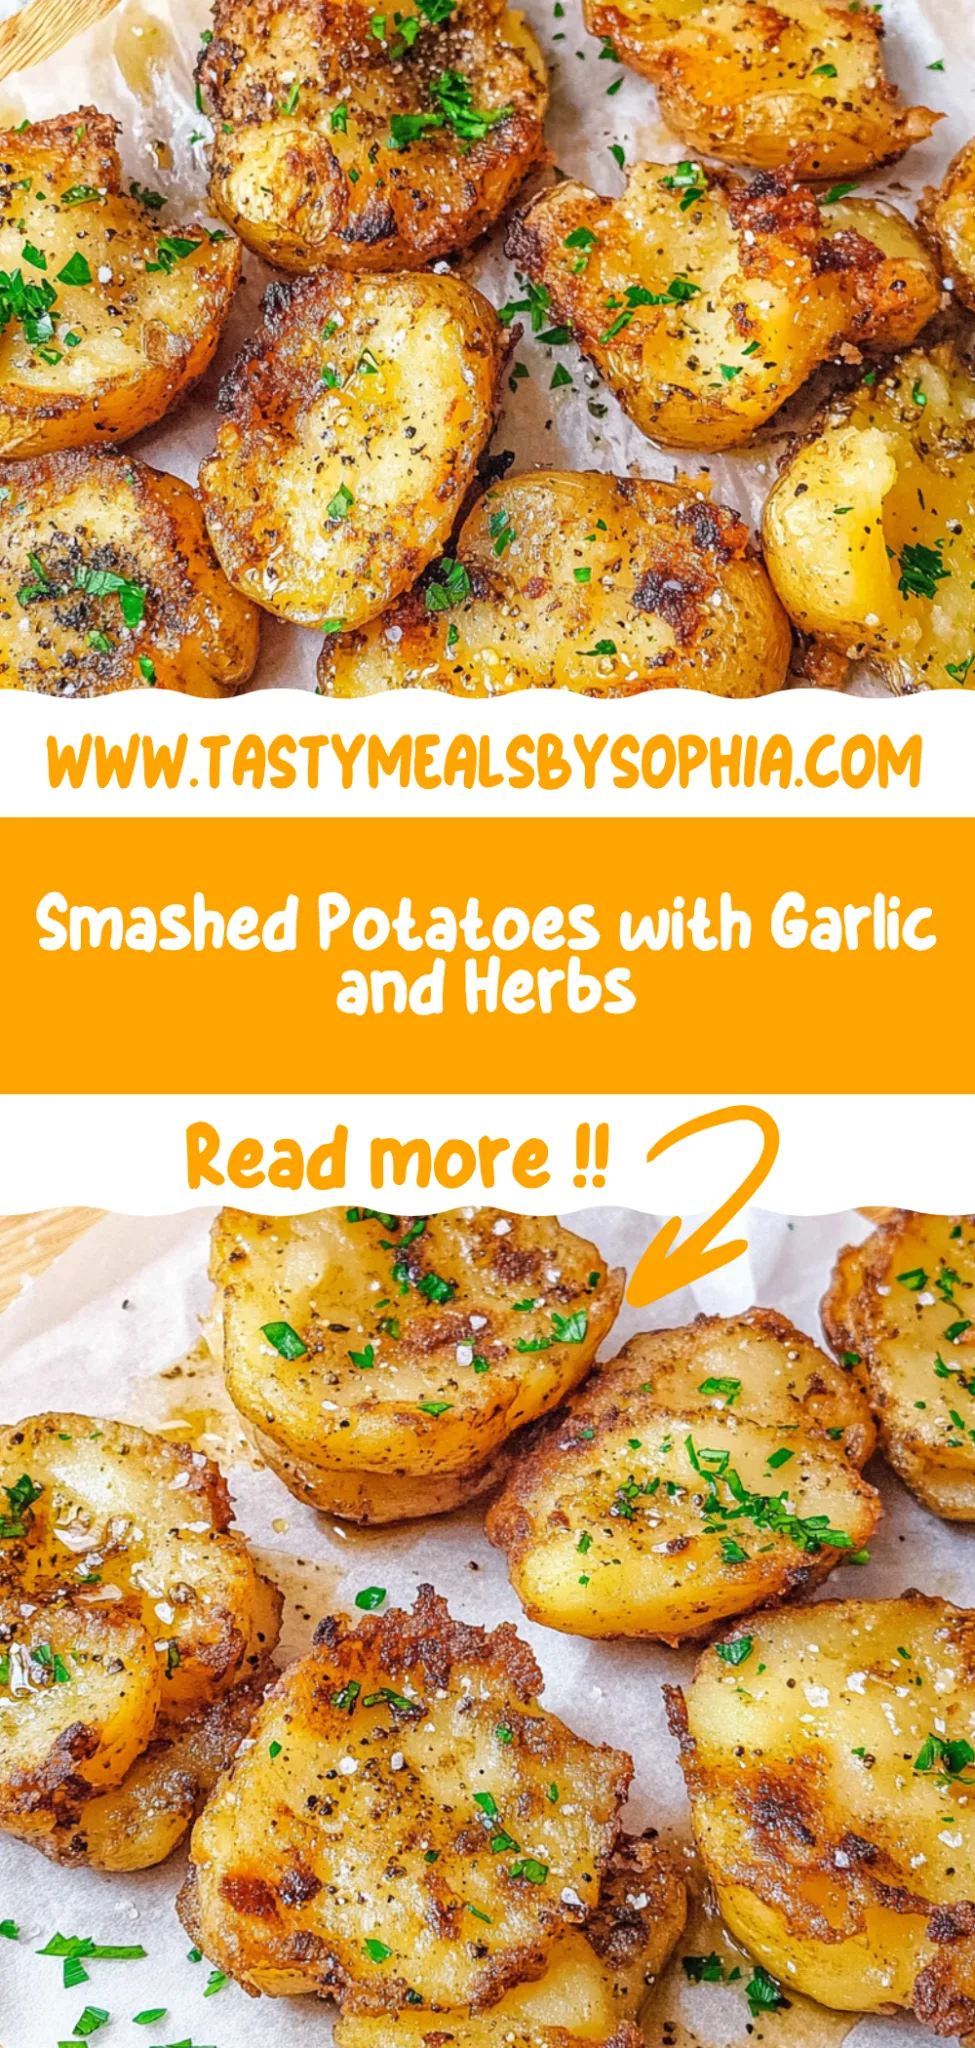
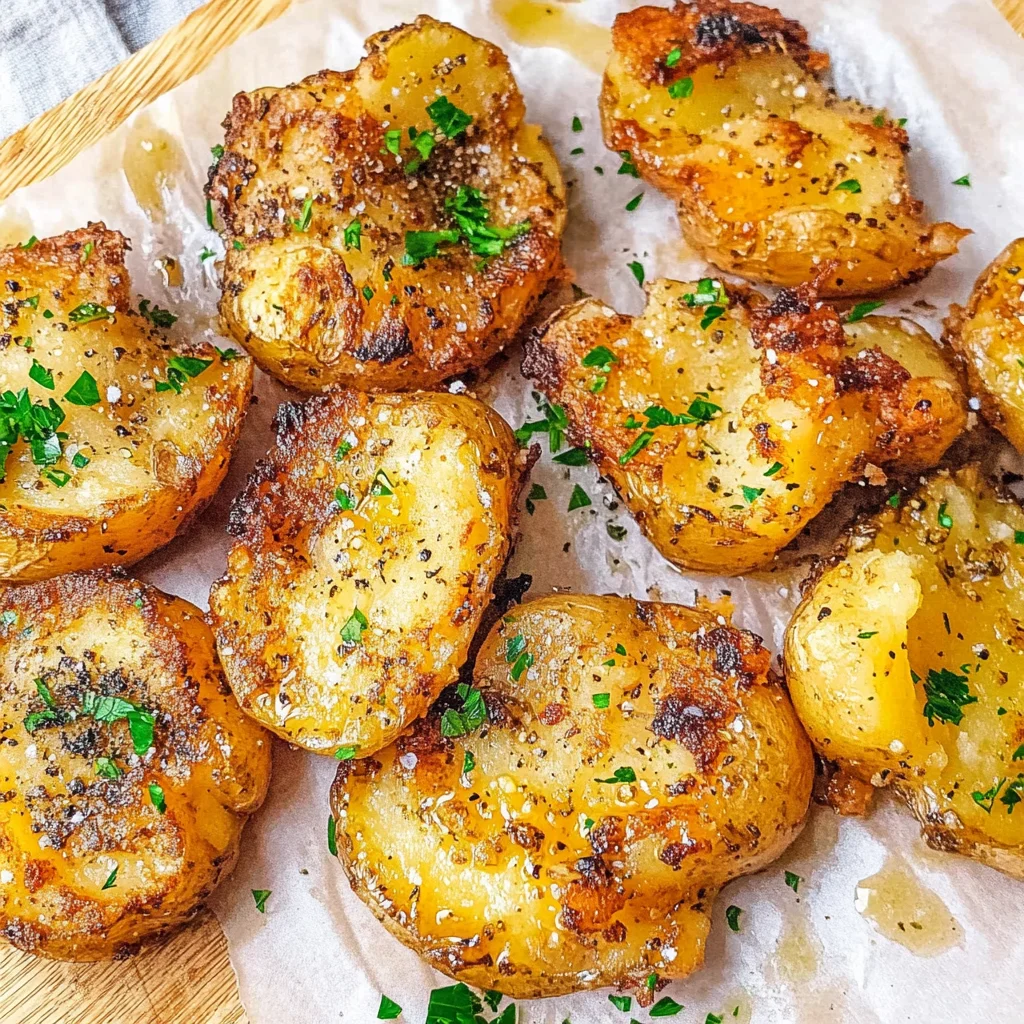
Smashed Potatoes: Crispy and Fluffy Perfection at Home
I first encountered the magic of smashed potatoes at a quaint little bistro tucked away in the heart of my favorite neighborhood. The moment I took my first bite, I was hooked—crispy on the outside, fluffy on the inside, they were everything a potato should aspire to be. I knew I had to recreate this dish at home, not only because it was a little pricey for a side but also because I was determined to make them even better. There’s just something about crafting your own version of a restaurant classic that feels so rewarding!
After several attempts and more than a few kitchen mishaps (let’s just say my early batches looked more like sad potato pancakes), I finally honed in on the perfect recipe. It took me about five tries before I got the balance just right—finding that sweet spot where the edges turn golden and crispy while keeping the insides delightfully fluffy. Each iteration was a lesson learned: adjusting cook times, tweaking temperatures, and yes, discovering how much smashing is too much smashing. Spoiler alert: there is definitely such a thing!
But all that trial and error? Totally worth it! These smashed potatoes turn out gloriously crunchy with an irresistible buttery flavor that’ll have everyone coming back for seconds (or thirds!). They’re not just a side dish; they’re an experience—perfectly seasoned with just the right amount of crispiness to satisfy any craving. So grab some spuds and let’s get smashing; you won’t regret it!
These Smashed Potatoes are….
….the ultimate side dish that will elevate any meal to a whole new level!
1. They deliver an irresistibly savory flavor with hints of garlic and rosemary, making every bite a taste sensation. The combination of fresh minced garlic and optional rosemary adds depth, transforming simple potatoes into a gourmet experience right at home.
2. Perfectly crispy texture on the outside with a fluffy interior that’s simply addictive. By smashing the baby potatoes before roasting, I found that they create more surface area for that golden crust while keeping the insides delightfully light and airy.
3. Smart cooking technique — boiling the potatoes before roasting is key to achieving that ideal combination of crunch and fluffiness. This method ensures they’re fully cooked through before hitting the oven, allowing for maximum crispiness as they roast in olive oil to perfection.
4. Incredible value — using just 2 pounds of baby potatoes makes this dish both budget-friendly and accessible. You can create a stunning side that rivals restaurant-quality dishes without breaking the bank, proving that comfort food can also be economical.
PS These Smashed Potatoes are perfect for gatherings or weeknight dinners, yielding enough servings to satisfy everyone at the table!
Gather These Ingredients
Each ingredient in this dish plays an essential role in flavor and texture. Here’s what you’ll need:
2 pounds baby potatoes (or small Yukon Gold potatoes): Provide a fluffy interior and crispy exterior when smashed.
3 tablespoons olive oil (for drizzling): Enhances crispiness and adds rich, savory flavor.
1 teaspoon salt (to taste): Elevates the natural flavors of the potatoes.
1 teaspoon black pepper (to taste): Introduces a subtle warmth and depth to the dish.
2 cloves garlic (minced): Infuses the potatoes with aromatic goodness.
1 tablespoon fresh rosemary (chopped, optional): Adds a fragrant herbal note that complements the potatoes beautifully.
You MUST Boil the Potatoes First! Trust Me on This One!
I know, I know—it adds time to the process, and who wants to wait for potatoes when you could just throw them in the oven? Believe me, I tried skipping this step, thinking I could save time. Spoiler alert: it didn’t work out. The result was a sad, undercooked heap of potato mush that even my dog turned his nose up at.
So why is boiling an absolute must? Think of it like pre-baking pizza dough: if you don’t give those potatoes a head start in boiling water, they won’t achieve that fluffy interior we all crave. The steam from boiling helps set the structure of the potatoes, ensuring they cook evenly and become irresistibly tender inside before they hit the oven for that glorious crispy exterior.
What does boiling do?
- Texture: Boiling makes the insides fluffy and light. Without it, you’ll end up with dense, gummy potatoes that just won’t smash well.
- Cooking Evenness: Boiling ensures every potato cooks uniformly. If you skip this step, you run the risk of some parts being overcooked while others remain hard.
- Moisture Retention: Proper boiling keeps moisture locked inside. Skipping it leads to dry smashed potatoes—nobody wants dry spuds!
- Flavor Absorption: When boiled in salted water, potatoes absorb that flavor deep into their core, making each bite deliciously savory.
- Crispy Exterior: The pre-cooked surface allows for better browning in the oven. Without boiling, the outside may not crisp up as beautifully as you’d like.
Different boiling times
- 10 minutes (good) — Potatoes are slightly tender but still firm; good for those who prefer a little bite.
- 15 minutes (better) — Fork-tender and ready to smash; this is where you want to be for optimal texture.
- 20 minutes (best) — Super soft and fluffy inside; perfect for a melt-in-your-mouth experience but be careful not to overcook!
- Beyond 20 minutes — Risk of falling apart; too mushy to hold their shape when smashing.
Be warned: the most common mistake is not boiling long enough. If your potatoes are still firm when you’re smashing them, you’re setting yourself up for disappointment. Don’t rush this step—trust me!
How to make Smashed Potatoes
Are you ready to see how straightforward it is to make the Smashed Potatoes of your dreams??
1. PREPARE THE POTATOES
Let’s get those potatoes ready for their transformation into crispy, fluffy bites!
Bold Action Step: WASH – Start by washing the baby potatoes thoroughly under cold running water. This will remove any dirt or debris that could affect the texture of your delicious smashed potatoes. Place the clean potatoes in a large pot, covering them with fresh water and adding a pinch of salt to enhance their flavor.
Bold Action Step: BOIL – Bring the pot of water to a boil over high heat and cook the potatoes for about 15-20 minutes, or until they’re fork-tender. You’ll know they’re done when you can easily pierce them with a fork but they still hold their shape. ❓ Why does this matter? Because properly cooked potatoes will smash beautifully without turning into mush!
HANDY TIPS
- For extra flavor, consider adding a bay leaf or garlic clove to the boiling water.
- If you’re using larger Yukon Gold potatoes, cut them in half before boiling for even cooking.
2. SMASH AND SEASON
Now comes the fun part—smashing and seasoning these little gems!
Bold Action Step: PREHEAT – Preheat your oven to 450°F (230°C). This high temperature is key for achieving that irresistible crispiness later on.
Bold Action Step: DRAIN – Once the potatoes are fork-tender, drain them in a colander and let them cool slightly for easier handling.
Bold Action Step: SMASH – On a baking sheet lined with parchment paper, place each potato and gently smash it with a potato masher until it flattens but remains intact. You want those crispy edges!
Bold Action Step: DRIZZLE AND SEASON – Drizzle the smashed potatoes generously with olive oil, then sprinkle with salt, pepper, minced garlic, and chopped rosemary if you’re feeling fancy. This combination brings out all the amazing flavors! 💡 TIP: Don’t be shy with the oil; it helps achieve that golden-brown crunch you crave.
HANDY TIPS
- If you prefer extra crispy edges, use a cast iron skillet instead of a baking sheet.
- Experiment with different herbs like thyme or parsley for varied flavors!
3. BAKE
Time to turn up the heat and watch those potatoes transform!
Bold Action Step: BAKE – Place your baking sheet in the preheated oven and bake for 20-25 minutes. Keep an eye on them; you’re looking for golden brown edges that signify perfect crispiness! ⚠️ Be careful when removing them from the oven; they will be hot!
Bold Action Step: COOL – Once baked to perfection, remove them from the oven and let them cool for a few minutes before serving. This cooling period allows the flavors to settle and makes handling easier!
HANDY TIPS
- For extra crunch, turn on the broiler for the last couple of minutes—just keep watch so they don’t burn!
- These smashed potatoes are best served immediately but can also be reheated in an oven or air fryer.
You’ve just created crispy on the outside, fluffy on the inside smashed potatoes that will steal the show at any meal! With just 45 minutes from start to finish, this delightful side dish is perfect alongside any main course. Make these once, and I wager they will invade your dreams every night too! – Nagi x
FAQ – Smashed Potatoes
🥔 How long will these smashed potatoes keep?
Smashed potatoes can be stored in the refrigerator for about 3-4 days. After that, they start to lose their crispy texture and flavor. If you keep them tightly sealed, they should retain about 90% of their quality on day 2 and drop to around 75% by day 4. To reheat, simply pop them back in the oven at a high temperature to regain some crispiness!
⏰ Do I need to let the potatoes cool before smashing them?
Yes, you really do! Letting the potatoes cool slightly after boiling makes them easier to handle and helps prevent burns. If they’re too hot, you might end up squeezing them too hard, which can lead to a mushy mess instead of those lovely smashed shapes. Aim for about 5 minutes of cooling time before smashing.
❄️ Can I freeze the smashed potatoes for later?
You absolutely can! To freeze, allow the smashed potatoes to cool completely first. Then, arrange them in a single layer on a baking sheet and freeze until solid—this prevents them from sticking together. Once frozen, transfer them into a freezer-safe bag or container. They’ll last about 2-3 months in the freezer. To reheat, bake straight from frozen at 425°F (220°C) for about 30-35 minutes, adding more oil if needed!
🌱 Are these smashed potatoes gluten-free?
Yes! The ingredients in this recipe are naturally gluten-free, making these smashed potatoes perfect for anyone avoiding gluten. Just make sure that any additional toppings or seasonings you might want to add are also gluten-free. Always check labels if you’re unsure!
🔄 Can I substitute olive oil with something else?
Definitely! While I love the flavor of olive oil, you can substitute it with other oils like avocado oil or melted butter if you prefer. Just keep in mind that different oils have distinct flavors:
- Avocado Oil: Mild flavor and high smoke point.
- Butter: Adds a rich taste but can burn if not monitored closely.
Experimenting is part of the fun—just stick with what you love!
🤔 Why do I need to smash the potatoes instead of just slicing them?
Smashing creates more surface area for crispiness while allowing steam to escape during baking, resulting in that perfect contrast between crispy edges and fluffy insides! Trust me; I’ve tested both methods extensively—smashed wins every time! You want those golden crispy bits; they’re where the magic happens.
🎨 Can I customize these smashed potatoes with different herbs or spices?
Absolutely! This recipe is super versatile. You can add various herbs such as thyme or parsley for a different flavor profile. If you’re feeling adventurous, try adding spices like paprika or chili flakes for a kick! Remember: freshness is key—fresh herbs will always give your dish an extra lift. Go wild and make it your own!
Troubleshooting
I will continue to add more to this Troubleshooting section as I start seeing questions coming through from people who have made the recipe.
Troubleshooting tips
“My smashed potatoes came out too thin! 😩”
- You may have smashed your potatoes too aggressively, flattening them beyond the desired thickness. Aim for a height of about 1.5 cm (0.5 inches) to maintain that perfect crispy texture.
- Alternatively, if your potatoes were smaller than recommended, they may not hold their shape as well when smashed. Stick with baby potatoes or small Yukon Golds for best results.
I bet they were still YUM though!
“My potatoes turned out too dry! 😢”
- If you overcooked your potatoes during boiling, they can lose moisture and become dry. Make sure to check for fork-tenderness at the 15-minute mark.
- Using too little olive oil when drizzling can also contribute to dryness. Ensure a good coating—3 tablespoons should do the trick!
I bet they were still YUM though!
“Why are my potatoes unevenly browned? 🔥”
- If you overcrowded the baking sheet, the potatoes might steam instead of roast, leading to uneven browning. Give them enough space to crisp up nicely!
- Not preheating your oven properly can also result in uneven cooking. Make sure it’s fully heated to 450°F (230°C) before placing your smashed potatoes inside.
I bet they were still YUM though!
“My smashed potatoes are misshapen and wonky! 🤷♀️”
- If you didn’t smash each potato evenly with a consistent pressure, it can lead to various shapes and sizes. Try using a gentle but firm pressure across all potatoes for uniformity.
- Additionally, if your potatoes are different sizes, some will cook faster than others. Keep an eye on them while baking!
I bet they were still YUM though!
Smashed Potatoes
Ingredients
Method
- Wash the baby potatoes thoroughly and place them in a large pot. Cover with water and add a pinch of salt.
- Bring the water to a boil and cook the potatoes for about 15-20 minutes, or until fork-tender.
- Preheat the oven to 450°F (230°C). Drain the potatoes and let them cool slightly.
- Place the potatoes on a baking sheet and gently smash each potato with a potato masher until flattened but still intact.
- Drizzle the smashed potatoes with olive oil, and sprinkle with salt, pepper, minced garlic, and rosemary if using.
- Bake in the preheated oven for 20-25 minutes, or until the edges are crispy and golden brown.
- Remove from the oven and let cool for a few minutes before serving.