Crispy Chicken Caesar Sandwich: Irresistibly Crunchy Delight
I first stumbled upon the idea for this Crispy Chicken Caesar Sandwich during an indulgent lunch outing at a cozy café that boasted a menu full of comfort food classics. The moment I bit into that crispy chicken paired with creamy Caesar dressing and crunchy romaine, I was hooked. It was one of those flavors that lingered in my mind long after I left, but let’s be real—eating out all the time isn’t exactly budget-friendly or convenient. So, I decided to take on the challenge of recreating this sandwich at home, armed with the desire to make it even better than the original.
What followed was a delightful mess of trial and error over several weekends. I lost track of how many batches of chicken I fried (let’s just say my smoke alarm got quite the workout), but each attempt taught me something new about achieving that perfect crunch and balance of flavors. My goal was simple: to nail down the juiciness of the chicken while ensuring every bite was packed with flavor—from the rich dressing to the salty Parmesan. Spoiler alert: it wasn’t as easy as it sounds!
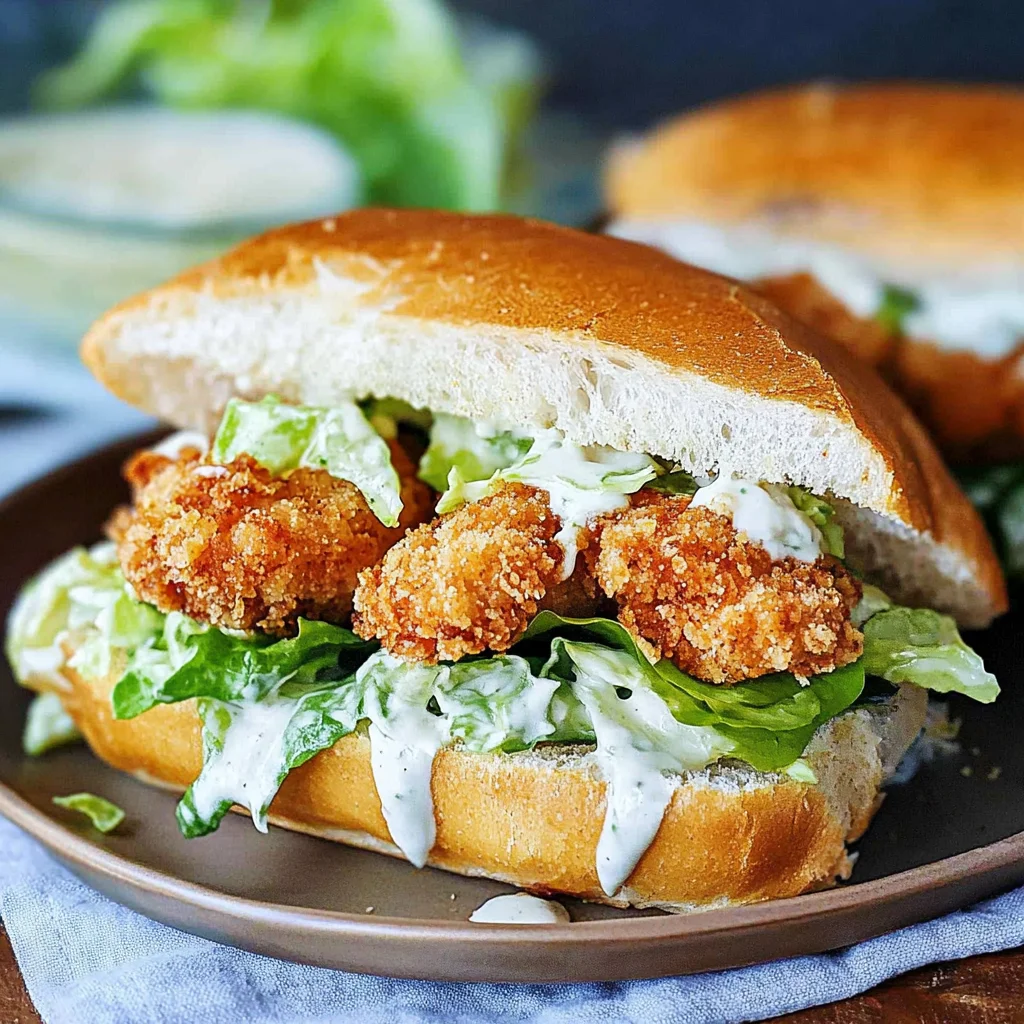
But oh boy, was it worth every crispy disaster! The final product is nothing short of heavenly—a delicious sandwich featuring perfectly crispy chicken, crisp romaine lettuce, and a luxuriously creamy Caesar dressing snugly tucked between warm, toasted bread. Each bite delivers an impressive crunch followed by a burst of savory flavor that’s hard to resist. Trust me; you’re going to want to whip up this Crispy Chicken Caesar Sandwich ASAP! I can’t wait for you to experience this blissful combination yourself!
These Crispy Chicken Caesar Sandwich are… the ultimate indulgence for any sandwich lover!
1. They deliver an explosive flavor that’s hard to resist, thanks to the buttermilk marinade infused with garlic powder. This step not only tenderizes the chicken but also allows the flavors to penetrate deep, making every bite a savory delight that’s bursting with taste.
2. The irresistible crunch comes from a double coating of flour and panko breadcrumbs. This method creates a golden, crispy shell around the juicy chicken breast, giving you that satisfying crunch when you take a bite — it’s like a symphony of textures in your mouth!
3. The secret technique lies in marinating the chicken in buttermilk before frying. This crucial step ensures that the chicken is not only flavorful but also incredibly moist, elevating it above ordinary fried chicken sandwiches. It makes all the difference in achieving that tender, juicy bite.
4. An incredible value can be found in making these sandwiches at home rather than ordering out. With just a few simple ingredients, you can create restaurant-quality Crispy Chicken Caesar Sandwiches for a fraction of the cost, plus they’re easily customizable to suit your taste.
PS These sandwiches are packed with flavor and texture! Make sure to serve them fresh so you can enjoy that perfect crunch along with the creamy Caesar dressing!
Ingredients for the Crispy Chicken Caesar Sandwich
Each ingredient in this dish plays an essential role in flavor and texture. Here’s what you’ll need:
Chicken
2 pieces chicken breasts (boneless, skinless): Provides a tender and juicy base for the sandwich.
1 cup buttermilk: Acts as a marinade to ensure the chicken is flavorful and moist.
1 cup all-purpose flour: Forms a crispy coating that enhances texture when fried.
1 cup panko breadcrumbs: Adds an extra crunch to the chicken’s exterior.
1 teaspoon salt: Enhances the natural flavors of the chicken.
1 teaspoon black pepper: Brings a subtle warmth and depth to the seasoning.
1 teaspoon garlic powder: Infuses a savory note that complements the chicken perfectly.
Sandwich Assembly
4 slices ciabatta bread (or your choice of bread): Offers a sturdy yet soft base for holding all the delicious fillings.
2 cups romaine lettuce (chopped): Provides a fresh and crunchy contrast to the crispy chicken.
1/2 cup Caesar dressing (store-bought or homemade): Delivers rich, creamy flavor that ties all elements together.
1/2 cup Parmesan cheese (shredded): Adds a salty and nutty finish that enhances each bite.
2 tablespoons olive oil: Used for toasting the bread, creating a golden, crispy crust.
Marinating the Chicken in Buttermilk is Non-Negotiable. Trust Me!
I’ll admit it: I tried to skip the buttermilk marination step when making this Crispy Chicken Caesar Sandwich. I mean, who has the time, right? But after a few less-than-satisfying attempts, I realized that there’s just no shortcut here. The result was far from the crunchy, juicy chicken sandwich I was aiming for — more like a sad little piece of poultry. So, trust me when I say you don’t want to skip this crucial step.
So why is marinating chicken in buttermilk so essential? Think of it as a cozy spa day for your chicken breasts. The acidity in the buttermilk tenderizes the meat, breaking down proteins and allowing it to absorb flavor. This means that after marinating, your chicken not only comes out juicier and more flavorful but also boasts that coveted crispy exterior when coated and fried. It’s like giving each bite a warm hug — you won’t understand until you try it!
What does marinating in buttermilk do?
- Flavor infusion — The buttermilk seeps into the chicken, enhancing its natural taste with a tangy richness that’s hard to replicate.
- Tenderness — The acid in buttermilk breaks down tough proteins, resulting in juicy chicken that won’t dry out during cooking.
- Crispiness — A well-marinated chicken creates a better surface for the flour and panko coating to adhere to, leading to an irresistible crunch.
- Moisture retention — The marination process helps the chicken retain moisture while frying, preventing it from becoming dry or rubbery.
- Golden color — Buttermilk helps achieve that inviting golden-brown crust on your chicken by promoting even browning during frying.
Different marinating times
- 30 minutes (good) — The bare minimum; your chicken will be somewhat tender but could use more flavor.
- 1 hour (better) — Noticeably improved flavor and tenderness; you can taste the difference!
- 2 hours (great) — Optimal soaking time where flavor really penetrates and texture improves significantly.
- Overnight (best) — Pure magic happens! Your chicken will be incredibly juicy and bursting with flavor; this is what crispy dreams are made of.
Just a heads up: the most common mistake is thinking that short marination times are sufficient. Don’t fall into this trap! Skipping adequate time in the buttermilk means sacrificing flavor and tenderness, leaving you with less-than-stellar results. Trust me on this one; you’ve been warned!
How to make Crispy Chicken Caesar Sandwich

Are you ready to see how straightforward it is to make the Crispy Chicken Caesar Sandwich of your dreams??
1. PREPARE THE CHICKEN
Let’s get that chicken marinating for incredible flavor and tenderness!
1. Marinate – Place the chicken breasts in a bowl and pour the buttermilk over them, ensuring they are fully submerged. Let them marinate for at least 30 minutes; this helps tenderize the chicken and infuse it with moisture. ❓ Why does this matter? Because buttermilk adds flavor and keeps your chicken juicy!
2. Mix Dry Ingredients – In a separate bowl, combine the flour, salt, black pepper, and garlic powder. This seasoning mix will add a delightful kick to your crispy coating!
3. Dredge Chicken – Remove each chicken breast from the marinade, allowing any excess buttermilk to drip off, then dredge them in the flour mixture until fully coated. Next, dip them into panko breadcrumbs, pressing gently to ensure an even coating for maximum crunch.
4. Cook Chicken – Heat olive oil in a frying pan over medium heat. Once hot, carefully place the chicken breasts in the pan and cook for 6-7 minutes on each side until golden brown and cooked through (the internal temperature should reach 165°F/75°C). You’ll know they’re done when they are beautifully crisp and golden!
HANDY TIPS
- For extra crunch, you can double-dip by dipping back into the flour mixture after coating with panko.
- If you want to keep things healthier, consider baking the chicken instead! Just spray with cooking oil and bake at 400°F (200°C) for about 20-25 minutes.
2. ASSEMBLE THE SANDWICH
Now comes the fun part—putting together your masterpiece!
5. Toast Bread – Toast your ciabatta bread slices in a toaster or on a baking sheet in the oven until lightly golden and crispy. This not only adds texture but also prevents sogginess from the dressing! 💡 TIP: Brush olive oil on the bread before toasting for an extra flavor boost!
6. Spread Dressing – Once toasted, spread Caesar dressing generously on the bottom slice of each piece of bread. It brings that creamy goodness right into every bite!
7. Layer Ingredients – On top of the dressing, layer with chopped romaine lettuce, followed by your perfectly crispy chicken pieces. Don’t forget to sprinkle shredded Parmesan cheese over the top for that classic Caesar touch!
8. Complete Sandwich – Finally, place the other slice of bread on top to finish your sandwich creation! Serve immediately while everything is still warm and inviting.
HANDY TIPS
- If you’re feeling adventurous, add some sliced tomatoes or crispy bacon for an elevated twist!
- For smaller sandwiches (perfect for parties!), cut each ciabatta slice into halves or quarters before assembling.
Make these once, and I wager they will invade your dreams every night too! – Nagi x
FAQ – Crispy Chicken Caesar Sandwich
🍗 How long will these sandwiches keep in the fridge?
These Crispy Chicken Caesar Sandwiches are best enjoyed fresh, but they can be stored in the fridge for up to 2 days. After that, the quality starts to decline significantly—about 80% as good on day 2, and by day 3, it’s down to around 65%. To keep them fresher longer, consider storing the components separately and assembling them right before eating.
⏰ Can I skip marinating the chicken in buttermilk?
No, you cannot skip marinating the chicken! Trust me, I’ve tried. Marinating for at least 30 minutes (or even overnight if you have time) is crucial for tender and flavorful chicken. The buttermilk not only helps to tenderize the meat but also adds a delicious tang that enhances the overall flavor of your sandwich.
❄️ Can I freeze the chicken for this recipe?
Yes, you can freeze the cooked crispy chicken! Once cooled, wrap it tightly in plastic wrap or aluminum foil and place it in an airtight container. It will keep well for about 2-3 months. When you’re ready to enjoy, thaw it overnight in the fridge and reheat on a skillet until heated through. Just a quick note: reheating may not retain that crispy texture as well, so I suggest broiling it briefly to crisp it back up.
🌾 Can I make this sandwich gluten-free?
Absolutely! To make a gluten-free version of this Crispy Chicken Caesar Sandwich, substitute the all-purpose flour with a gluten-free flour blend and use gluten-free panko breadcrumbs. For your choice of bread, there are many excellent gluten-free options available nowadays—just check your local grocery store or bakery!
🥛 What can I use instead of buttermilk?
If you don’t have buttermilk on hand, you can easily make a substitute! Mix 1 cup of milk (whole or low-fat) with 1 tablespoon of vinegar or lemon juice, let it sit for about 5-10 minutes until it thickens slightly. This will mimic buttermilk’s acidity and help achieve similar results in terms of flavor and tenderness.
🔍 Why do I need to dredge the chicken in flour before frying?
Dredging the chicken in flour serves several purposes: it creates a moisture barrier that helps keep the chicken juicy while frying, enhances adhesion for the panko breadcrumbs (which gives that glorious crunch), and helps achieve that beautiful golden-brown color when cooked. Skipping this step? Well, you might end up with soggy coating—and nobody wants that!
🥗 Can I add other toppings or ingredients to this sandwich?
Absolutely! This sandwich is super customizable. You can add things like crispy bacon for extra flavor, sliced tomatoes for freshness, or even avocado slices for creaminess. If you’re feeling adventurous, try swapping out romaine lettuce with arugula or spinach for a different green profile—just remember to balance those flavors so they complement each other nicely!
🤔 How many times did you test this recipe before sharing?
I lost count after my sixth batch! 😅 Each time was an exploration into achieving that perfect crunch while keeping the chicken juicy inside. It took quite a bit of tweaking—different frying times and methods—to ensure every bite is absolutely delightful. So rest assured, I’ve got your back on this one!
Troubleshooting
I will continue to add more to this Troubleshooting section as I start seeing questions coming through from people who have made the recipe.
Troubleshooting tips
“My chicken turned out dry and tough! 😭”
- If your chicken breasts were overcooked, they can become dry and tough. Make sure to monitor the cooking time closely, aiming for a golden brown color and an internal temperature of 165°F (75°C).
- Using chicken breasts that are too thin can also lead to dryness. Try to use breasts that are about 1 inch thick; if yours are thinner, reduce the cooking time.
- Lastly, if you skipped marinating in buttermilk or didn’t marinate long enough, it won’t have had the chance to tenderize the chicken properly. I bet they were still YUM though!
“My bread was soggy instead of toasted! 🤦♀️”
- If you didn’t toast the ciabatta bread long enough or at a high enough temperature, it won’t get crispy. Aim for a nice golden color; it usually takes about 2-3 minutes in a toaster or oven.
- Spreading too much Caesar dressing on the bread before toasting can make it soggy. Try using just enough to coat lightly, and then add more after to assemble the sandwich. I bet they were still YUM though!
“My chicken didn’t get crispy! 😔”
- Not using enough oil in the frying pan can prevent your chicken from getting that desirable crunch. Make sure there’s enough oil to cover the base of the pan adequately.
- If you overcrowded the pan while frying, that can also lead to steaming instead of frying. Fry in batches if necessary to ensure each piece has room to crisp up nicely. I bet they were still YUM though!
“The panko coating fell off my chicken! 😱”
- If you didn’t press down firmly enough when coating with panko breadcrumbs, they might not stick well. Make sure to gently press them onto the marinated chicken for a better grip.
- Another common issue is using wet hands while breading; this can create clumps and prevent even coating. Ensure your hands are dry when handling the coated chicken. I bet they were still YUM though!
Crispy Chicken Caesar Sandwich
Ingredients
Method
- Marinate the chicken breasts in buttermilk for at least 30 minutes.
- In a bowl, mix flour, salt, pepper, and garlic powder.
- Dredge the marinated chicken in the flour mixture, then coat with panko breadcrumbs.
- Heat oil in a frying pan over medium heat and cook the chicken for 6-7 minutes on each side until golden brown and cooked through.
- Toast the ciabatta bread slices in a toaster or on a baking sheet in the oven.
- Spread Caesar dressing on the bottom slice of each toasted bread.
- Layer with chopped romaine lettuce, crispy chicken, and sprinkle with Parmesan cheese.
- Top with the other slice of bread and serve immediately.