Classic Christmas Toffee: Sweet Holiday Delight at Home
I first fell in love with toffee during a holiday visit to a charming little café that boasted the most decadent treats. The moment I tasted their Classic Christmas Toffee, I was hooked. It was rich, buttery, and topped with chocolate and nuts—pure bliss! But as I crunched into that delightful morsel, a thought struck me: could I recreate this magic at home? With the holidays around the corner, I wanted to share something special without breaking the bank or relying on those overpriced store-bought versions.
After several attempts—okay, maybe more than several; let’s just say my kitchen looked like a candy war zone—I finally nailed it! It took me about four weekends of testing, tweaking temperatures, and trying to perfect the timing. Each attempt was an adventure (and sometimes a disaster), as I aimed for that ideal balance of buttery richness and crunchy texture. At one point, I nearly set off the smoke alarm with my first batch—oops! But hey, that’s how you learn, right?
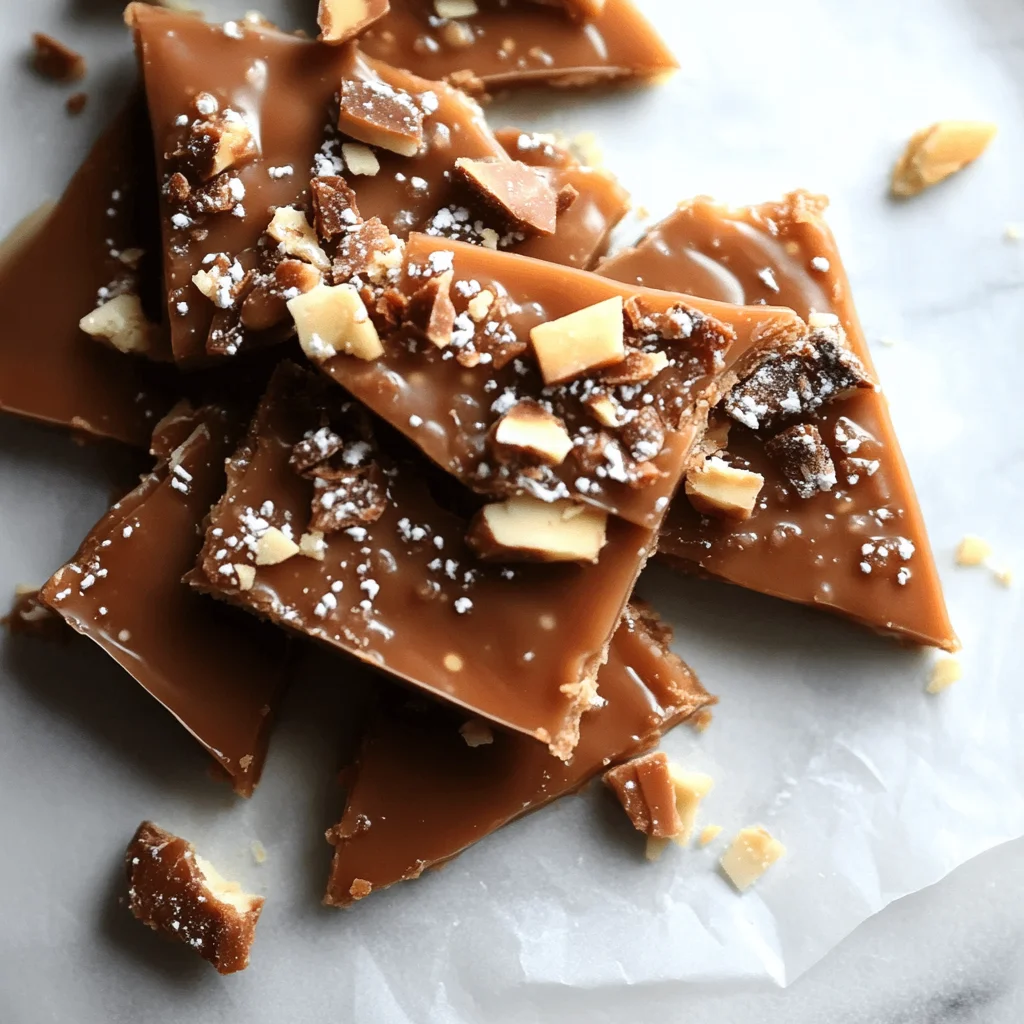
The payoff was absolutely worth every sticky mishap. My Classic Christmas Toffee turned out beautifully: a luscious layer of toffee enveloped in silky chocolate and sprinkled with crunchy nuts. It’s got this irresistible melt-in-your-mouth quality that makes it perfect for gifting—or sneaking bites of when no one’s looking! So grab your apron and get ready to impress your friends and family with this festive treat; trust me, they’ll be begging for the recipe!
These Classic Christmas Toffee are… the ultimate holiday treat that everyone will love!
1. They deliver an irresistible buttery flavor that truly captures the essence of Christmas. The combination of unsalted butter and granulated sugar creates a rich caramelization, resulting in a toffee that is both sweet and deeply satisfying—perfect for holiday snacking or gifting.
2. Perfectly crunchy texture – each bite offers a delightful contrast between the crispy toffee layer and the smooth chocolate topping. This is achieved by cooking the toffee mixture until it reaches the hard crack stage, ensuring a satisfying crunch that doesn’t lose its integrity even after sitting out.
3. Elevated technique – mastering the art of toffee making lies in precise temperature control. By using a candy thermometer, I ensure that the mixture reaches exactly 300°F (hard crack stage), which gives this Classic Christmas Toffee its signature snap and prevents it from becoming sticky or chewy over time.
4. Incredible value – making your own toffee at home is not only cost-effective but also allows you to customize your ingredients. With just a handful of pantry staples like butter, sugar, and chocolate, you can create batches of this decadent treat that rival store-bought versions, all while saving money and enjoying the satisfaction of homemade goodness.
PS These Classic Christmas Toffee yield about 24 pieces, making them perfect for sharing during the festive season!
Ingredients for the Classic Christmas Toffee
Each ingredient in this dish plays an essential role in flavor and texture. Here’s what you’ll need:
- 1 cup unsalted butter (cut into pieces): Provides a rich, creamy base that enhances the toffee’s buttery flavor.
- 1 cup granulated sugar: Sweetens the toffee and helps achieve that perfect crunchy texture.
- 1/4 cup water: Aids in cooking the sugar evenly, preventing crystallization.
- 1/4 teaspoon salt: Balances the sweetness and elevates the overall flavor profile.
- 1 teaspoon vanilla extract: Adds a warm, aromatic note that complements the toffee beautifully.
- 1 cup semi-sweet chocolate chips: Melts into a luscious layer that adds richness and sweetness.
- 1/2 cup chopped nuts (such as almonds or pecans): Introduces a delightful crunch and nutty flavor.
You MUST use a candy thermometer. Seriously!
I’ll be honest — when I first tackled this Classic Christmas Toffee, I thought I could wing it without a candy thermometer. I figured, “How hard can it be to know when toffee is done?” Well, after a few burnt batches and some very confused taste testers (sorry, friends!), I learned the hard way that skipping this step is not an option.
The science behind using a candy thermometer is straightforward but essential. Toffee needs to reach exactly 300°F (the hard crack stage) for that perfect crunchy texture. If you don’t hit that temperature, you risk ending up with either sticky goo or overly hard toffee that’s impossible to bite through — think of it like trying to make pizza dough without measuring the yeast; you just can’t achieve that perfect rise!
What does using a candy thermometer do?
- Consistent texture — Ensures the toffee reaches the hard crack stage, giving you that satisfying crunch.
- Improved flavor — Cooking to the right temperature caramelizes the sugar perfectly, enhancing its rich buttery flavor.
- Optimal color — A precise temperature yields a beautiful golden hue, making your toffee visually appealing for gifting.
- Shelf life — Properly cooked toffee has a longer shelf life as it’s less likely to absorb moisture and become sticky.
- Controlled melting of chocolate — Knowing when to pour ensures your chocolate melts beautifully on top without burning.
Different cooking temperatures
- Below 250°F (poor) — The sugar hasn’t caramelized enough; texture is chewy and not crunchy.
- 250°F – 275°F (fair) — Approaching the right consistency but still too soft; results in grainy texture.
- 300°F (perfect) — Ideal hard crack stage achieved; results in crunchy, melt-in-your-mouth goodness!
- 325°F or higher (risk) — Overcooked; may burn and turn bitter, resulting in an unpleasant flavor and texture.
Be warned: The most common mistake? Ignoring the thermometer! Trust me, I tried guessing the temperature once or twice… Let’s just say my “toffee” ended up as sweetened charcoal! Don’t make my mistake; use a candy thermometer for guaranteed success.
How to make Classic Christmas Toffee

Are you ready to see how straightforward it is to make the Classic Christmas Toffee of your dreams??
1. PREPARE THE BAKING SHEET
Get your workspace ready for some deliciously sweet magic!
1. Line – Start by lining a baking sheet with parchment paper and set it aside. This will prevent the toffee from sticking and make cleanup a breeze!
HANDY TIPS
- Use a baking sheet that fits comfortably in your fridge if you plan to chill the toffee after it’s made; this will speed up the cooling process.
2. COOK THE TOFFEE
Now it’s time to create that irresistible buttery goodness!
2. Combine – In a heavy-bottomed saucepan, combine the unsalted butter, granulated sugar, water, and salt. Cook over medium heat, stirring constantly until the mixture reaches a boil, which should take about 5 minutes.
3. Cook – Once boiling, continue to cook without stirring until the mixture reaches 300°F (hard crack stage) on a candy thermometer—this usually takes around 10–15 minutes. You’ll know it’s ready when it turns a lovely golden amber color!
4. Remove – Carefully remove from heat and stir in the vanilla extract for that warm, aromatic touch that makes all the difference!
5. Pour – Quickly pour the hot toffee onto the prepared baking sheet, using a spatula to spread it evenly across the surface.
HANDY TIPS
- Keep an eye on your thermometer; reaching 300°F is crucial for achieving that perfect crunchy texture!
- If you’re feeling adventurous, try adding a pinch of cinnamon or nutmeg along with the vanilla for an extra festive kick!
3. ADD TOPPINGS
It’s time to elevate your toffee with some chocolatey goodness!
6. Sprinkle – Immediately sprinkle the semi-sweet chocolate chips over the hot toffee. Allow them to sit for about 5 minutes until they melt beautifully into a luscious layer of chocolate.
7. Press – Once melted, use a spatula to spread the chocolate evenly over the entire surface of the toffee. Then sprinkle your chopped nuts over the melted chocolate and gently press them in so they stick well.
HANDY TIPS
- For an extra touch of flavor, toast those nuts before adding them on top; it brings out their natural oils and enhances their crunchiness!
- Experiment with different nuts like pecans or hazelnuts for unique flavors!
4. COOL AND BREAK
Patience is key as we let our creation set!
8. Cool – Let the toffee cool completely at room temperature until hardened, which will take about 1 hour—resist any temptation to rush this part!
9. Break – Once cooled and firm, break the toffee into pieces of your desired size and store them in an airtight container.
HANDY TIPS
- Want uniform pieces? Use a sharp knife or break them gently with your hands—either way works wonders!
- Store in a cool place away from sunlight; proper storage keeps your classic Christmas toffee fresh for weeks!
That’s it! You’ve just created an indulgent treat perfect for holiday gifting or enjoying yourself—a delightful balance of crunchy, sweet, and nutty flavors! Make these once, and I wager they will invade your dreams every night too! – Nagi x
FAQ – Classic Christmas Toffee
❓ How long will this toffee keep?
Classic Christmas Toffee can be stored in an airtight container at room temperature for up to 2 weeks. After the first week, it may start to lose its crunchiness, but I find it still retains about 90% of its flavor and quality on day 10. If you’re planning to keep it longer, consider refrigerating it, but be aware that refrigeration can introduce moisture and soften the toffee slightly.
⏳ Do I need to chill the toffee before adding toppings?
No, you cannot skip letting the toffee cool before adding the toppings! After pouring the hot toffee onto the parchment-lined baking sheet, allow it to cool for about 1 hour until hardened. This cooling period is crucial because it ensures that the chocolate melts properly and adheres well when you sprinkle on those delicious chopped nuts. Trust me; I’ve made this mistake before, and it’s not pretty!
❄️ Can I freeze Classic Christmas Toffee?
Absolutely! You can freeze the toffee for up to 3 months. Once cooled and broken into pieces, wrap each piece tightly in plastic wrap or aluminum foil and place them in a freezer-safe bag or container. When you’re ready to enjoy your toffee again, simply thaw it at room temperature for a couple of hours. Just remember not to refreeze after thawing—nobody likes a second-rate candy!
🌾 Is there a gluten-free option for this recipe?
Yes, Classic Christmas Toffee is naturally gluten-free! The ingredients used—unsalted butter, sugar, water, salt, vanilla extract, chocolate chips, and nuts—do not contain gluten. Just ensure that any chocolate chips you choose are labeled gluten-free if you’re serving someone with celiac disease or gluten sensitivity.
🔄 Can I substitute the unsalted butter with margarine?
No, I really don’t recommend substituting unsalted butter with margarine in this recipe. Butter has a unique composition that contributes significantly to the flavor and texture of the toffee. Margarine often contains water and other additives that can alter how the candy cooks and sets—trust me; I’ve tried it multiple times with disappointing results!
🤔 Why do I need a heavy-bottomed saucepan for cooking the toffee?
Using a heavy-bottomed saucepan is essential because it distributes heat evenly across the bottom. This helps prevent hot spots that could lead to burning the sugar mixture while cooking. If you use a thin pan instead, you risk uneven heating which can cause your beautiful toffee to scorch or not reach the desired hard crack stage of 300°F reliably. So grab that trusty heavy-bottomed saucepan—it’s worth it!
🍫 Can I add different nuts or toppings?
Definitely! While almonds and pecans are delicious options for topping your Classic Christmas Toffee, feel free to get creative! You could try walnuts for a softer bite or even crushed peppermint candies for a festive twist. Just remember that whatever nuts or add-ins you choose should complement the rich buttery flavor of the toffee without overpowering it—experimenting is half the fun!
Troubleshooting
I will continue to add more to this Troubleshooting section as I start seeing questions coming through from people who have made the recipe.
Troubleshooting tips
“My toffee is too thin and spread out! 😩”
- You may have poured the toffee onto the baking sheet too quickly without letting it reach the proper temperature of 300°F. If it’s not hot enough, it won’t set correctly and will spread too much.
- Make sure your butter, sugar, and water mixture is boiling vigorously before you stop stirring, allowing it to reach that hard crack stage.
- I bet it was still YUM though!
“My toffee turned out grainy! 😭”
- This could be due to sugar crystallization, which often happens if you stir the mixture once it’s boiling. Once it reaches a boil, avoid stirring; just let it do its thing!
- Additionally, ensure that you are using granulated sugar and not brown sugar, as brown sugar can contribute to graininess.
- I bet it was still YUM though!
“The chocolate didn’t melt properly on top! 😕”
- If your toffee isn’t hot enough when you sprinkle the chocolate chips on top, they won’t melt smoothly. Make sure the toffee is bubbling hot when you add them.
- Also, if you used a very cold or refrigerated baking sheet, this might have caused the chocolate to seize rather than melt.
- I bet it was still YUM though!
“My toffee has an uneven surface and looks wonky! 😳”
- This can happen if you don’t spread the toffee evenly on the baking sheet before it cools. It’s essential to work quickly after pouring so that you achieve an even layer.
- If the mixture is setting too fast while you’re spreading it, consider working with smaller batches next time for better control.
- I bet it was still YUM though!
Classic Christmas Toffee
Ingredients
Method
- Line a baking sheet with parchment paper and set aside.
- In a heavy-bottomed saucepan, combine the butter, sugar, water, and salt. Cook over medium heat, stirring constantly until the mixture reaches a boil.
- Continue to cook without stirring until the mixture reaches 300°F (hard crack stage) on a candy thermometer.
- Remove from heat and stir in the vanilla extract.
- Quickly pour the toffee onto the prepared baking sheet and spread it evenly.
- Sprinkle the chocolate chips over the hot toffee. Allow them to sit for a few minutes until melted, then spread the chocolate evenly over the toffee.
- Sprinkle the chopped nuts over the melted chocolate and gently press them in.
- Let the toffee cool completely at room temperature until hardened, about 1 hour.
- Once cooled, break the toffee into pieces and store in an airtight container.