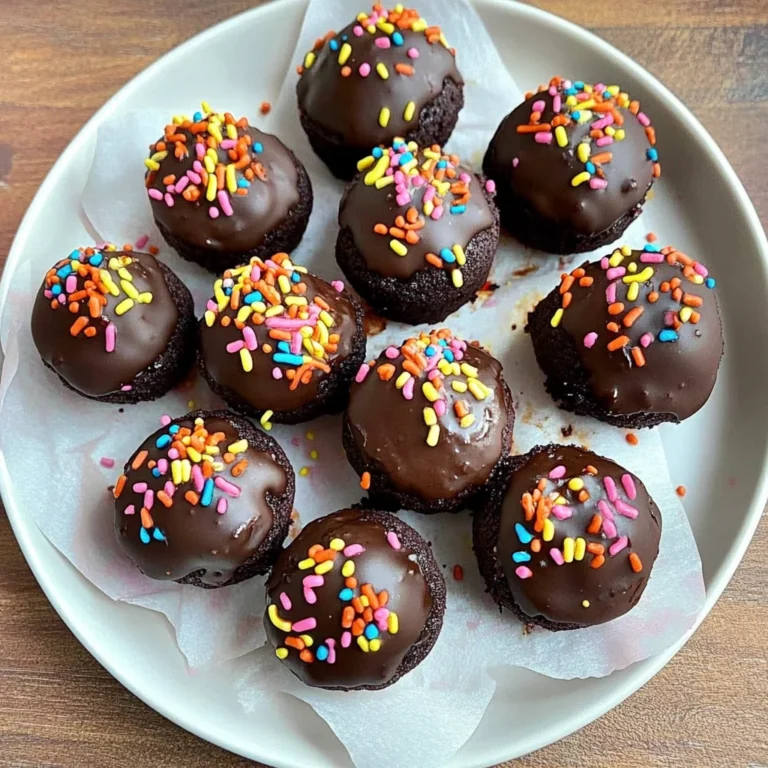
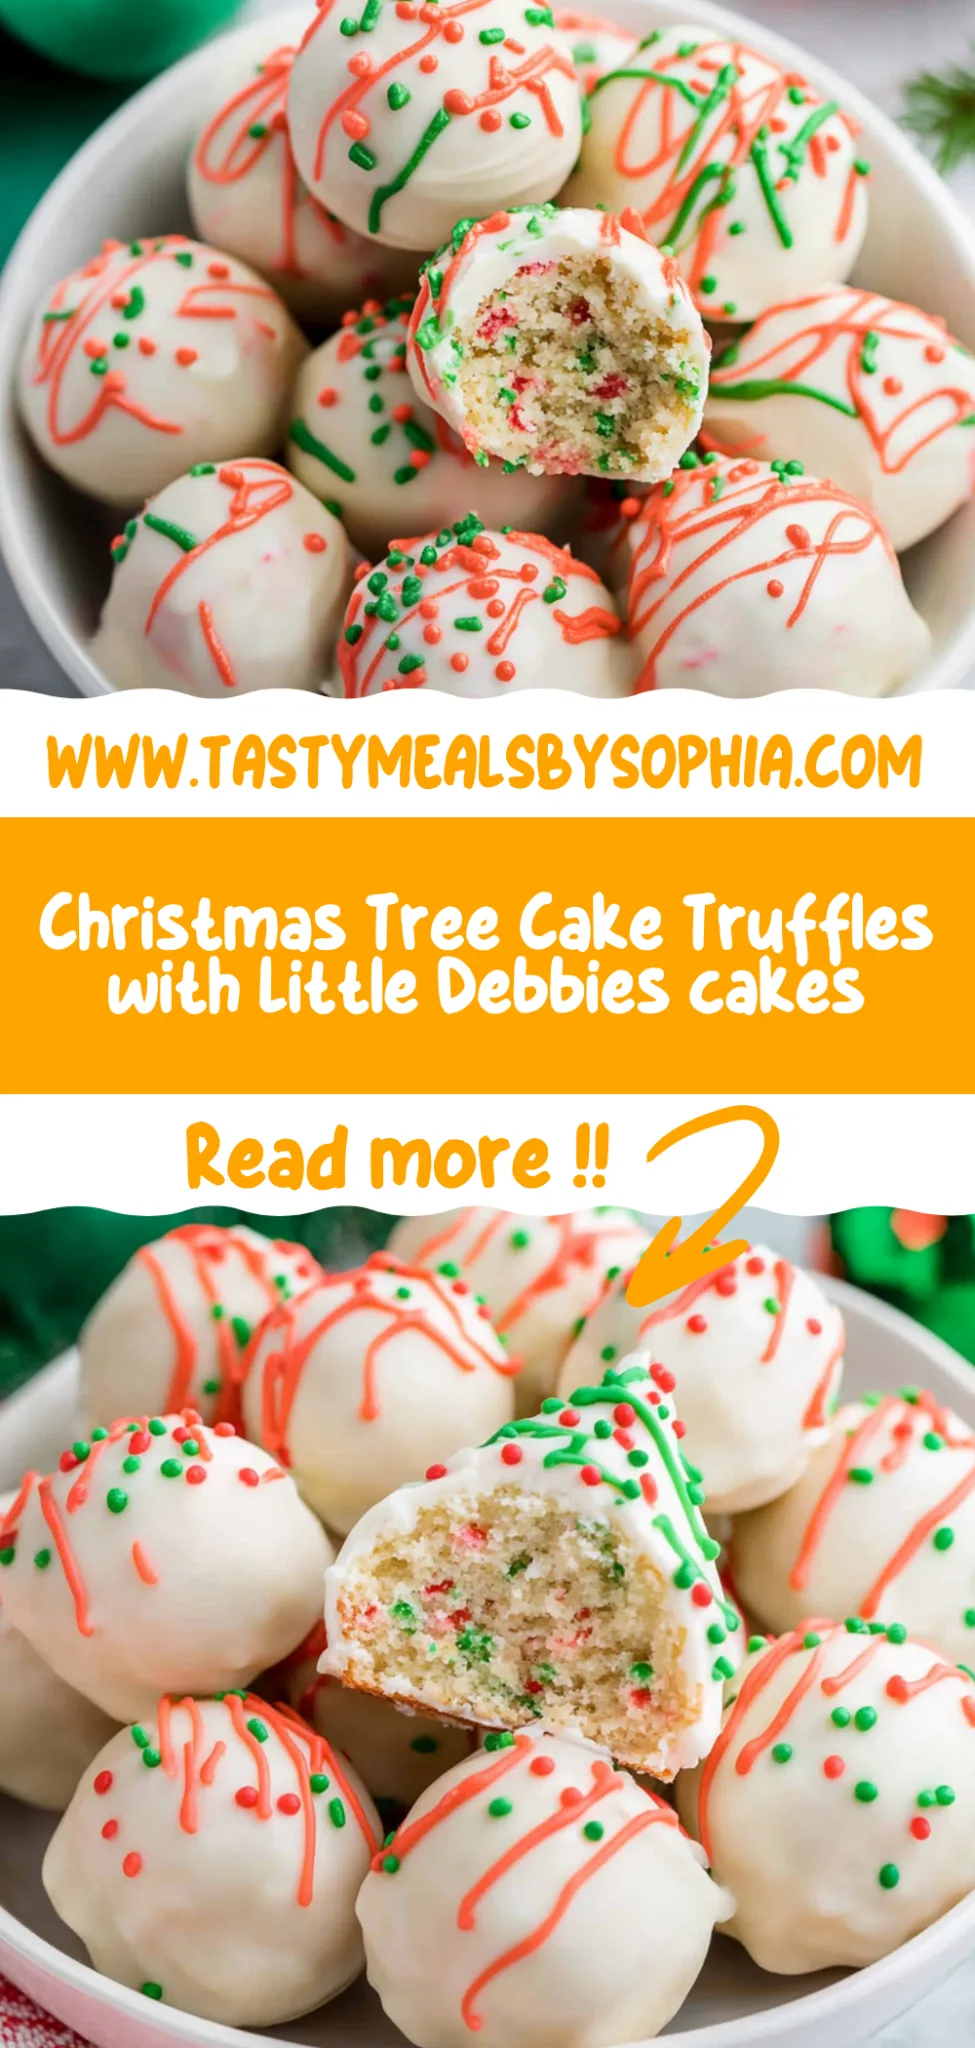
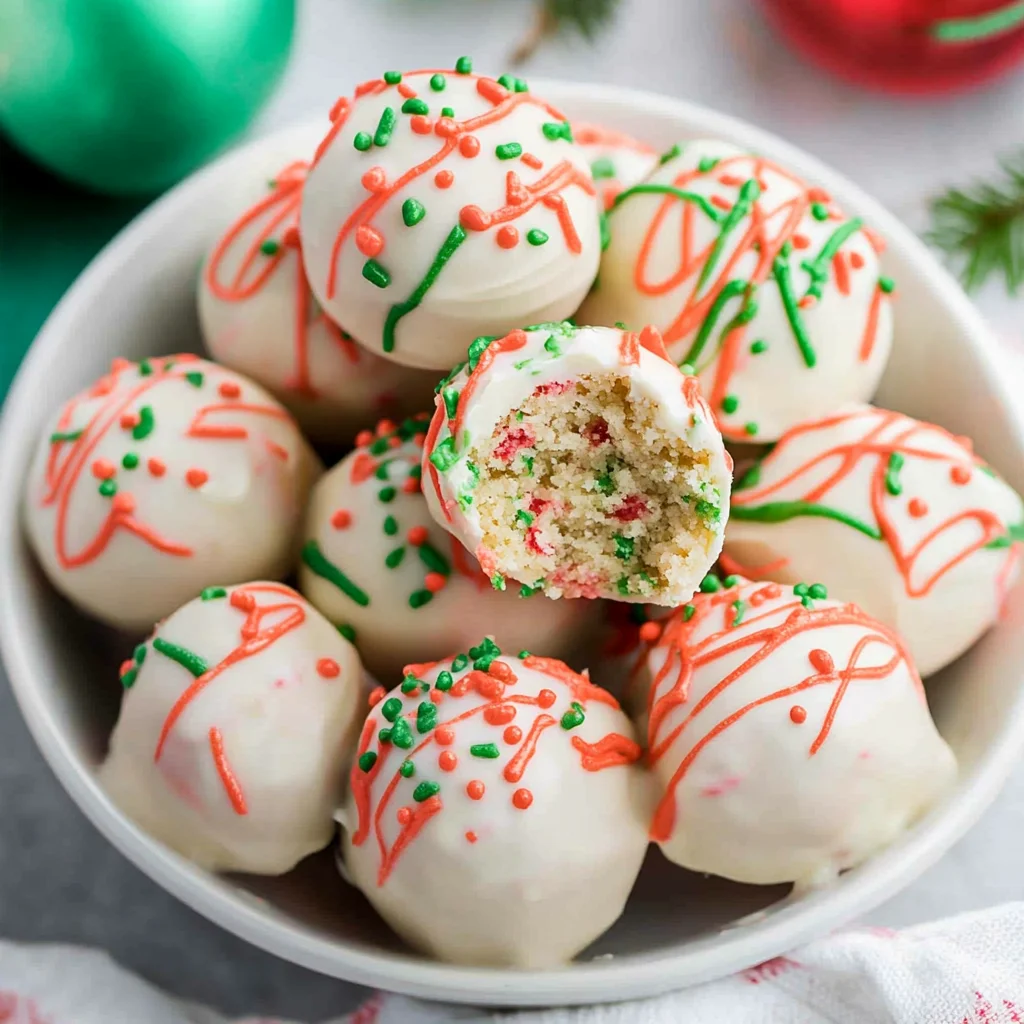
Christmas Tree Cake Truffles with Little Debbies: Irresis…
I’ll never forget the first time I stumbled upon Little Debbie Christmas Tree Cakes. It was during a holiday gathering, and those adorable, festive treats were practically flying off the table! The soft cake, creamy filling, and that delightful layer of icing took me straight back to my childhood. I couldn’t shake the idea of turning these nostalgic snacks into something even more indulgent, and thus, the quest for Christmas Tree Cake Truffles with Little Debbies cakes began! Let’s be real—why buy them when you can make a batch at home that’s even better (and probably cheaper)?
Let me tell you, perfecting this recipe was no walk in the park. I went through five different attempts over the span of a week—my kitchen looked like a sugar bomb exploded! Each iteration had its own little hiccups; the first batch was too crumbly, while another one turned out more like a gooey mess than a truffle. But as I tinkered with ratios and techniques, I finally honed in on that ideal balance of flavor and texture that would make anyone swoon over these truffles. Who knew recreating a childhood favorite could be so much trial and error?
But oh boy, was it worth every mishap! The final result is nothing short of magical: rich and decadent truffles that melt in your mouth with every bite, boasting that signature taste of Little Debbie Christmas Tree Cakes. They’re beautifully festive, have an irresistible creamy center, and hold their shape surprisingly well at room temperature—perfect for sharing at any holiday gathering! If you’re looking to impress your friends or just indulge your sweet tooth (or both!), you’ve got to give these truffles a try. Trust me; they’ll be gone before you know it!
These Christmas Tree Cake Truffles with Little Debbies cakes are…
….the ultimate festive treat that will have everyone coming back for seconds!
1. They deliver an irresistibly sweet flavor that captures the essence of Christmas in every bite. The crumbled Little Debbie Christmas Tree Cakes provide a nostalgic combination of vanilla cake and creamy frosting, creating a delightful burst of holiday cheer that’s undeniably addictive.
2. Decadent texture – a perfect balance of creamy and crumbly. The truffle base, made from those iconic cakes, ensures you experience a soft, melt-in-your-mouth sensation while the outer white chocolate coating adds just the right amount of smoothness, making these truffles an absolute joy to eat.
3. They showcase a simple yet effective technique that makes these truffles stand out. By combining crumbled Little Debbie cakes with melted chocolate, I found that the process not only binds the ingredients beautifully but also enhances the flavors, ensuring that each truffle is packed with the classic taste we all love.
4. Incredible value – these truffles are both fun to make and budget-friendly! Using just two packages of Little Debbie Christmas Tree Cakes as the base means you can whip up a delightful batch without breaking the bank, making them a fantastic option for holiday gatherings or gift-giving.
PS These truffles yield about 20 pieces, so they’re perfect for sharing at your next holiday party or as sweet treats for friends and family!
Ingredients for the Christmas Tree Cake Truffles with Little Debbies cakes
Each ingredient in this dish plays an essential role in flavor and texture. Here’s what you’ll need:
2 packages Little Debbie Christmas Tree Cakes (crumbled): Provides a festive, sweet base that captures the essence of holiday treats.
1 cup white chocolate chips: Melts down to create a creamy coating that envelops the truffles in sweetness.
1 tablespoon vegetable oil: Helps to thin the melted chocolate, ensuring an even and smooth coating.
2 tablespoons sprinkles: Adds a cheerful and festive touch for decoration, making these truffles as delightful to look at as they are to eat.
You Must Crumble and Mix Thoroughly — No Skimping!
I confess, I tried to cut corners with the crumbling and mixing step. I thought, “Surely there’s a way to rush this!” But after several attempts that resulted in less-than-perfect truffles, I realized there are no shortcuts here. Trust me; your taste buds will thank you for taking the time to do it right!
When you crumble the Little Debbie Christmas Tree Cakes thoroughly and mix them well, you’re not just creating a base; you’re ensuring that every bite of these truffles is packed with flavor and texture. Think of it like making the perfect cookie dough—if the ingredients aren’t combined properly, you end up with inconsistencies in taste and texture. A well-mixed truffle base means each bite is as delightful as the last!
What does thorough crumbling and mixing do?
- Flavour: Ensures even distribution of flavors from the cakes, giving each truffle a consistent sweet, vanilla taste.
- Texture: Fine crumbs create a smoother, creamier truffle filling that melts in your mouth.
- Moisture: Proper mixing helps retain moisture from the cakes, preventing dry spots that can ruin your truffles.
- Shape: A well-combined mixture binds together better, resulting in perfectly round truffles that hold their shape.
- Appearance: Uniform consistency leads to a more appealing look once dipped in chocolate—no lumpy or uneven surfaces here!
Different crumbling and mixing times
- 1 minute (good) — The crumbs are still chunky; expect uneven texture and flavor distribution throughout the truffle.
- 3 minutes (better) — The mixture is fairly fine but might have some larger pieces; flavor starts to improve but isn’t fully integrated.
- 5 minutes (great) — Crumbs are mostly fine and well mixed; truffles will be smoother but could still benefit from more attention.
- 8 minutes or more (best) — Achieves the ultimate smoothness and consistency; every bite is perfectly blended with full flavor.
Be warned: Skipping or rushing this crucial step can lead to uneven flavors and textures in your truffles. If you don’t crumble and mix thoroughly, you might end up with some bites that are overwhelmingly sweet while others taste bland. Don’t make my mistake!
How to make Christmas Tree Cake Truffles with Little Debbies cakes
Are you ready to see how straightforward it is to make the Christmas Tree Cake Truffles with Little Debbies cakes of your dreams??
1. PREPARE THE TRUFFLE MIXTURE
Let’s kick things off by transforming those festive cakes into a delightful truffle base!
1. Crumble – Take the two packages of Little Debbie Christmas Tree Cakes and crumble them into a mixing bowl. Use your hands or a fork to break them down into fine pieces, ensuring there are no large chunks left. You want the mixture to have a consistent texture for the best results!
2. Mix – Combine the crumbled cakes thoroughly until you achieve a uniform consistency. This will create a solid base for your truffles, and it should resemble moist cake crumbs that hold together when pressed.
HANDY TIPS
- For an extra festive twist, try mixing in some finely chopped nuts or crushed candy canes into the truffle base!
- Ensure that your hands are clean and dry when handling the mixture to prevent it from becoming too sticky.
2. FORM THE TRUFFLES
Time to shape these delicious bites of holiday cheer!
3. Form – With clean hands, take small portions of the truffle mixture and roll them into balls about 1 inch in diameter. This size is perfect for popping into your mouth during those holiday gatherings!
4. Place – Carefully arrange the formed truffles on a baking sheet lined with parchment paper, giving each piece enough space to breathe.
HANDY TIPS
- If you find the mixture too crumbly, let it sit for a few minutes; the moisture from the cake will help bind it together.
- To ensure uniformity, consider using a small cookie scoop for consistent sizing!
3. MELT THE CHOCOLATE
Let’s prepare that silky smooth coating that will make these truffles truly irresistible!
5. Melt – In a double boiler or microwave-safe bowl, combine 1 cup of white chocolate chips with 1 tablespoon of vegetable oil. Heat gently until melted and smooth, stirring frequently to avoid scorching. The vegetable oil helps thin out the chocolate for easier dipping!
HANDY TIPS
- Make sure not to overheat the chocolate; if using a microwave, start with 30-second intervals!
- You can also use colored candy melts if you want to add some vibrant hues to your truffles.
4. COAT THE TRUFFLES
Now comes the fun part—dipping these little gems in chocolate!
6. Dip – One by one, take each truffle and dip it into the melted chocolate, ensuring it’s completely coated all around. A fork works well for this step—just lift and gently tap off any excess chocolate before placing it back on the baking sheet.
7. Sprinkle – While the chocolate is still wet, add your festive sprinkles on top so they stick well before the coating sets.
HANDY TIPS
- Don’t skip this sprinkle step; they add that extra holiday flair!
- If you prefer a more rustic look, you can drizzle some additional melted chocolate over the coated truffles instead of rolling them in sprinkles.
5. CHILL AND SERVE
Almost there—just a little patience required!
8. Refrigerate – Pop the baking sheet in the refrigerator and chill your truffles for at least 15 minutes, or until the chocolate hardens completely. This will ensure they maintain their shape when served!
9. Serve – Once set, take them out of the fridge and serve chilled at your next festive gathering; watch how quickly they disappear!
Make these once, and I wager they will invade your dreams every night too! – Nagi x
FAQ – Christmas Tree Cake Truffles with Little Debbies cakes
How long will these truffles keep?
The truffles will stay fresh in the fridge for about 5 days. After that, I’d say their quality starts to dip significantly—down to about 80% as good on day 6 and around 65% by day 7. To maximize their shelf life, make sure they’re stored in an airtight container. If you notice any weird smells or textures, just toss them. Remember, no one likes a stale truffle!
❄️ Do I really have to chill? YES YOU DO.
Yes, chilling is essential! After coating the truffles in melted chocolate, refrigerate them for at least 15 minutes to allow the chocolate to set properly. Skipping this step can lead to messy truffles as the chocolate won’t harden correctly, and trust me, no one wants a chocolate puddle instead of a delightful treat.
Can I freeze these truffles for later?
Absolutely! You can freeze these truffles for up to 3 months. To do this, arrange them on a baking sheet lined with parchment paper and freeze until solid. Once frozen, transfer them to an airtight container or freezer bag. When you’re ready to enjoy them again, simply thaw them in the fridge overnight. They’ll taste just as delightful!
🌾 Can these be made gluten-free?
Unfortunately, these truffles can’t be made gluten-free due to the Little Debbie Christmas Tree Cakes containing wheat flour. However, if you want a gluten-free alternative, I recommend making your own cake base using gluten-free cake mix and following the same steps for crumbling and forming into truffles. It may take some tweaking, but it’s totally doable!
Can I substitute milk chocolate instead of white chocolate?
You can certainly use milk chocolate if you’d like! Just keep in mind that it will change the flavor profile significantly—milk chocolate is sweeter and creamier compared to white chocolate’s pure sweetness. If you do choose milk chocolate, melt it carefully as it can seize up more easily than white chocolate. Also, adjust your oil slightly; you might find you need a bit less since milk chocolate tends to be creamier.
Why do I need to crumble the Little Debbie cakes so fine?
Crumbling the Little Debbie cakes finely ensures that they mix well with each other and form a cohesive mixture when rolling into truffles. If the crumbs are too chunky, you might end up with unevenly formed truffles that aren’t as smooth when biting into them. Trust me on this—I learned from experience after trying it with bigger chunks once (it did not go well)!
Can I add flavor variations or mix-ins?
Definitely! You can customize these truffles by adding in ingredients like crushed peppermint candy for a minty twist or even some finely chopped nuts for added texture. Just remember not to overload your mixture; keeping it balanced is key so that they still hold together nicely when formed into balls! Feel free to experiment—it’s part of the fun!
Troubleshooting
I will continue to add more to this Troubleshooting section as I start seeing questions coming through from people who have made the recipe.
Troubleshooting tips
“My truffles are flat and not round! 😩”
- Your truffle mixture might be too wet, which can happen if the Little Debbie Christmas Tree Cakes are overly crumbled or if they contain too much moisture. Make sure to crumble them finely but not to the point of adding extra liquid.
- If your hands are too warm while forming the truffles, it can cause them to flatten as you shape them. Try chilling your hands in cold water for a few minutes before rolling.
I bet they were still YUM though!
“The chocolate coating is too thick and clumpy! 😳”
- Not using enough vegetable oil when melting the white chocolate chips can lead to a thick coating that doesn’t adhere well. Be sure to add that tablespoon of vegetable oil to help thin it out!
- If the chocolate has cooled down too much before dipping, it can start to harden and become clumpy. Keep it warm while you work — a gentle heat is key!
I bet they were still YUM though!
“My truffles are too dry and crumbly! 😢”
- If your truffle mixture is dry, you may not have mixed the crumbled Little Debbie cakes enough, leading to uneven moisture distribution. Ensure everything is well combined and moist throughout.
- Using stale cakes could also lead to dryness in your truffles. Fresh cakes provide better moisture and flavor, so always check those dates!
I bet they were still YUM though!
“The chocolate coating cracked! 😱”
- If your chocolate was overheated during melting, it can seize, causing cracks once it cools on the truffles. Always melt slowly over a double boiler or in short bursts in the microwave.
- Dipping cold truffles directly into warm chocolate may cause thermal shock and lead to cracking. Allow them to come closer to room temperature before dipping.
I bet they were still YUM though!
Christmas Tree Cake Truffles with Little Debbies cakes
Ingredients
Method
- Crumble the Little Debbie Christmas Tree Cakes into a mixing bowl.
- Mix until the crumbs are fine and well combined.
- Using your hands, form the mixture into small balls, about 1 inch in diameter.
- Place the truffles on a baking sheet lined with parchment paper.
- In a double boiler or microwave-safe bowl, melt the white chocolate chips with vegetable oil until smooth.
- Dip each truffle into the melted chocolate, ensuring it is fully coated.
- Return the coated truffles to the baking sheet and sprinkle with decorations before the chocolate sets.
- Refrigerate the truffles for at least 15 minutes to set the chocolate.
- Serve chilled and enjoy your festive treat!