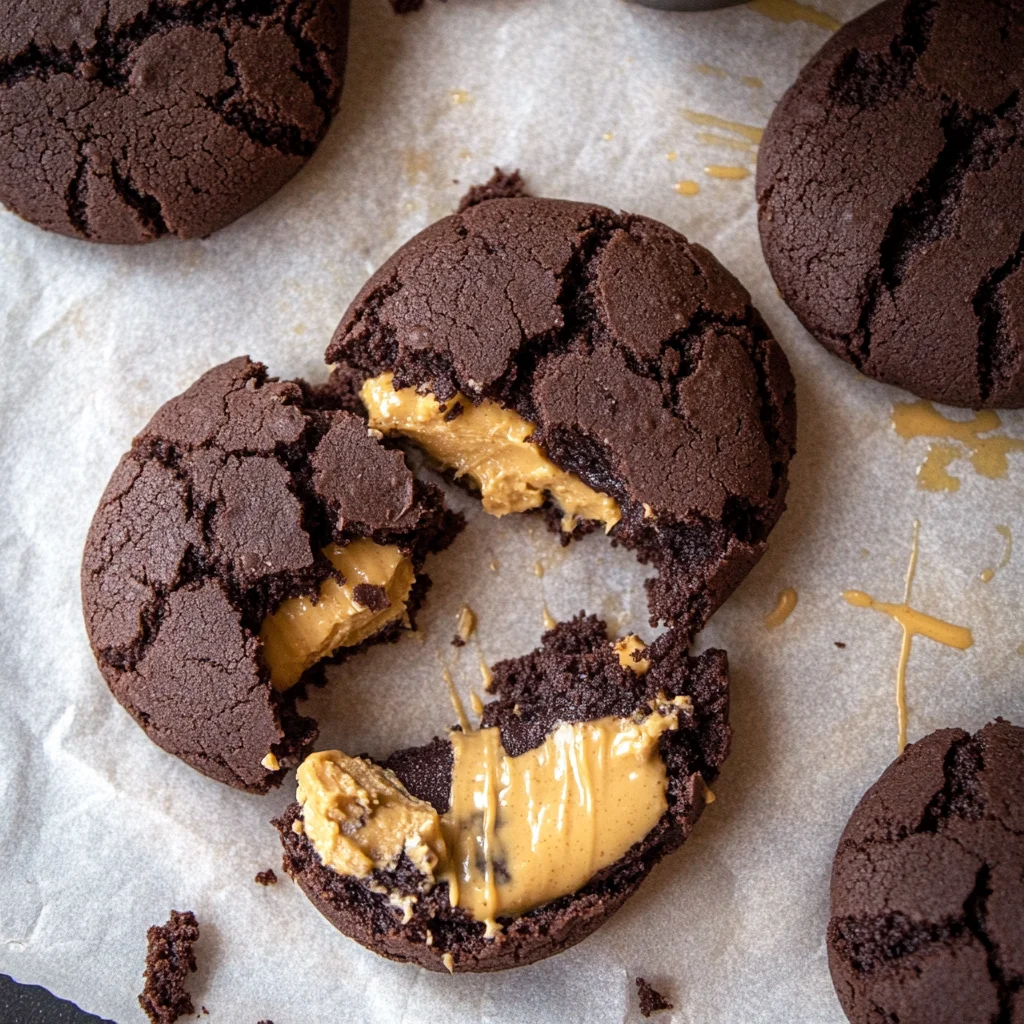
Chocolate Peanut Butter Filled Cookies: Sweet Indulgence …
I first stumbled upon the idea of Chocolate Peanut Butter Filled Cookies during a late-night dessert craving that simply wouldn’t quit. I was at a cozy little café, and they had a cookie that was soft, warm, and filled with the most divine chocolate peanut butter center. It was such a delightful surprise that I couldn’t help but think, “I’ve got to recreate this magic at home!” The thought of saving some cash while conjuring up this sweet indulgence in my own kitchen felt like a challenge I couldn’t resist.
After several attempts that ranged from cookie splatters on my kitchen walls to more than one batch ending up as sad, crumbly excuses for cookies, I finally found my rhythm. I spent what felt like an eternity tweaking the ratios of flour, sugar, and just the right amount of creamy peanut butter until I nailed down the perfect texture. Seriously, at one point, I almost declared myself the queen of cookie flops! But each iteration brought me closer to those dreamy little morsels of joy that I first fell in love with.
But let me tell you, it was all worth it! The final result is nothing short of heavenly—deliciously soft cookies filled with a creamy chocolate peanut butter center that practically melts in your mouth. They’re not just tasty; they boast an incredible balance of rich flavor and delightful texture that keeps you reaching for just one more (or maybe three). So grab your apron and get ready to indulge in these Chocolate Peanut Butter Filled Cookies; trust me, you won’t regret it!
These Chocolate Peanut Butter Filled Cookies are….
…an absolute dream come true for cookie lovers everywhere!
1. They deliver a decadent flavor explosion that perfectly balances rich chocolate and creamy peanut butter. The combination of semi-sweet chocolate chips and luscious peanut butter creates an indulgent center that elevates the cookie from ordinary to extraordinary, making each bite a delightful treat.
2. Incredible texture – soft, chewy cookies with a melt-in-your-mouth filling. The use of both granulated and brown sugars in the dough not only adds sweetness but also contributes to the perfect mix of a slightly crisp exterior while the inside remains delectably soft, ensuring an unforgettable eating experience.
3. A simple yet effective technique is the chilling of the dough before baking. This crucial step helps to control spread and ensures that each cookie retains its thicker shape, resulting in a perfect ratio of cookie to that heavenly chocolate peanut butter filling.
4. Budget-friendly indulgence — these cookies are a fraction of the cost of store-bought gourmet cookies. With accessible ingredients like unsalted butter, eggs, and pantry staples, you can whip up a batch of these Chocolate Peanut Butter Filled Cookies at home without breaking the bank while enjoying their fresh-baked goodness.
PS These cookies yield about 24 generous servings, making them perfect for sharing or indulging throughout the week!
Ingredients for the Chocolate Peanut Butter Filled Cookies
Each ingredient in this dish plays an essential role in flavor and texture. Here’s what you’ll need:
- 1 cup unsalted butter (softened): Provides a rich, creamy base for the cookie dough.
- 1 cup granulated sugar: Contributes sweetness and helps achieve a light texture.
- 1 cup brown sugar (packed): Adds moisture and a hint of caramel flavor.
- 2 large eggs: Binder that adds moisture and richness to the dough.
- 1 teaspoon vanilla extract: Enhances the overall flavor with its warm notes.
- 3 cups all-purpose flour: Creates structure and body for the cookies.
- 1 teaspoon baking soda: Acts as a leavening agent for a soft, chewy texture.
- 1 teaspoon salt: Balances sweetness and intensifies the flavors.
Chill That Filling! You Won’t Regret It
I know, I know—chilling the peanut butter filling for 15 minutes sounds like an unnecessary step that adds to your baking time. I thought I could skip it too, but after a few rounds of testing, I quickly learned that this little wait is a game-changer. Trust me, I tried to cheat my way through this, and let’s just say my first batch looked more like peanut butter puddles than cookies!
So why is chilling the filling so crucial? Think of it as letting the flavors mingle at a party—when you give those ingredients time to come together in the fridge, the peanut butter thickens up, making it easier to scoop and shape into perfect little balls. If you skip this step, you’re left with a gooey filling that can escape from your cookies during baking, leading to an unholy mess instead of those delightful chocolate-peanut butter surprises.
What does chilling do?
- Texture: Chilling firms up the filling, making it easier to handle without oozing out while baking.
- Flavor: The brief chill allows the powdered sugar to dissolve slightly into the peanut butter, enhancing its sweetness and creaminess.
- Stability: A chilled filling holds its shape better when baked inside the soft cookie dough, preventing leaks.
- Mouthfeel: The cold filling creates a contrast with the warm cookie exterior, giving each bite a delightful creamy center.
- Control: Helps maintain the integrity of the cookie’s structure, ensuring they bake evenly without collapsing.
Different chilling times
- 5 minutes (okay) — Filling is slightly firmer but still quite gooey; expect some leakage during baking.
- 15 minutes (good) — Ideal for a balanced texture; filling holds its shape well without sacrificing flavor.
- 30 minutes (better) — Filling becomes more manageable and even thicker; less risk of oozing out while baking.
- 1 hour (best) — Optimal firmness achieved; cookies bake perfectly with no surprises!
Be warned: skipping or rushing this chilling process is a rookie mistake! You’ll end up with cookies that might look delicious on the outside but have all their peanut butter goodness leaking out onto your baking sheet. No one likes a sad cookie!
How to make Chocolate Peanut Butter Filled Cookies

Are you ready to see how straightforward it is to make the Chocolate Peanut Butter Filled Cookies of your dreams??
1. PREPARE THE FILLING
Let’s get that gooey center ready for these delicious cookies!
1. COMBINE – In a mixing bowl, combine creamy peanut butter and powdered sugar until smooth. Stir in the semi-sweet chocolate chips until evenly distributed. This creates a rich filling that will melt in your mouth!
2. CHILL – Chill the filling in the refrigerator for about 15 minutes to firm up. This step is crucial as it helps the filling maintain its shape when baked, preventing any ooze.
HANDY TIPS
- If you want to add a bit of saltiness, consider using crunchy peanut butter for added texture.
- Want a sweeter filling? Adjust the powdered sugar to taste!
2. MAKE THE COOKIE DOUGH
Now, let’s whip up the buttery cookie dough that will hug that scrumptious filling!
3. PREHEAT – Preheat the oven to 350°F (175°C). This ensures your cookies bake evenly and reach that perfect golden brown color.
4. CREAM – In a large mixing bowl, cream together the softened unsalted butter, granulated sugar, and brown sugar until light and fluffy, about 3-4 minutes. This step incorporates air into the mixture for a lighter cookie texture!
5. ADD EGGS – Add eggs one at a time, mixing well after each addition. Stir in vanilla extract until fully combined; this adds depth of flavor to your cookies.
6. WHISK DRY INGREDIENTS – In another bowl, whisk together flour, baking soda, and salt. Gradually add this dry mixture to the wet mixture, mixing until just combined. Be careful not to overmix — you want soft cookies!
HANDY TIPS
- Make sure your butter is at room temperature; this helps achieve that fluffy texture.
- For added flavor complexity, consider adding a dash of cinnamon or espresso powder.
3. ASSEMBLE AND BAKE
This is where the magic happens — assembling those beautiful cookies!
7. SCOOP – Using a cookie scoop, drop a tablespoon of cookie dough onto a baking sheet lined with parchment paper. You should have enough dough for about 30 cookies!
8. INDENT – Make a small indentation in the center of each dough ball and fill with about a teaspoon of the chilled peanut butter filling. Don’t worry if it looks messy; it’ll all come together in baking!
9. COVER – Cover the filling with another tablespoon of cookie dough, sealing the edges carefully so that no filling escapes during baking — we want every bite filled with goodness!
10. BAKE – Bake in the preheated oven for 10-12 minutes or until the edges are lightly golden but still soft in the center — they’ll firm up as they cool!
11. COOL – Allow cookies to cool on the baking sheet for 5 minutes before transferring them to a wire rack to cool completely. This helps them set without falling apart.
HANDY TIPS
- Smaller cookies? They work beautifully too; just roll them into balls instead of discs and bake for an additional minute or two.
- If you prefer thicker cookies, chill your assembled dough balls for another 15 minutes before baking.
That’s it — you’ve just created these delightful Chocolate Peanut Butter Filled Cookies that are sure to impress! With their soft exterior and creamy interior, each bite will be pure bliss—perfect for sharing or keeping all to yourself (no judgment here!). Make these once, and I wager they will invade your dreams every night too! – Nagi x
FAQ – Chocolate Peanut Butter Filled Cookies
How long will these cookies keep?
These cookies can be stored in an airtight container at room temperature for about 3-4 days. After that, they start to lose their soft texture and flavor, dropping to about 85% quality by day 5. If you want to extend their shelf life, refrigerating them can keep them fresh for up to a week, retaining around 90% of their deliciousness. Just make sure they are well-sealed to prevent them from drying out!
❄️ Do I really have to chill the filling? YES YOU DO.
Yes, chilling the peanut butter filling is non-negotiable! It firms up the mixture, making it much easier to handle when filling your cookies. If you skip this step, you might end up with a gooey mess instead of a delightful center. A 15-minute chill in the refrigerator is usually enough time, but if you’re in a hurry, even 10 minutes can help. Trust me on this one — your future self will thank you!
Can I freeze these cookies for later?
Absolutely! These cookies freeze beautifully. After baking and cooling them completely, place them in a single layer on a baking sheet and freeze until solid. Then transfer them to an airtight container or freezer bag, separating layers with parchment paper. They can be kept frozen for up to 3 months. When you’re ready to enjoy them, simply thaw at room temperature for about an hour or pop them in a warm oven for a few minutes to restore that freshly baked softness.
🌾 Can these be made gluten-free?
Yes! To make these cookies gluten-free, substitute the all-purpose flour with a high-quality gluten-free flour blend that includes xanthan gum (if it’s not already included). I’ve tested it using Bob’s Red Mill Gluten Free 1-to-1 Baking Flour, which worked perfectly. Just be mindful that the texture might differ slightly — they might be a touch drier or crumbly compared to the original recipe. But hey, you’ll still get that amazing chocolate-peanut butter combo!
Can I reduce the sugar or substitute with sweeteners?
Nope! Unfortunately, reducing the sugar won’t yield great results — I tried this multiple times with varying levels of success and found that the cookie’s structure relies heavily on the sugar content for softness and flavor balance. If you’re looking for alternatives, consider using coconut sugar as a substitute for brown sugar; it will give you a nice caramel flavor. But don’t go too low on sugar unless you’re willing to accept some compromises in taste and texture.
Why do I need to cream the butter and sugars until light and fluffy?
Creaming together the softened butter with granulated and brown sugars is crucial because it incorporates air into the mixture, leading to lighter cookies. This process creates tiny pockets of air that expand during baking, giving your cookies their soft yet chewy texture. If you don’t cream long enough (aim for about 3-5 minutes), your cookies will likely turn out dense and heavy — definitely not what we’re going for here!
Can I add chocolate chunks or nuts into the cookie dough?
Absolutely! Feel free to customize your cookie dough by adding semi-sweet chocolate chunks or chopped nuts like pecans or walnuts for added texture and flavor. Just keep in mind that if you add too many mix-ins, you may need to adjust baking time slightly because they can affect how evenly your cookies bake through. In my opinion, though — more chocolate is always better! 😄
Troubleshooting
I will continue to add more to this Troubleshooting section as I start seeing questions coming through from people who have made the recipe.
Troubleshooting tips
“My cookies were flat and spread out too much! 😭”
- Your butter may have been too warm or melted. Softened butter should be at room temperature, not greasy. If it’s too warm, it causes the cookies to spread excessively.
- You might have skipped chilling the peanut butter filling! If it’s too soft, it can lead to uneven baking and spreading. A little chill time helps it firm up nicely.
- You didn’t measure your flour accurately. Too little flour can cause cookies to lose their shape. Make sure you’re spooning and leveling your flour for precision!
I bet they were still YUM though!
“The edges of my cookies are burnt while the centers are undercooked! 🔥”
- Your oven temperature may be off; if it’s too hot, the edges will cook faster than the center. Using an oven thermometer can help ensure accurate baking temperatures.
- You might have used a baking sheet that was too dark or thin, which can lead to uneven cooking. Try using light-colored, heavy-duty baking sheets for better results.
I bet they were still YUM though!
“My cookies came out dry and crumbly! 😩”
- Overmixing your dough after adding the flour can develop gluten, resulting in tough cookies. Mix until just combined for a softer texture.
- You may have added too much flour by not measuring correctly. Make sure you’re using the spoon-and-level method or weighing your flour for accuracy.
I bet they were still YUM though!
“Why are my cookies not as soft as yours?!”
- You might have baked them for too long; even an extra minute can make a big difference in softness. Keep an eye on them and take them out when they’re just lightly golden around the edges.
- If you used cold eggs straight from the fridge, it could affect how well they incorporate into your dough, leading to a denser cookie. Room-temperature eggs help create a lighter texture!
I bet they were still YUM though!
Chocolate Peanut Butter Filled Cookies
Ingredients
Method
- In a mixing bowl, combine creamy peanut butter and powdered sugar until smooth. Stir in chocolate chips.
- Chill the filling in the refrigerator for about 15 minutes to firm up.
- Preheat the oven to 350°F (175°C).
- In a large mixing bowl, cream together the softened butter, granulated sugar, and brown sugar until light and fluffy.
- Add eggs one at a time, mixing well after each addition. Stir in vanilla extract.
- In another bowl, whisk together flour, baking soda, and salt. Gradually add to the wet mixture, mixing until just combined.
- Using a cookie scoop, drop a tablespoon of cookie dough onto a baking sheet.
- Make a small indentation in the center of each dough ball and fill with about a teaspoon of the peanut butter filling.
- Cover the filling with another tablespoon of cookie dough, sealing the edges.
- Bake in the preheated oven for 10-12 minutes, or until the edges are lightly golden.
- Allow cookies to cool on the baking sheet for 5 minutes before transferring to a wire rack to cool completely.