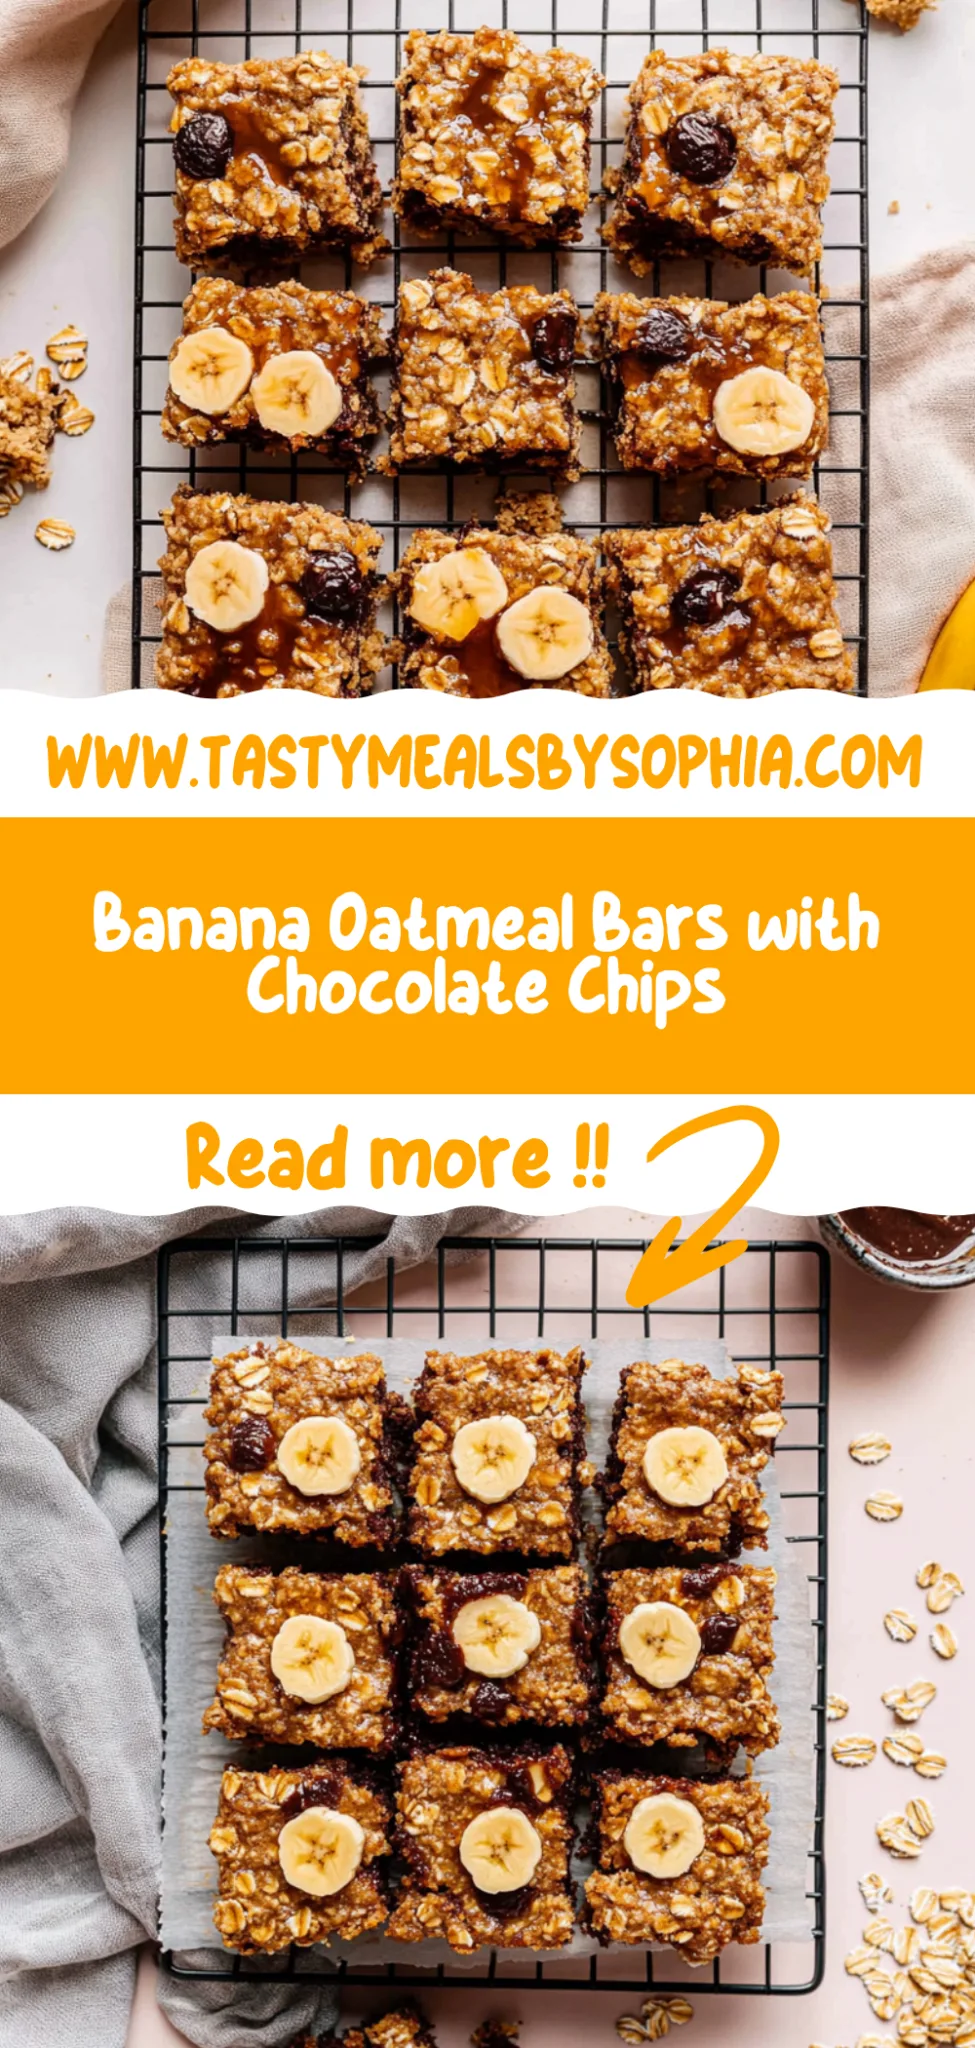
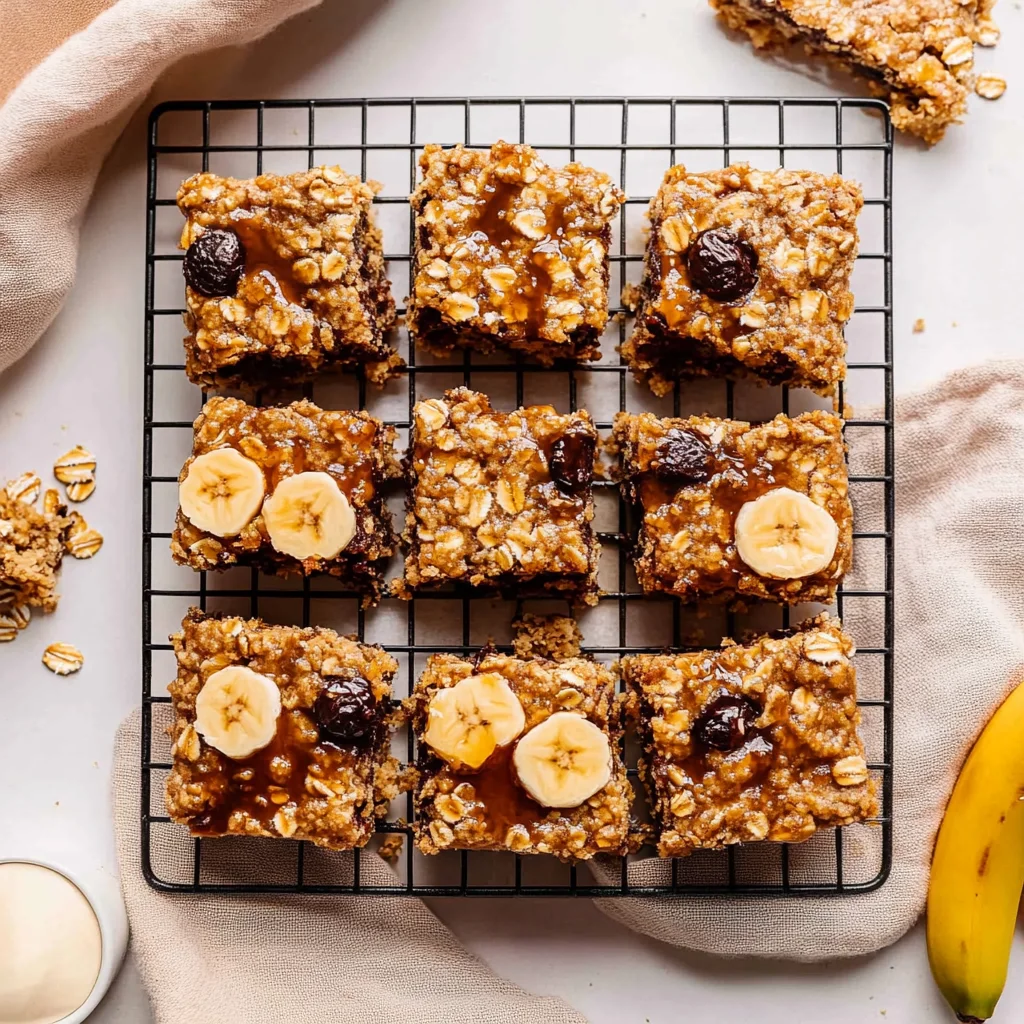
Banana Oatmeal Bars: Guilt-Free and Deliciously Chewy
It all started with a late-night craving for something sweet yet healthy, and I found myself reminiscing about these amazing banana oatmeal bars I had at a quaint little cafe during my travels. They were perfectly chewy, subtly sweet, and packed with wholesome goodness—just the kind of treat that feels indulgent without the guilt. The only problem? They weren’t exactly budget-friendly, and I figured I could whip up something just as delicious at home for a fraction of the cost (and maybe even better!).
Let me tell you, perfecting my Banana Oatmeal Bars was no walk in the park. It took me five attempts to finally get it right—yes, five! At first, they were either too dry or too mushy, then there was that one time they turned into banana pudding instead of bars (who knew that could happen?). With each batch, I was on a mission to achieve that ideal balance of moistness and chewiness while ensuring they held together nicely. Let’s just say my kitchen looked like a banana graveyard by the end of it!
But boy, was it worth every mishap! The final result is nothing short of heavenly—these Banana Oatmeal Bars are soft yet firm, bursting with rich banana flavor and a hint of cinnamon that’ll have you coming back for more. Plus, they’re healthy enough to eat for breakfast or as an afternoon snack without any guilt! I can’t wait for you to try these; trust me, you’ll be baking them on repeat!
These Banana Oatmeal Bars are….
….the ultimate breakfast solution that doesn’t compromise on taste or health!
1. They deliver a natural sweetness that’s simply irresistible, thanks to the ripe bananas and honey. The combination of these two ingredients not only enhances the flavor profile but also provides moisture, ensuring each bite is packed with deliciousness and nutrition.
2. Experience a perfectly chewy texture that strikes a balance between soft and satisfying. The rolled oats absorb the moisture from the bananas and milk, creating a hearty base that feels wonderfully substantial without being overly dense.
3. Simple preparation technique – just mash, mix, and bake! Using ripe bananas in the wet mixture means there’s no need for added sugars or complicated methods, making it easy for anyone to whip up these bars in no time.
4. They offer impressive value for your money, as you can make a batch of these bars at home for a fraction of the cost of store-bought snacks. With just a few simple ingredients that are often already in your pantry, you can enjoy fresh, homemade Banana Oatmeal Bars that save both time and money.
PS These bars are easy to cut into perfect snack-sized portions and keep well in the fridge for days. Enjoy them warm or cold — they’re fantastic either way!
Ingredients for the Banana Oatmeal Bars
Each ingredient in this dish plays an essential role in flavor and texture. Here’s what you’ll need:
2 cups rolled oats (old-fashioned): Provides a hearty base and chewy texture.
1 teaspoon baking powder: Helps the bars rise and achieve a light texture.
1/2 teaspoon salt: Enhances sweetness and balances flavors.
1 teaspoon cinnamon (optional): Adds warmth and a comforting spice note.
2 large ripe bananas (mashed): Contributes natural sweetness and moisture.
1/4 cup honey (or maple syrup): Acts as a natural sweetener and binds the ingredients.
1/4 cup milk (dairy or non-dairy): Ensures the mixture is moist and cohesive.
1 teaspoon vanilla extract: Infuses a delightful depth of flavor.
1/2 cup chocolate chips (or nuts): Offers a rich, indulgent element or crunch.
1/4 cup dried fruit (like raisins or cranberries): Adds bursts of sweetness and chewiness.
Don’t Skip the Cooling Time — It’s Crucial!
I know, I know—waiting to cut into your delicious banana oatmeal bars is torture. Trust me, I tried to shortcut this step by slicing them early, and the results were a sticky mess! I was left with a gooey disaster instead of the perfectly chewy bars I was hoping for. Believe me when I say that patience truly pays off here.
Letting the bars cool completely before cutting is essential for achieving that perfect texture. Think of it like letting a cake rest after baking; if you dive in too soon, it can crumble and fall apart. The cooling process allows the oats to set properly while the flavors meld together beautifully, resulting in chewy, well-structured bars that hold their shape when you slice into them.
What does cooling do?
- Texture: The bars become chewier and firmer as they cool, preventing them from falling apart when you cut them.
- Flavor: Cooling allows the flavors from the ripe bananas and cinnamon to deepen and blend, enhancing the overall taste.
- Moisture retention: Proper cooling helps prevent excess moisture loss, keeping your bars soft and delightful rather than dry.
- Easier slicing: When fully cooled, the bars are easier to cut into clean squares without squishing or tearing.
- Visual appeal: A well-set bar looks more appetizing and presents better when serving or packaging for snacks.
Different cooling times
- 10 minutes (okay) — Bars are still warm but sliceable; expect some crumbly edges.
- 30 minutes (good) — They have cooled down enough to hold their shape better but might still be slightly soft in the center.
- 1 hour (great) — Perfectly set; these bars are chewy with a nice structure that holds up during storage or transport.
- 2 hours (best) — The ultimate texture achieved! These bars will be at peak chewiness and flavor complexity.
Don’t let impatience ruin your creation! The most common mistake is trying to cut the banana oatmeal bars before they’ve fully cooled. If you do this, you’ll likely end up with a gooey mess instead of those beautiful squares you envisioned. Save yourself the trouble—wait it out!
How to make Banana Oatmeal Bars
Are you ready to see how straightforward it is to make the Banana Oatmeal Bars of your dreams??
1. PREPARE THE OVEN AND BAKING DISH
Start by getting your oven prepped for some deliciousness!
Preheat – Preheat the oven to 350°F (175°C). This temperature is perfect for baking the bars evenly, ensuring they cook through without burning. Grease or line an 8×8 inch baking dish with parchment paper. Lining with parchment makes it easier to lift the bars out later for cutting!
HANDY TIPS
- If you prefer easy removal, use parchment paper that overhangs the sides of the baking dish.
- You can also use a larger dish if you want thinner bars; just adjust the bake time slightly.
2. MIX DRY INGREDIENTS
Let’s bring those wholesome ingredients together!
Combine – In a mixing bowl, combine 2 cups of rolled oats, 1 teaspoon baking powder, 1/2 teaspoon salt, and 1 teaspoon cinnamon (if using). Stir until well mixed. The oats will be the base of your bars, providing fiber and a hearty texture.
HANDY TIPS
- Feel free to swap in gluten-free oats if you need a gluten-free option!
- Cinnamon not only adds flavor but also has health benefits; it can help regulate blood sugar levels.
3. MIX WET INGREDIENTS
Now it’s time to get fruity!
Mash – In another bowl, mash 2 large ripe bananas until smooth. Add in 1/4 cup honey (or maple syrup), 1/4 cup milk (dairy or non-dairy), and 1 teaspoon vanilla extract. Mix until smooth. The bananas will naturally sweeten the mixture while adding moisture.
HANDY TIPS
- The riper your bananas are, the sweeter your bars will be! Aim for bananas with lots of brown spots.
- If you’re using maple syrup instead of honey, keep in mind it might change the flavor profile slightly but will still taste fantastic!
4. COMBINE MIXTURES
Let’s get mixing!
Pour – Pour the wet mixture into the dry ingredients. Stir until just combined — don’t overmix! Overmixing can lead to tough bars instead of soft ones. Fold in any optional add-ins like chocolate chips or dried fruit if you’re using them for extra flavor and texture.
HANDY TIPS
- For an extra burst of flavor, choose dark chocolate chips; they pair beautifully with bananas!
- Adding nuts not only gives a nice crunch but also boosts protein content.
5. BAKE THE BARS
Time to transform that batter into something magical!
Spread – Spread the mixture evenly in the prepared baking dish. Bake for 25-30 minutes or until golden brown and a toothpick inserted comes out clean. You’ll know they’re done when your kitchen smells heavenly and they have a lovely golden color on top!
HANDY TIPS
- Remember that every oven is different; start checking at around 25 minutes!
- If you want even browner edges, switch to broil for just a minute at the end — but watch closely!
6. COOL AND SERVE
The final step before indulging!
Cool – Allow the bars to cool in the pan for about 10 minutes. Then transfer them to a wire rack to cool completely before cutting into squares. This cooling process helps ensure they firm up nicely for easy slicing.
HANDY TIPS
- For perfect squares, use a sharp knife and cut while they are still slightly warm.
- These bars can be stored in an airtight container for up to a week — if they last that long!
Make these once, and I wager they will invade your dreams every night too! – Nagi x
FAQ – Banana Oatmeal Bars
How long will these bars keep? 🕒
These Banana Oatmeal Bars are best enjoyed fresh, but they can be stored for up to 5 days at room temperature. After day 1, I found that their quality starts to decline a bit—around 97% as good on day 2, and by day 5, they’re about 85% as tasty. To keep them fresher longer, I recommend storing them in an airtight container. If you prefer a softer texture, they can also be refrigerated for up to a week.
Can I freeze these bars? ❄️
Absolutely! Freezing is a great way to extend the shelf life of these bars. Once they’ve cooled completely, cut them into squares and place them in a single layer on a baking sheet. Freeze for about an hour until firm, then transfer them to a freezer-safe bag or container. They’ll keep well for up to 3 months. When you’re ready to enjoy one, simply thaw it at room temperature for about 30 minutes or microwave it for a few seconds if you’re in a hurry!
Can I make these bars gluten-free? 🌾
Yes, you can easily make this recipe gluten-free! Just swap the rolled oats with certified gluten-free oats. I’ve tested this substitution multiple times, and it works perfectly without altering the taste or texture significantly. This way, everyone can enjoy these delicious bars without worrying about gluten.
What can I use instead of honey? 🍯
If you’re looking for alternatives to honey, maple syrup is an excellent substitute that I’ve tried and loved! You can use the same amount—1/4 cup. If you’re avoiding sweeteners altogether, consider using mashed ripe bananas; they add sweetness naturally but might slightly alter the texture. However, don’t reduce the amount too much—I’ve tried that and found it doesn’t work well!
Why do I need to mix the dry ingredients separately? 🤔
Mixing the dry ingredients separately ensures that everything is evenly distributed before combining with the wet ingredients. This step is crucial because you want the baking powder and spices (if using) to be uniformly spread throughout the oats. If you skip this step, you might end up with pockets of baking powder or salt in your final product—definitely not what you want!
Can I add extra ingredients like nuts or chocolate chips? 🍫
Yes! Adding nuts or chocolate chips is one of my favorite ways to customize this recipe. You can fold in about 1/2 cup of chocolate chips or your choice of nuts once you’ve combined the wet and dry mixtures. If you’re feeling adventurous, you could also throw in some dried fruits like raisins or cranberries—just remember not to overload it; otherwise, it might affect how well they hold together when baked!
How long should I let the bars cool before cutting? ⏳
It’s essential to let these bars cool for at least 10 minutes in the pan after baking before transferring them to a wire rack. This cooling period allows them to set properly and makes cutting much easier without crumbling apart. If you try cutting them too soon—believe me—you’ll end up with a messy situation that’s more “crumbly disaster” than “perfect square.” 😅
Troubleshooting
I will continue to add more to this Troubleshooting section as I start seeing questions coming through from people who have made the recipe.
Troubleshooting tips
“My bars came out too thin! 😩”
- You may have used a baking dish that was larger than 8×8 inches, causing the mixture to spread out too much. Make sure you’re using the specified size to get the right thickness.
- If you didn’t pack your mashed bananas enough, the moisture content could be lower, resulting in thinner bars. Ensure your bananas are well mashed and fully incorporated.
- If you added too many optional ingredients like chocolate chips or nuts without adjusting the base mixture, that could affect the structure as well. Stick to the recommended amounts for best results.
I bet they were still YUM though!
“My bars turned out way too dry! 😢”
- Overbaking is a common culprit; if you left them in for longer than 30 minutes, they might lose too much moisture. Keep an eye on them as they approach the baking time.
- Using old-fashioned rolled oats instead of quick oats is key here; if you used a different type of oats, it could absorb more moisture than intended. Always check the type before measuring!
- If your bananas weren’t ripe enough, they wouldn’t provide enough natural moisture. Make sure your bananas are ripe and spotty for optimal texture!
I bet they were still YUM though!
“Why are my bars so crumbly? 😟”
- This often happens if you didn’t measure your honey or milk accurately. Too little liquid can lead to a dry and crumbly texture, so be sure to measure carefully next time.
- Not mixing wet and dry ingredients thoroughly can also result in uneven distribution of moisture, leading to crumbliness. Stir until just combined but not overmixed!
- If you chose not to use any add-ins like chocolate chips or nuts, you may need to increase the liquid slightly as those ingredients can help bind everything together.
I bet they were still YUM though!
“My bars look uneven and wonky! 🤔”
- If your batter wasn’t spread evenly in the baking dish, some parts may bake faster than others, creating an uneven shape. Take a moment to smooth it out before baking.
- You might have added optional ingredients unevenly throughout the mixture, which can cause lumps and bumps. Try folding them in gently for a more uniform appearance next time!
- Also, running your knife through the mixture before baking can help break up any large clumps for a smoother finish.
I bet they were still YUM though!
Banana Oatmeal Bars
Ingredients
Method
- Preheat the oven to 350°F (175°C). Grease or line an 8x8 inch baking dish with parchment paper.
- In a mixing bowl, combine rolled oats, baking powder, salt, and cinnamon. Stir until well mixed.
- In another bowl, mash the ripe bananas. Add honey, milk, and vanilla extract. Mix until smooth.
- Pour the wet mixture into the dry ingredients. Stir until just combined. Fold in any optional add-ins if using.
- Spread the mixture evenly in the prepared baking dish. Bake for 25-30 minutes or until golden brown and a toothpick comes out clean.
- Allow the bars to cool in the pan for 10 minutes, then transfer to a wire rack to cool completely before cutting into squares.