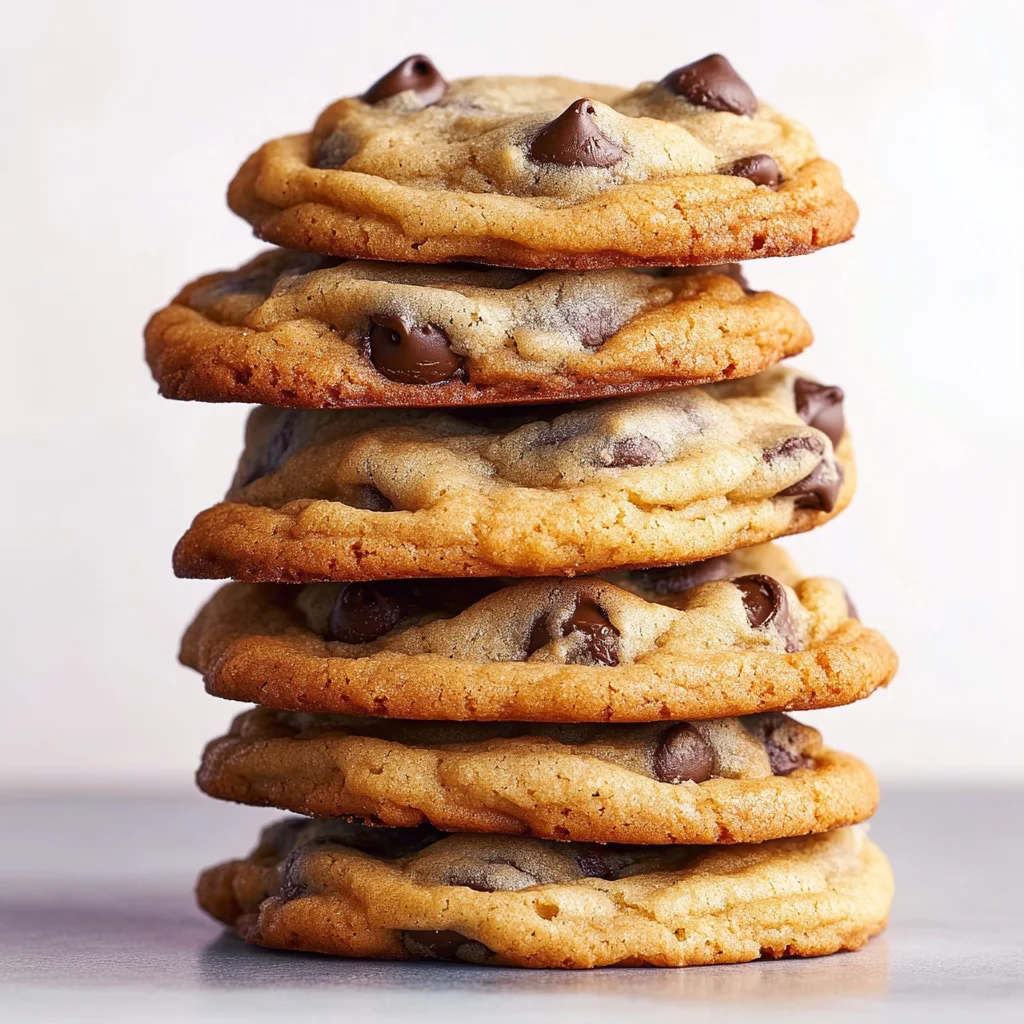
Bakery Style Chocolate Chip Cookies: Gooey Perfection at …
It all started one rainy afternoon when I found myself craving those iconic bakery-style chocolate chip cookies that always seem to beckon from behind glass counters. You know the ones – perfectly golden, with gooey chocolate chips just waiting to melt in your mouth. I thought, why not recreate that magic at home? After all, there’s nothing quite like the satisfaction of baking a batch of cookies that not only rivals my favorite café but also saves me a small fortune in the process. Plus, who wouldn’t want a warm cookie fresh out of the oven rather than waiting for a store-bought one?
Let me tell you, perfecting this recipe was no walk in the park! I lost count after my fifth attempt (or was it sixth?) because every batch seemed to come out either too cakey or too flat. Each time, I was determined to nail that ideal balance of softness and chewiness while making sure those chocolate chips were perfectly distributed. Spoiler alert: my kitchen looked like a flour bomb exploded more times than I’d like to admit! But through each mishap, I learned something new about the science of cookie-making and what it truly takes to achieve that bakery-style goodness.
But oh boy, was it worth every messy moment! The final result is nothing short of glorious: deliciously soft and chewy chocolate chip cookies that are perfect for any occasion. They’ve got that irresistible texture with edges just slightly crisped while the centers remain delightfully gooey. And let’s not forget about the deep, rich flavor of melted chocolate that dances on your tongue with every bite. Trust me, once you try these Bakery Style Chocolate Chip Cookies, you’ll be as hooked as I am! So grab your apron and let’s get baking – you won’t regret it!
These Bakery Style Chocolate Chip Cookies are….
….the ultimate treat that will elevate your cookie game to new heights!
1. They deliver a deep, rich flavor that’s simply irresistible, all thanks to the perfect blend of granulated and brown sugars. The brown sugar not only adds sweetness but also brings a hint of caramel-like depth that makes each bite a flavor sensation.
2. Incredible texture – with a perfectly crisp edge and a soft, chewy centre. Achieved through the right balance of all-purpose flour and baking soda, these cookies maintain their structure while giving you that delightful gooeyness in the middle.
3. A standout technique lies in the careful creaming of softened butter with sugars, which creates a light and fluffy base. This method ensures that air is incorporated into the dough, resulting in cookies that rise beautifully and have an airy quality that’s hard to resist.
4. They offer remarkable value for homemade goodness, as you can whip up a batch for just a fraction of what you’d spend at a bakery. Plus, with just basic pantry ingredients like flour and chocolate chips, they’re accessible and easy to make any day of the week!
PS These cookies yield about 24 generous servings, perfect for sharing or indulging throughout the week!
Ingredients for the Bakery Style Chocolate Chip Cookies
Each ingredient in this dish plays an essential role in flavor and texture. Here’s what you’ll need:
2 cups all-purpose flour: Provides the structure and chewiness of the cookies.
1 teaspoon baking soda: Helps the cookies rise and creates a soft texture.
1 teaspoon salt: Enhances the sweetness and balances the flavors.
1 cup unsalted butter (softened): Contributes to a rich, creamy texture and flavor.
3/4 cup granulated sugar: Adds sweetness and helps achieve a crisp exterior.
3/4 cup brown sugar (packed): Brings moisture and a deep caramel flavor.
1 tablespoon vanilla extract: Infuses the cookies with warm, aromatic notes.
2 large eggs: Binds the ingredients together and adds richness to the dough.
- 2 cups semi-sweet chocolate chips: Provides bursts of chocolatey goodness in every bite.
This step is non-negotiable: Chill the dough!
I’ll be honest—I tried to skip chilling the dough for these Bakery Style Chocolate Chip Cookies. I thought, “Who has time for that?” But after a few batches of sad, flat cookies, I came crawling back to the fridge. Turns out, my impatience was no match for the magic that happens when you chill cookie dough.
Chilling the dough is essential because it allows the flour to fully hydrate and gives the butter time to firm up again after creaming. Think of it like letting a good steak rest before you slice into it; this little pause makes all the difference in texture and flavor. For our cookie recipe, this means a more tender interior with just enough structure from the flour and baking soda, ensuring every bite is perfectly chewy and satisfying.
What does chilling the dough do?
- Texture — Chilling allows the cookies to spread less while baking, resulting in a thicker cookie that holds its shape.
- Flavor — The resting time enhances flavor development as ingredients meld together, creating a richer taste that’s hard to replicate quickly.
- Color — Chilled dough promotes even browning in the oven, giving your cookies that beautiful golden hue we all love.
- Moisture — Hydrated flour leads to a chewier texture; without chilling, your cookies can end up dry and crumbly.
- Shelf Life — Cookies made from chilled dough tend to stay fresher longer since they retain moisture better than their hurried counterparts.
Different chilling times
- 30 minutes (good) — A bare minimum; cookies will still taste decent but are flatter than desired with less chewiness.
- 1 hour (better) — Improved texture and flavor start to show, but still not quite optimal.
- 2 hours (great) — You’re getting close! Noticeably thicker cookies with richer flavor.
- ⭐️ 12 hours⭐️ — This is where cookie nirvana lives! Maximum chewiness and flavor complexity achieved.
- Beyond 24 hours — Diminishing returns; while still good, there’s a risk of the dough drying out if left too long.
If you think you can skip this chilling step or rush it—think again! The most common mistake is assuming that just a quick chill will do the trick. Trust me; you don’t want flat, sad cookies when perfection is just a few hours away.
How to make Bakery Style Chocolate Chip Cookies

Are you ready to see how straightforward it is to make the Bakery Style Chocolate Chip Cookies of your dreams??
1. PREPARE THE OVEN AND BAKING SHEET
Before diving into the mixing, let’s set the stage for baking perfection!
Preheat – Preheat your oven to 350°F (175°C) and line a baking sheet with parchment paper. This ensures that your cookies will bake evenly and won’t stick to the pan.
2. MIX DRY INGREDIENTS
Now, we’ll get our dry ingredients ready before combining everything together!
Whisk – In a mixing bowl, whisk together the flour, baking soda, and salt until well combined. This step is crucial as it helps distribute the leavening agent (baking soda) evenly, ensuring your cookies rise beautifully. Set this aside while you work on the wet ingredients.
3. CREAM BUTTER AND SUGARS
Get ready for some delightful mixing that creates a fluffy base for your cookies!
Cream – In another bowl, using an electric mixer, cream together the softened butter, granulated sugar, and brown sugar until light and fluffy. This usually takes about 3-5 minutes and is key to incorporating air into your mixture for that soft texture we love in bakery-style cookies.
4. ADD EGGS AND VANILLA
Let’s amp up those flavors with some eggs and vanilla!
Beat – Beat in the eggs one at a time, ensuring each egg is fully incorporated before adding the next. Then stir in the vanilla extract. The eggs add moisture and richness while helping bind all the ingredients together.
5. COMBINE MIXTURES
It’s time to bring everything together into one delicious dough!
Gradually add – Gradually add the dry ingredients to the wet mixture, mixing until just combined. Avoid overmixing here; you want a slightly sticky dough that will yield soft cookies after baking.
6. ADD CHOCOLATE CHIPS
The best part: folding in those adorable chocolate chips!
Fold – Gently fold in the chocolate chips until they are evenly distributed throughout the dough. This will ensure every bite is packed with gooey chocolate goodness!
7. SCOOP AND BAKE
Let’s turn that dough into beautiful cookies ready for baking!
Drop – Drop rounded tablespoons of dough onto the prepared baking sheet, spacing them about 2 inches apart to allow for spreading during baking. Bake for 10-12 minutes or until the edges are golden brown but still soft in the center—this is crucial for that chewy texture!
8. COOL AND SERVE
Patience pays off—just a little longer before you can indulge!
Allow – Allow the cookies to cool on the baking sheet for 5 minutes before transferring them to a wire rack to cool completely. This resting time helps them firm up while retaining their soft centers.
HANDY TIPS
- For even softer cookies, try chilling your dough for about 30 minutes before scooping.
- If you prefer smaller cookies, simply roll them into balls instead of disc shapes; adjust baking time to around 12-14 minutes.
- Want a cookie log? Roll your dough into a big log shape, refrigerate for at least an hour, then slice into thick pieces before baking.
What an incredible journey through cookie-making we’ve had! With just a few simple steps, you’ve created bakery-style chocolate chip cookies that will surely impress friends and family—maybe even yourself if you’re lucky enough to snag one fresh out of the oven! Make these once, and I wager they will invade your dreams every night too! – Nagi x
FAQ – Bakery Style Chocolate Chip Cookies
How long will these cookies keep?
These cookies are best enjoyed fresh, but they can last in an airtight container at room temperature for about 3-5 days. After day 1, they may start to lose their perfect texture, feeling roughly 97% as good on day 3 and around 90% by day 5. For longer storage, consider freezing them!
❄️ Can I freeze the cookie dough for later baking?
Absolutely! I recommend scooping the dough into rounded tablespoons and placing them on a baking sheet to freeze individually for about 1-2 hours. Once frozen, transfer the dough balls to a zip-top freezer bag and store them for up to 3 months. When you’re ready to bake, simply preheat your oven and bake from frozen for an additional 2-3 minutes.
🌾 Can these cookies be made gluten free?
Yes, you can make these cookies gluten free by substituting the all-purpose flour with a gluten-free flour blend that is designed for baking. Brands like Bob’s Red Mill or King Arthur Flour have great options. Just ensure you check that it contains xanthan gum for the right texture! Keep in mind that the taste and texture may vary slightly from the original recipe, but they will still be delicious!
Can I reduce the sugar or substitute with sweeteners?
No, you cannot reduce the sugar — I tried reducing it by 25% and the cookies spread too much, ending up flat and crispy rather than soft and chewy (not what we want!). If you’re looking to use a sweetener instead of granulated or brown sugar, consider using coconut sugar or a stevia blend that measures like sugar. Just note that this may impact flavor and texture.
Why do I need to cream the butter and sugars until fluffy?
Creaming butter and sugars until light and fluffy is crucial because it incorporates air into your mixture, which helps create a lighter texture in your cookies. This step also ensures proper distribution of sweetness throughout the dough. Trust me; I’ve tested it both ways—skipping this step results in dense cookies that are just not as enjoyable!
What can I add for extra flavor or texture?
Feel free to customize your cookies by adding ingredients like chopped nuts (walnuts or pecans are fantastic), oatmeal for chewiness, or even a dash of espresso powder to enhance the chocolate flavor. You can also swap out half of the semi-sweet chocolate chips for milk chocolate or dark chocolate chips depending on your preference. The world is your oyster when it comes to cookie add-ins!
How long should I let them cool before transferring them?
Letting your cookies cool on the baking sheet for about 5 minutes before transferring them to a wire rack is essential! This time allows them to set up properly; otherwise, they might fall apart when you try to move them too soon. 🍪 Patience is key here—I promise it’s worth it!
Troubleshooting
I will continue to add more to this Troubleshooting section as I start seeing questions coming through from people who have made the recipe.
Troubleshooting tips
“My cookies were not as thick as yours! 😭”
- You might have used too little flour. If you didn’t measure your flour correctly or packed it down, your dough could be too wet, leading to flatter cookies.
- Another reason could be that you overmixed the dough after adding the dry ingredients. This can develop gluten and make them spread more in the oven.
- I bet they were still YUM though!
“My cookies came out wonky!” 🍪
- If your dough wasn’t chilled before baking, it can lead to uneven shapes. Chilling helps the butter firm up, which keeps them from spreading too much.
- Also, if you used different sized chocolate chips or added too many, this can affect how they hold their shape while baking.
- I bet they were still YUM though!
“The surface of my cookies split and had massive crevices! 😱”
- This usually happens when the oven temperature is too high. Make sure your oven is accurately calibrated to 350°F (175°C) for perfect baking.
- Another possibility is that you baked them for too long; if they’re in the oven beyond the recommended time, they can dry out and crack on top.
- I bet they were still YUM though!
“My cookies turned out too dry! 😩”
- This could be due to overmeasuring your flour. If you scoop directly from the bag or container without spooning it into a measuring cup, you might end up with too much flour in your dough.
- Additionally, if you baked them for too long, even a couple of minutes can lead to dryness. Keep an eye on them towards the end of baking!
- I bet they were still YUM though!
Bakery Style Chocolate Chip Cookies
Ingredients
Method
- Preheat your oven to 350°F (175°C) and line a baking sheet with parchment paper.
- In a mixing bowl, whisk together the flour, baking soda, and salt. Set aside.
- In another bowl, using an electric mixer, cream together the softened butter, granulated sugar, and brown sugar until light and fluffy.
- Beat in the eggs one at a time, then stir in the vanilla extract.
- Gradually add the dry ingredients to the wet ingredients, mixing until just combined.
- Fold in the chocolate chips until evenly distributed.
- Drop rounded tablespoons of dough onto the prepared baking sheet, spacing them about 2 inches apart. Bake for 10-12 minutes or until the edges are golden brown.
- Allow the cookies to cool on the baking sheet for 5 minutes before transferring them to a wire rack to cool completely.