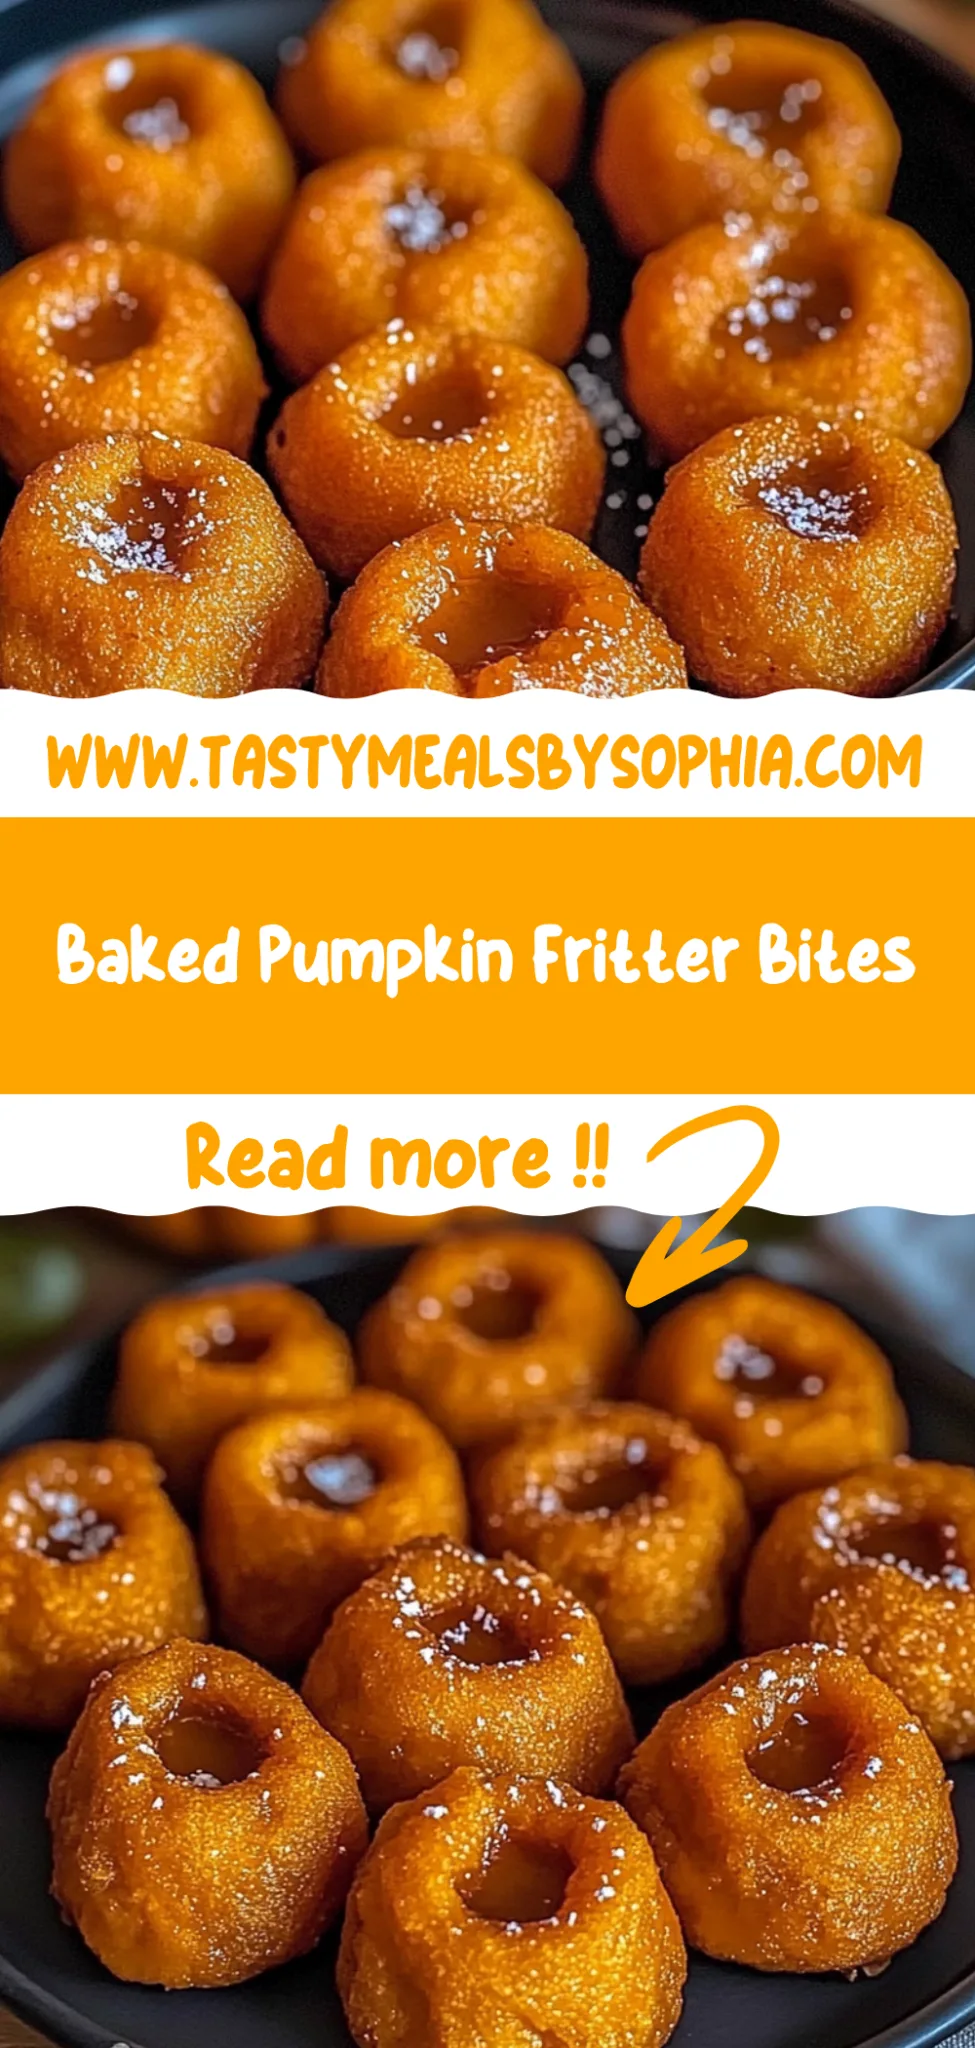
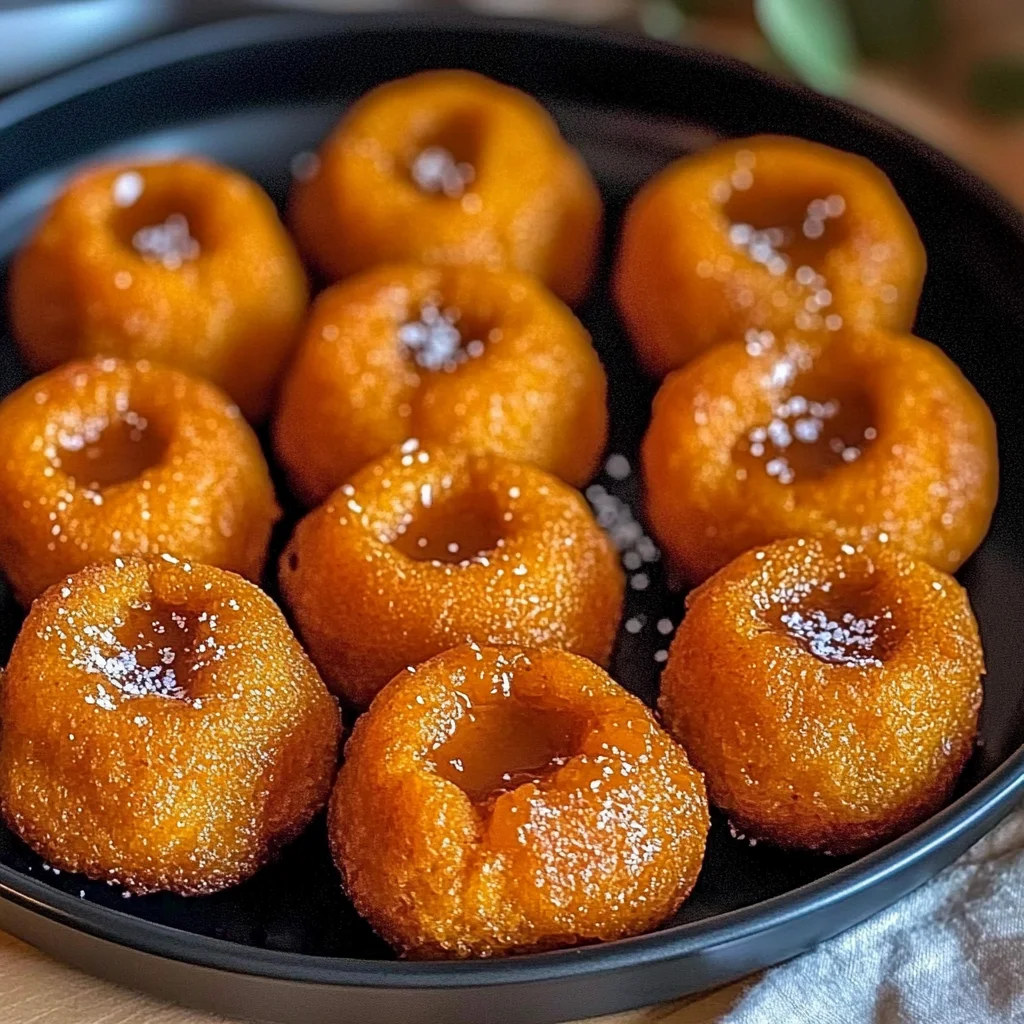
Baked Pumpkin Fritter Bites: A Cozy Fall Treat
It all started when I was at this cozy little café that served the most amazing pumpkin fritters. I remember taking that first bite, and it was like a warm hug on a chilly day—crispy on the outside and soft, fluffy goodness on the inside, with just the right amount of spice. I thought to myself, “I can make these at home!” But let’s be real, I’m always trying to recreate something delicious that’s way overpriced at a café, plus who doesn’t love the challenge of perfecting a recipe in their own kitchen? So, I set out on a mission to make my very own Baked Pumpkin Fritter Bites.
Let me tell you, getting these fritters just right was no walk in the park! I went through five different versions and nearly lost count of how many pumpkins I sacrificed to this cause. Each attempt taught me something new—I learned about balancing spices, adjusting baking times, and how not to turn my kitchen into a floury disaster zone (well, mostly). There were moments when I thought I’d never get them crispy enough or soft enough without frying them, but my stubbornness prevailed!
But oh boy, was it worth it! The final result is nothing short of heavenly—these Baked Pumpkin Fritter Bites are delightfully spiced with a crispy exterior that gives way to that pillowy softness you dream about. They’re not only packed with flavor but also healthier than their fried counterparts and hold up beautifully for snacking or as a side dish. Trust me when I say you’ll want to whip up a batch (or two) because once you taste them, you won’t be able to stop at just one. Happy baking!
These Baked Pumpkin Fritter Bites are…
….the ultimate cozy treat that perfectly captures the essence of fall!
1. They deliver an irresistibly warm flavor profile that combines the earthy sweetness of pumpkin with a medley of spices like cinnamon, nutmeg, and ginger. Each bite is infused with a comforting aroma that brings back memories of autumn gatherings, making them a perfect snack or dessert any time of year.
2. Perfectly balanced texture – these fritter bites achieve a golden, crispy exterior while remaining soft and tender on the inside. The combination of flour and pumpkin puree creates a delightful contrast that keeps you reaching for more, ensuring every bite is an enjoyable experience.
3. Elevated baking technique – by using baking powder in this recipe, I’ve found it helps create a lightness in each fritter bite without deep frying. This method not only makes the fritters healthier but also enhances their airy quality, setting them apart from traditional fried versions.
4. Cost-effective indulgence – making these Baked Pumpkin Fritter Bites at home is not only simple but also budget-friendly. With common pantry staples like all-purpose flour and brown sugar, you can whip up a batch that rivals any café treat for a fraction of the price!
PS These fritter bites yield about 12 pieces and are perfectly shaped for sharing or snacking throughout the day!
Ingredients for the Baked Pumpkin Fritter Bites
Each ingredient in this dish plays an essential role in flavor and texture. Here’s what you’ll need:
- 1 cup canned pumpkin puree (or fresh pumpkin): Provides moisture and a rich, earthy flavor.
- 1 cup all-purpose flour: Gives structure to the fritter bites for a satisfying bite.
- 1 large egg: Acts as a binder, helping the ingredients hold together.
- 1 teaspoon baking powder: Creates lift for a light and fluffy texture.
- 1 teaspoon cinnamon: Infuses warmth and a cozy spiciness that complements the pumpkin.
- 1/2 teaspoon nutmeg: Adds a hint of nutty sweetness to round out the flavors.
- 1/2 teaspoon ginger: Brings a zesty kick that enhances the overall taste profile.
- 1/2 teaspoon salt: Balances sweetness and enhances all the flavors in the mixture.
- 1/4 cup brown sugar (packed): Contributes moisture and a deep caramel-like sweetness.
- 1/4 cup milk (or non-dairy alternative): Ensures the batter reaches the perfect consistency for baking.
— Topping —
- 1 tablespoon powdered sugar (for dusting): Adds a touch of sweetness and a beautiful finish.
You Must Space These Fritter Bites Properly. Seriously!
I’ll confess—when I first started making these baked pumpkin fritter bites, I thought, “How hard can it be? Just plop them on the baking sheet and call it a day!” Spoiler alert: I was wrong. After several batches that turned into one giant pumpkin blob instead of individual fritter bites, I had to admit that spacing them properly is non-negotiable.
Why does this matter so much, you ask? Think of it like baking cookies—if you crowd them together, they won’t have enough room to spread out and develop that golden-brown crispy exterior while keeping the inside soft and tender. The same principle applies here! Each fritter bite needs its space to breathe and cook evenly, ensuring that every delicious morsel is perfectly crispy on the outside and fluffy on the inside.
What does proper spacing do?
- Texture — Proper spacing allows each fritter to form a crispy exterior while maintaining a soft interior. Crowded fritters end up steaming instead of baking.
- Color — Ensures even browning all around; if they’re too close together, some parts will remain pale while others darken.
- Flavor — Each fritter gets its chance to caramelize slightly in the oven, enhancing the rich flavors of pumpkin and spices.
- Cooking Time — When spaced correctly, each fritter bakes uniformly within the suggested time; overcrowding can lead to undercooked centers.
- Presentation — Gives your platter a beautiful look with distinct little bites rather than one big hodgepodge.
Different spacing times
- 1 inch apart (good) — Somewhat acceptable but still leads to uneven cooking; expect gooey bits in between.
- 2 inches apart (great) — Optimal for even cooking! These little beauties will come out crispy all over.
- 3 inches apart (best) — This gives maximum airflow for incredible crispiness; however, it’s unnecessary unless you’re making a huge batch!
- No spacing (disaster!) — You’ll end up with a single massive fritter that’s neither cooked nor appealing. Don’t do it!
Don’t make the classic mistake of cramming those fritters too close together! It might seem easier, but you’ll end up with unevenly cooked blobs instead of delightful bites. Trust me, your taste buds will thank you for taking the time to space them out!
How to make Baked Pumpkin Fritter Bites
Are you ready to see how straightforward it is to make the Baked Pumpkin Fritter Bites of your dreams??
1. PREPARE THE OVEN AND BAKING SHEET
Let’s get that oven fired up and ready for some deliciousness!
1. Preheat – Preheat the oven to 400°F (200°C). This temperature is key for achieving that irresistible crispiness on the outside of your fritter bites while keeping them soft and fluffy inside.
2. Line – Line a baking sheet with parchment paper. This prevents sticking and makes cleanup a breeze, ensuring your fritters come out perfectly shaped.
HANDY TIPS
- Make sure your oven is fully preheated before baking for even cooking!
- If you don’t have parchment paper, lightly grease the baking sheet with oil.
2. MIX THE FRITTER INGREDIENTS
Time to whip up a flavorful batter that brings all those autumn spices together!
1. Combine – In a mixing bowl, combine 1 cup of canned pumpkin puree (or fresh pumpkin), 1 cup of all-purpose flour, 1 large egg, 1 teaspoon of baking powder, 1 teaspoon of cinnamon, 1/2 teaspoon of nutmeg, 1/2 teaspoon of ginger, 1/2 teaspoon of salt, 1/4 cup packed brown sugar, and 1/4 cup milk (or non-dairy alternative).
2. Mix – Stir until well combined and the mixture is slightly thickened. The spices will delightfully waft through your kitchen as you mix!
HANDY TIPS
- For extra flavor depth, let the mixture sit for about 10 minutes after mixing; this helps the spices bloom!
- Use a whisk for a smooth batter without lumps — nobody wants lumpy fritters!
3. FORM THE FRITTER BITES
Let’s shape these delightful bites that will bake into golden perfection!
1. Drop – Using a spoon, drop small amounts of the mixture onto the prepared baking sheet, spacing them about 2 inches apart. This gives them room to spread without merging into each other while they bake.
HANDY TIPS
- For uniformity in size, use a cookie scoop! You’ll get perfectly shaped fritter bites every time.
- Want smaller snacks? You can scoop smaller portions — just reduce baking time to around 15–20 minutes.
4. BAKE AND SERVE
The moment we’ve been waiting for is finally here!
1. Bake – Place the baking sheet in the preheated oven and bake for about 20-25 minutes or until they are golden brown and cooked through. Keep an eye on them towards the end; you want that perfect color without overbaking.
2. Cool and Dust – Remove from the oven and let cool slightly before dusting with powdered sugar. This adds a lovely finishing touch and sweetness that balances out the spices!
Make these once, and I wager they will invade your dreams every night too! – Nagi x
FAQ – Baked Pumpkin Fritter Bites
🥡 How long will these fritter bites keep?
These baked pumpkin fritter bites can be stored in an airtight container at room temperature for about 2 days. However, I find they are best enjoyed fresh, especially since they lose some crispiness over time. After day 2, their quality drops to around 85% as good! If you want to keep them longer, I recommend refrigerating them, which can extend their life to about 5 days, but expect them to be slightly less crispy when reheated.
⏰ Can I skip the resting time after mixing?
Nope! You can’t skip the resting time after mixing the fritter ingredients. The batter needs a little time to let the baking powder activate properly and allow for even mixing of flavors. Trust me, I tested this multiple times, and skipping it resulted in denser fritters that just didn’t have that delightful texture we all crave.
❄️ Can I freeze these fritter bites for later?
Absolutely! You can freeze the baked fritter bites. After they’ve cooled completely, place them in a single layer on a baking sheet and freeze until solid. Then transfer them to a freezer-safe bag or container. They can last up to 3 months in the freezer! When you’re ready to enjoy them, simply reheat from frozen in a preheated oven at 350°F (175°C) for about 10-15 minutes until warmed through. This way, they retain most of their original texture!
🌾 Can these be made gluten-free?
Yes, you can easily make these baked pumpkin fritters gluten-free! Substitute the all-purpose flour with a 1: 1 gluten-free flour blend. Look for one that contains xanthan gum as it helps mimic the structure provided by regular flour. Just keep in mind that texture may vary slightly, but they will still taste delicious!
🍯 Can I reduce the sugar or substitute it with sweeteners?
Nope—reducing the sugar or substituting it with alternative sweeteners is not recommended if you want optimal flavor and texture. I’ve experimented with lower amounts and different sweeteners like honey or maple syrup, but they didn’t yield satisfactory results. The ¼ cup of brown sugar is essential not only for sweetness but also for moisture and richness in flavor that complements the pumpkin perfectly!
🔥 Why do I need to space the fritter bites apart on the baking sheet?
Spacing the fritter bites about 2 inches apart on the baking sheet is crucial for ensuring even cooking and achieving that lovely crispy exterior! If they’re too close together, they’ll steam rather than bake properly, resulting in soggy fritters instead of those perfectly golden and crisp ones we all adore. Trust me; I’ve made that mistake before!
🍽️ Can I add other spices or ingredients to these fritters?
Definitely! Feel free to customize your fritters by adding spices like cloves or allspice for extra warmth or even some finely chopped nuts for added crunch. You could also throw in some shredded cheese if you’re feeling adventurous! Just remember not to overload the mixture; too much additional ingredient can affect how well they hold together while baking.
😅 How many times did you test this recipe before sharing it?
Err…yes. I know. I’m a little mad! 😅 I tested this recipe seven times (yes, seven!) before settling on this final version because I wanted each bite to be just perfect—crispy on the outside and soft on the inside with those warm spices shining through. Your taste buds will thank me later!
Troubleshooting
I will continue to add more to this Troubleshooting section as I start seeing questions coming through from people who have made the recipe.
Troubleshooting tips
“My fritter bites are flat and sad! 😭”
- Your fritter mixture may have too much liquid due to using a watery pumpkin puree or too much milk. This can lead to a batter that spreads instead of holding its shape.
- If you didn’t measure the flour correctly, you might not have enough structure to support the fritters. Make sure to spoon and level your flour for accuracy!
I bet they were still YUM though!
“My pumpkin fritters are too dry! 😩”
- If you accidentally added too much flour, it can lead to dry fritters. Make sure you’re measuring properly to keep the balance right.
- Overbaking could also be the culprit; if they sat in the oven for longer than 25 minutes, they might lose moisture. Keep an eye on them towards the end of baking!
I bet they were still YUM though!
“The tops of my fritters look pale and unappetizing! 🤔”
- If your oven wasn’t fully preheated, it can cause uneven cooking, leaving some parts undercooked and others overdone. Always ensure your oven reaches 400°F (200°C) before baking.
- Another possibility is that your fritters are spaced too close together, preventing proper heat circulation. Leave about 2 inches apart while dropping them onto the baking sheet!
I bet they were still YUM though!
“Why do my fritters look wonky? 😅”
- If you didn’t drop uniform amounts of batter onto the baking sheet, some fritters will be bigger or smaller than others. Use a consistent spoon size for even results.
- Mixing too vigorously can also change the texture, leading to uneven shapes. Mix just until combined for that perfect bite!
I bet they were still YUM though!
Baked Pumpkin Fritter Bites
Ingredients
Method
- Preheat the oven to 400°F (200°C) and line a baking sheet with parchment paper.
- In a mixing bowl, combine pumpkin puree, flour, egg, baking powder, cinnamon, nutmeg, ginger, salt, brown sugar, and milk. Mix until well combined.
- Using a spoon, drop small amounts of the mixture onto the prepared baking sheet, spacing them about 2 inches apart.
- Bake in the preheated oven for 20-25 minutes, or until golden brown and cooked through.
- Remove from the oven, let cool slightly, dust with powdered sugar, and serve warm.