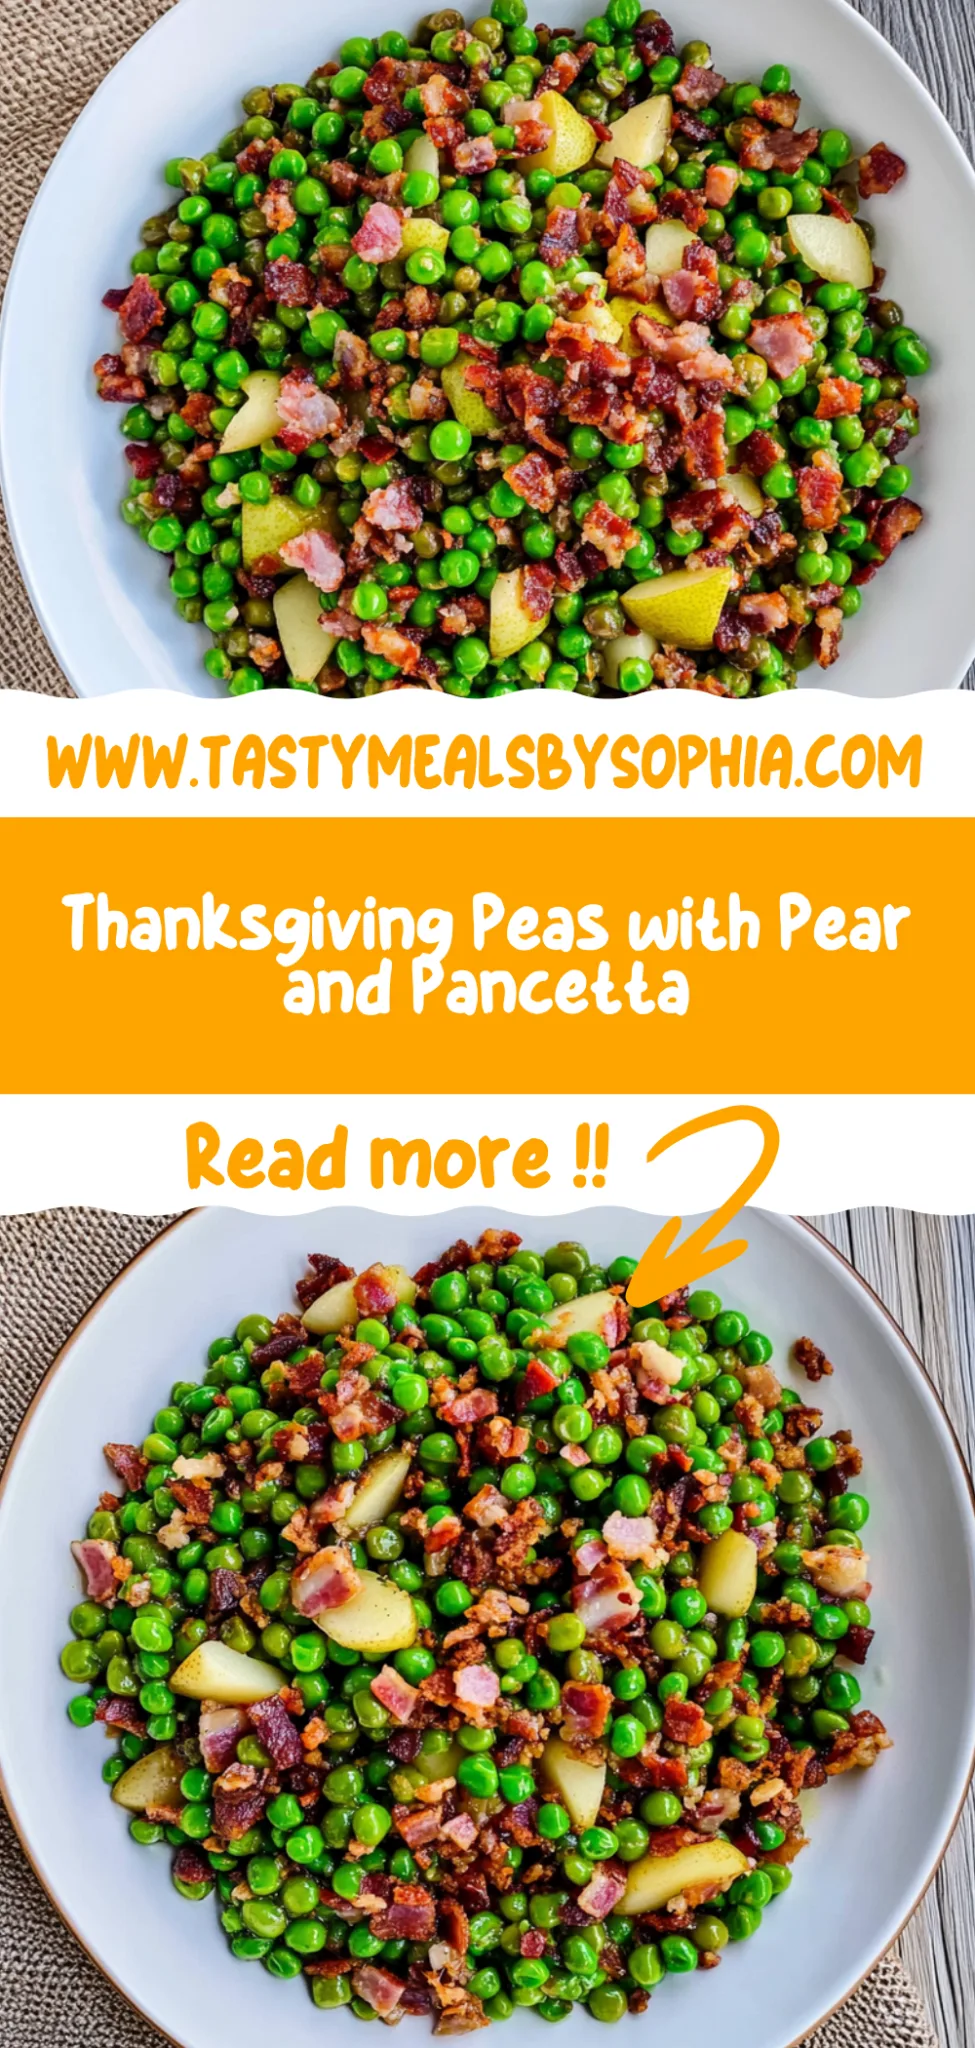
Thanksgiving Peas (with Pear and Pancetta): A Flavorful T…
I’ll never forget the first time I encountered a dish featuring sweet peas and pancetta at a little bistro during one of my trips. The combination was unexpected; the sweetness of the peas paired with the salty crispiness of the pancetta was downright addictive. I couldn’t help but think how it could be even better with juicy pears thrown into the mix—after all, Thanksgiving is all about balancing flavors. So, I decided to recreate this dish at home, not just to save a few bucks but also to put my own twist on it.
Let me tell you, the testing journey was no walk in the park! I went through six different versions of my Thanksgiving Peas (with Pear and Pancetta) before I finally nailed it, and trust me, there were some real disasters along the way—think mushy peas and overly crispy pancetta that resembled little burnt nuggets. With each iteration, I aimed to perfect the balance between sweetness, saltiness, and texture until I finally hit that heavenly spot where every bite sang together in harmony.
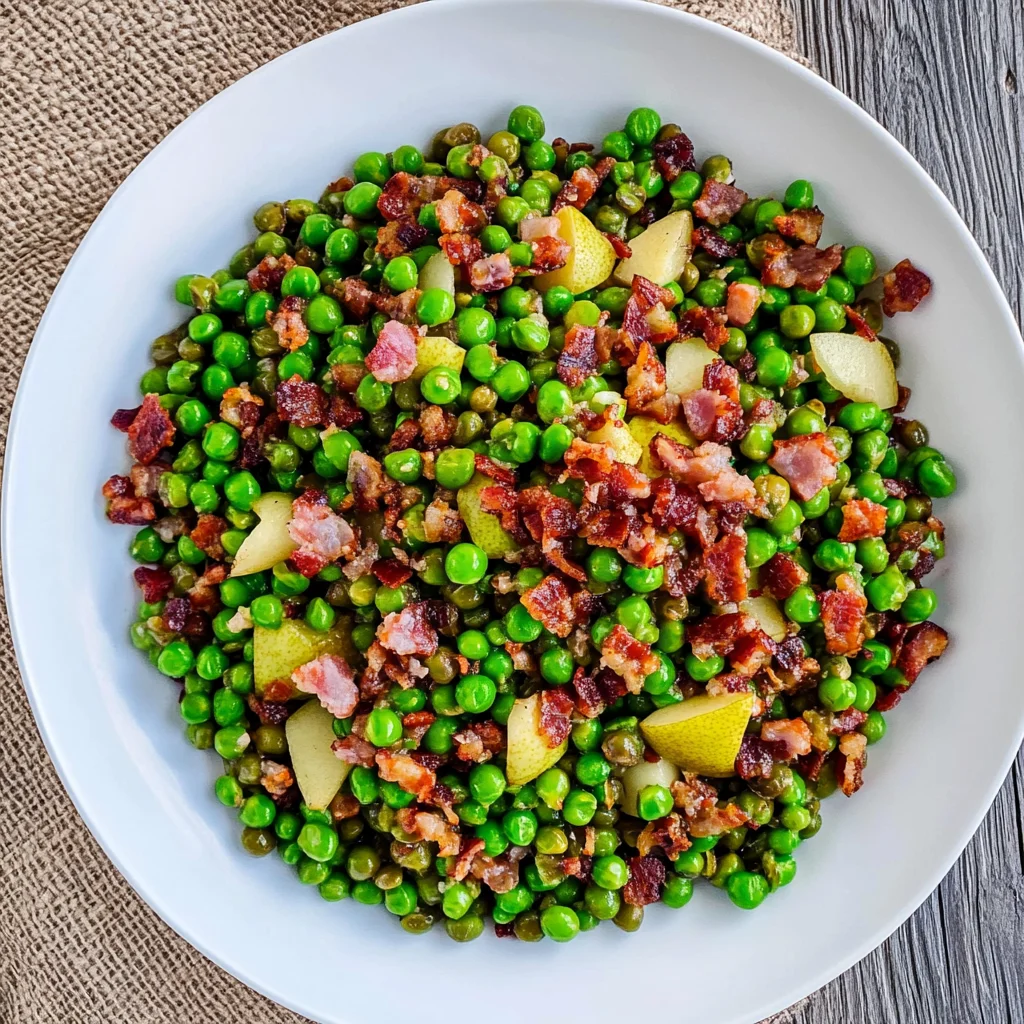
And oh boy, was it worth it! The final result is a delightful side dish that bursts with color and flavor: vibrant green peas glisten alongside caramelized golden pears and perfectly crunchy pancetta. The sweetness from the pears complements the savory notes of the pancetta while the sweet peas add a pop of freshness that’s just irresistible. Trust me when I say, if you’re looking to impress your guests this Thanksgiving, these peas are going to steal the show! So grab your apron and let’s make some magic happen in the kitchen!
These Thanksgiving Peas (with Pear and Pancetta) are…
….the ultimate side dish that will elevate your Thanksgiving table!
1. They deliver an incredible burst of sweetness from the fresh peas and juicy pears, creating a harmonious flavor profile. The natural sugars in the peas complement the pears perfectly, making each bite a delightful celebration of seasonal tastes that will have your guests raving.
2. Their irresistible crunch comes from the crispy pancetta, which adds a satisfying contrast to the tender peas and soft pear. The pancetta is rendered until golden, providing not only texture but also a savory depth that enhances the overall eating experience.
3. This recipe employs a simple sautéing technique that maximizes flavor while keeping the ingredients fresh and vibrant. By cooking the pancetta first, I allow its rich fat to infuse the olive oil, which then coats the peas and pears beautifully without losing their individual freshness.
4. These Thanksgiving Peas (with Pear and Pancetta) are a budget-friendly option compared to many holiday sides, using just a handful of accessible ingredients. The combination of fresh produce and pantry staples means you can create this elegant dish without breaking the bank or spending hours in preparation.
PS These Thanksgiving Peas (with Pear and Pancetta) yield about 4 servings, making them a perfect addition to your festive spread without overwhelming your kitchen space!
Ingredients for the Thanksgiving Peas (with Pear and Pancetta)
Each ingredient in this dish plays an essential role in flavor and texture. Here’s what you’ll need:
2 cups fresh peas (or frozen, thawed): These provide a sweet burst of flavor and vibrant color.
1 medium pear (diced): Adds a juicy sweetness that complements the savory elements.
4 oz pancetta (diced): Brings a rich, salty crunch that elevates the dish.
1 tbsp fresh thyme (chopped): Offers an aromatic freshness that enhances the overall taste.
1 tbsp olive oil (for cooking): Serves as the base for sautéing, adding depth of flavor.
salt to taste: Enhances all the flavors and balances sweetness.
- black pepper to taste: Adds a subtle heat and complexity to the dish.
You MUST Cook the Pancetta Until Crispy. No Exceptions!
I’ll be honest—I tried to take a shortcut here, thinking I could simply toss in the pancetta without cooking it long enough, and guess what? It was a disaster! I really wanted to skip that extra time, but trust me, you cannot underestimate this step if you want your Thanksgiving Peas to shine.
Cooking the pancetta until crispy is crucial because it brings out its rich, savory flavor and crunchy texture. Think of it like adding the perfect sear to a steak; it transforms not just the taste but the whole experience of the dish. In our Thanksgiving Peas with Pear and Pancetta, that crispy texture contrasts beautifully with the tender sweetness of peas and pears, making each bite a delightful journey.
What does cooking pancetta do?
- Flavor — The crispy pancetta releases its savory oils into the dish, infusing every pea and pear with an irresistible umami kick.
- Texture — Cooking until crispy creates a satisfying crunch that enhances the overall eating experience against the soft peas and juicy pears.
- Color — Properly cooked pancetta develops a golden-brown hue that adds visual appeal to your dish, making it look as delicious as it tastes.
- Aroma — The sizzling pancetta fills your kitchen with mouthwatering scents that signal deliciousness is on its way—no one can resist!
- Fat Rendering — As the pancetta cooks, it releases flavorful fat that coats the peas and pears, enriching their taste without needing extra oil or butter.
Different cooking times for pancetta
- 5 minutes (good) — Barely crispy; some flavor but lacks depth. You’ll get bits of chewy meat instead of satisfying crunch.
- 7 minutes (better) — A good compromise; crispy edges start to appear while still retaining some moisture.
- ⭐️ 9 minutes ⭐️ — Optimal! Perfectly crisped with rendered fat for maximum flavor impact—this is where you want to be!
- Beyond 10 minutes (diminishing returns) — Risk of burning; while you might think more crisp equals more flavor, too much can turn bitter.
Don’t even think about skimping on this step! The most common mistake is pulling the pancetta off too soon. If it’s not crispy, you’re missing out on all those beautiful flavors and textures that make this dish truly special. Trust me—you’ll thank me later!
How to make Thanksgiving Peas (with Pear and Pancetta)
Are you ready to see how straightforward it is to make the Thanksgiving Peas (with Pear and Pancetta) of your dreams??
1. COOK THE PANCETTA
Get ready for that deliciously crispy pancetta base that will elevate your dish!
1. Heat – In a large skillet, heat the olive oil over medium heat. You want just enough oil to lightly coat the bottom of the pan, which helps the pancetta crisp up beautifully.
2. Add – Add the diced pancetta to the skillet. Cook it until it’s crispy and golden brown, which should take about 5-7 minutes. Keep an eye on it; you’ll know it’s done when it starts to release its savory aroma and turns slightly crunchy!
HANDY TIPS
- 💡 TIP: If you’re using frozen peas, make sure they’re completely thawed before adding them in to maintain their texture.
- ⚠️ Watch closely! If you let the pancetta sit too long without stirring, it may burn.
2. ADD PEAS AND PEAR
This is where your dish starts coming together with vibrant colors and flavors!
3. Stir – Add the fresh peas and diced pear to the skillet with the crispy pancetta. Give everything a good stir to ensure that those sweet pears start soaking up all that savory goodness from the pancetta.
HANDY TIPS
- 💡 TIP: Dicing your pear into small pieces allows it to cook evenly, adding sweetness throughout each bite.
- ❓ Why does this matter? Combining these ingredients early helps build flavor layers that complement each other wonderfully!
3. SEASON AND COOK
Time to bring everything together with seasoning that enhances each ingredient!
4. Season – Sprinkle in salt, black pepper, and fresh thyme over the mixture in your skillet. This is where you can really personalize it—taste as you go!
5. Cook – Let everything cook for an additional 8-10 minutes until the peas are tender and heated through but still vibrant green. You want them tender without being mushy; they should retain a bit of bite!
HANDY TIPS
- ⚠️ Important! Make sure not to overcook the peas; they should be bright green and tender-crisp for maximum freshness!
- 💡 TIP: Fresh thyme adds a lovely earthy aroma—feel free to use more if you’re a fan!
4. SERVE
The moment you’ve been waiting for—it’s time to plate up this delightful side dish!
6. Remove – Take the skillet off the heat and serve warm as a beautiful side dish alongside your Thanksgiving feast.
That’s it! You’ve just crafted a stunning side of Thanksgiving Peas (with Pear and Pancetta) that will impress everyone at your table! Make these once, and I wager they will invade your dreams every night too! – Nagi x
FAQ – Thanksgiving Peas (with Pear and Pancetta)
❄️ Can I make this dish ahead of time?
Yes, you can prepare the components of this dish ahead of time! I recommend cooking the pancetta and then storing it separately from the peas and pears. You can refrigerate both for up to 3 days. When you’re ready to serve, simply reheat the pancetta in a skillet, add the peas and pears, and season as directed. This method keeps everything fresh and prevents sogginess!
🥡 How do I store leftovers?
Leftovers can be stored in an airtight container in the fridge for up to 3 days. However, I found that after day 2, the quality decreases to about 80% as the peas may lose their crispness. If you want to freeze them, it’s not ideal since freezing can change the texture of both peas and pears, but if you must, freeze them in a freezer-safe bag for up to 2 months. Just know they won’t be as delightful upon thawing!
🌱 Is this recipe gluten-free?
Absolutely! The ingredients in this recipe are naturally gluten-free. Just ensure that any additional products you use (like broth or seasoning) are also marked gluten-free. Enjoy this festive side without any worries!
🔄 Can I substitute pancetta with another meat?
Yes, if you’re looking for a substitution, you can use bacon or prosciutto instead. Bacon will give a smokier flavor while prosciutto offers a more delicate taste. Just note that bacon might require a bit longer to crisp up—about 7-10 minutes depending on thickness—while prosciutto should be added towards the end to avoid overcooking.
⏲️ Why do I need to cook the pancetta first?
Cooking the pancetta first is crucial because it renders out its fat, which adds flavor to the dish. If you skip this step and add everything together at once, you’ll miss out on that deliciously crispy texture and savory depth that perfectly complements the sweetness of peas and pears. Trust me; it’s worth those extra minutes!
🍐 Can I use canned peas instead?
I really don’t recommend using canned peas for this recipe; they tend to be mushy and lack the vibrant color and sweet flavor of fresh or even frozen peas. If you have only canned options available, just keep in mind that they should be added last in the cooking process—just enough to warm through without turning into mush.
🌈 What other variations can I try?
Feel free to get creative! You could add diced carrots or even sautéed shallots for added sweetness and depth. For a touch of nuttiness, consider sprinkling some toasted walnuts or almonds on top just before serving. If you’re feeling adventurous, a splash of balsamic vinegar can elevate those flavors beautifully!
Troubleshooting
I will continue to add more to this Troubleshooting section as I start seeing questions coming through from people who have made the recipe.
Troubleshooting tips
“My peas turned out mushy! 😱”
- You may have overcooked the peas. Fresh peas only need a few minutes to become tender, so cooking them for too long can lead to a mushy texture.
- If you used frozen peas, they can break down easily if cooked for too long. Aim for just heating them through without prolonged cooking.
I bet they were still YUM though!
“My pancetta didn’t get crispy! 😩”
- If you didn’t cook the pancetta on medium heat, it may have rendered too much fat without getting crispy. Make sure the skillet is hot enough before adding it.
- Adding peas and pears too early can also trap moisture and prevent the pancetta from crisping up. Wait until the pancetta is perfectly browned before mixing in other ingredients.
I bet they were still YUM though!
“My dish looks a bit bland in color!”
- If your pancetta wasn’t cooked until golden brown, it won’t impart that beautiful color to the dish. Make sure to let it get crispy and caramelized for visual appeal and flavor!
- The green of the peas can also look less vibrant if overcooked; maintain their bright color by keeping an eye on cooking time.
I bet they were still YUM though!
“My pears went mushy and lost shape! 😢”
- You might have added the diced pear too early in the cooking process. Pears should be added just after the pancetta and peas have combined, allowing them to soften slightly while retaining their shape.
- Using overripe pears can also lead to a mushy result; choose firm pears for best texture when cooked.
I bet they were still YUM though!
Thanksgiving Peas (with Pear and Pancetta)
Ingredients
Method
- In a large skillet, heat olive oil over medium heat. Add diced pancetta and cook until crispy, about 5-7 minutes.
- Add the fresh peas and diced pear to the skillet. Stir well to combine with the pancetta.
- Season with salt, black pepper, and fresh thyme. Cook for an additional 8-10 minutes until peas are tender and heated through.
- Remove from heat and serve warm as a side dish for your Thanksgiving meal.