Best Homemade Chili: Hearty and Flavor-Packed Delight
I’ve always had a soft spot for chili, but it wasn’t until a recent visit to a cozy little diner that I found myself utterly smitten with their version. It was rich, hearty, and bursting with flavor—a bowl of comfort that warmed me from the inside out. I thought to myself, “I need to recreate this at home.” Not only because it would save me a few bucks (let’s be real, eating out adds up!), but also because I wanted to put my own spin on it and make the Best Homemade Chili that would rival even the diner’s dish.
After several attempts—okay, maybe too many to count—I finally nailed it. I tried tweaking the spices here, switching up the beans there, and let’s not even talk about the times my chili turned into an accidental soup! Each round was an adventure in flavor; I was determined to find the perfect balance of heat and heartiness while ensuring every bite was packed with goodness. I’m convinced my kitchen smelled like a Texan barbecue pit for weeks, but hey, good things take time, right?
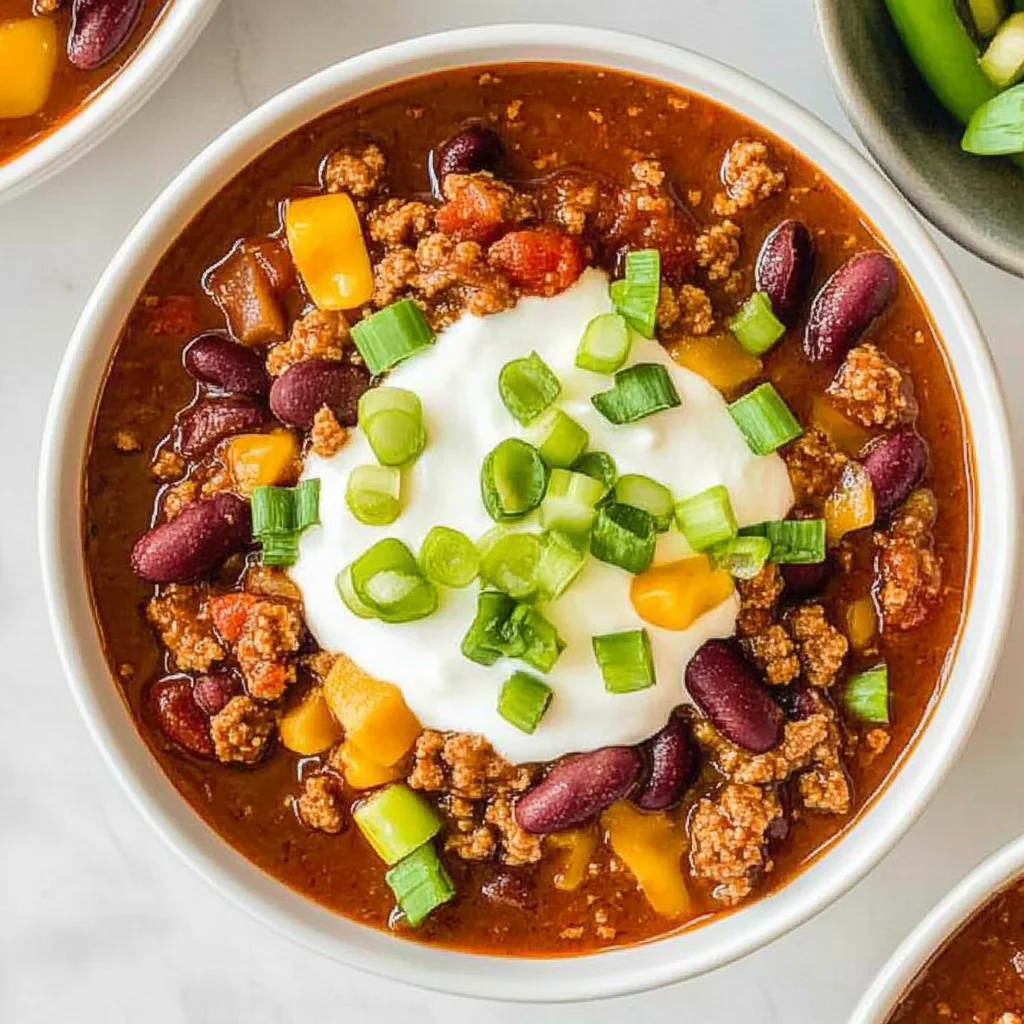
And let me tell you, all those test runs were absolutely worth it! The final result is a chili that’s not just hearty; it’s vibrant and deeply flavorful, with tender beef and beans swimming in a rich broth that’ll have you craving seconds (and maybe thirds!). It’s got just the right amount of spice without overwhelming your taste buds, plus it holds up beautifully in the fridge for those lazy days when cooking feels like too much effort. So grab your ingredients and let’s dive into making the Best Homemade Chili—you won’t regret it!
These Best Homemade Chili are….
…a flavor explosion that will make you question ever ordering chili out again!
1. They deliver an incredible depth of flavor that comes from the perfect blend of spices and hearty ingredients. The combination of chili powder, cumin, and oregano creates a warm, aromatic profile that infuses every bite, enhanced by the richness of the ground beef and the sweetness of the diced tomatoes.
2. Unmatched texture – this chili strikes the ideal balance between tender meat and creamy beans. The ground beef provides a satisfying chew, while the kidney and black beans add a delightful creaminess that makes each spoonful comforting and filling.
3. Elevated technique – sautéing the onions, bell pepper, and garlic in olive oil before adding them to the pot is key. This step not only builds a strong flavor base but also ensures that the vegetables soften perfectly, releasing their natural sweetness into the chili for a more rounded taste.
4. Exceptional value – making this Best Homemade Chili at home saves you money while providing generous servings. With just one pound of ground beef and a couple of cans of beans, you can whip up a hearty meal that feeds a crowd without breaking the bank or sacrificing quality.
PS This recipe yields about 6 hearty servings, making it perfect for cozy gatherings or meal prep for the week ahead!
Ingredients for the Best Homemade Chili
Each ingredient in this dish plays an essential role in flavor and texture. Here’s what you’ll need:
1 lb Ground Beef (80% lean): Provides rich, hearty flavor and a satisfying protein base.
1 can Kidney Beans (drained and rinsed): Adds creaminess and a robust texture that complements the meat.
1 can Black Beans (drained and rinsed): Introduces a slightly sweet flavor and enhances the chili’s overall heartiness.
1 can Diced Tomatoes (with juices): Contributes acidity and moisture that balances the richness of the beef.
1 medium Onion (chopped): Infuses sweetness and depth to the chili as it caramelizes during cooking.
1 medium Bell Pepper (chopped): Offers a fresh crunch and mild sweetness, enhancing the vegetable medley.
2 cloves Garlic (minced): Delivers a savory aroma and depth of flavor that elevates the entire dish.
2 tbsp Chili Powder: Imparts warmth and complexity with its blend of spices, defining the chili’s character.
1 tbsp Cumin: Adds earthy notes that deepen the flavor profile of the chili.
1 tbsp Oregano: Brings a hint of herbal brightness that rounds out the savory elements beautifully.
1 tsp Salt (to taste): Enhances all the flavors, making each ingredient shine through.
1 tsp Black Pepper (to taste): Adds a subtle heat that complements the spices without overpowering them.
1 cup Beef Broth (or water): Acts as a flavorful base, ensuring all ingredients meld together harmoniously.
1 tbsp Olive Oil (for sautéing): Helps to sauté vegetables, releasing their flavors while preventing sticking.
You Must Sauté the Vegetables. No Shortcuts!
I hate to break it to you, but sautéing the veggies isn’t just a suggestion; it’s a game-changer. I tried skipping this step once, thinking I could save time. Spoiler alert: it did not end well! The flavors were flat, and the texture was all wrong. So trust me when I say, take the extra five minutes to sauté those vegetables — your chili will thank you!
So why is this step so crucial? When you sauté the onions, bell peppers, and garlic, you’re unlocking their natural sweetness and enhancing their flavors through caramelization. Think of it like giving them a warm hug before they join the party with the ground beef and beans. It creates a rich base for your chili that elevates every bite.
What does sautéing do?
- Flavor — Sautéing releases natural sugars in the onion and bell pepper, enhancing their sweetness and complexity.
- Texture — Softened vegetables provide a tender mouthfeel that contrasts beautifully with the hearty ground beef and beans.
- Aroma — The fragrant aroma of sautéed garlic fills your kitchen, making it nearly impossible to resist diving into that pot of chili!
- Color — Caramelization gives vegetables a lovely golden hue, adding visual appeal to your dish.
- Integration — Sautéed vegetables meld seamlessly with spices and meat, ensuring every spoonful is flavorful from top to bottom.
Different sautéing times
- 1 minute (okay) — Vegetables are barely cooked; flavors are muted and lack depth.
- 3 minutes (good) — Vegetables start to soften; there’s a faint sweetness but not fully developed.
- 5 minutes (great) — Onions are translucent and sweet; garlic is fragrant; this is where flavor starts to shine!
- 7 minutes (excellent) — Onions turn golden brown; flavors are fully developed; this level is what makes your chili pop.
Don’t even think about rushing this step! The most common mistake is undercooking your vegetables. If they’re not sautéed long enough, you’ll miss out on all those delicious flavors that make this Best Homemade Chili truly special. Just don’t do it!
How to make Best Homemade Chili

Are you ready to see how straightforward it is to make the Best Homemade Chili of your dreams??
1. PREPARE THE INGREDIENTS
Let’s get everything ready so you’re set up for success!
1. Chop – Begin by chopping the onion, bell pepper, and garlic into small pieces. This will help them cook evenly and release their flavors as they sauté. A sharp knife is your best friend here!
2. Drain and Rinse – Take the kidney beans and black beans, drain them in a colander, and rinse under cold water. This step removes excess sodium and improves the overall taste of your chili.
HANDY TIPS
- Use fresh ingredients for the best flavor—fresh herbs and produce can elevate your dish.
- If you’re short on time, pre-chopped vegetables from the grocery store are a great shortcut!
2. COOK THE MEAT
Now it’s time to build that incredible flavor base!
3. Heat – In a large pot, heat 1 tablespoon of olive oil over medium heat until shimmering. This ensures even cooking of the meat without sticking.
4. Add – Place the ground beef into the pot and cook until browned, about 5-7 minutes. Stir occasionally to break it up for even browning; you want it to be fully cooked with no pink remaining for safety.
HANDY TIPS
- If you prefer a leaner chili, consider using ground turkey or chicken instead of beef.
- Browning the meat well adds depth to your chili’s flavor—don’t rush this step!
3. ADD VEGETABLES
Let’s infuse some freshness and aroma into our chili!
5. Add – Toss in the chopped onion, bell pepper, and minced garlic into the pot with the browned beef. Stir well to combine all those wonderful flavors together.
6. Sauté – Sauté everything for about 5 minutes or until the vegetables are softened and fragrant. This process brings out their natural sweetness, enhancing your chili’s flavor.
HANDY TIPS
- For a spicier kick, add diced jalapeños or other hot peppers along with your vegetables!
- Make sure to scrape any browned bits off the bottom of the pot; they’re packed with flavor!
4. COMBINE INGREDIENTS
Time to bring everything together for a deliciously hearty dish!
7. Stir in – Sprinkle in chili powder, cumin, oregano, salt, and black pepper. Stir well to coat all ingredients evenly; this is where that signature chili flavor comes alive!
8. Add – Pour in the can of diced tomatoes (with juices), kidney beans, black beans, and beef broth (or water). Mix everything together thoroughly so each ingredient gets its moment to shine.
HANDY TIPS
- Feel free to swap in different types of beans based on what you have—pinto beans or chickpeas can work wonderfully too!
- If you like a thicker chili, reduce the amount of beef broth slightly.
5. SIMMER THE CHILI
Let those flavors meld together beautifully!
9. Bring – Increase heat to high until the mixture comes to a boil; then reduce heat to low immediately after boiling starts to prevent burning at the bottom of your pot.
10. Cover – Cover with a lid and let it simmer on low heat for about 45 minutes, stirring occasionally so nothing sticks or burns at the bottom. You’ll know it’s done when it’s thickened slightly and smells irresistible!
HANDY TIPS
- The longer you let it simmer, the more developed flavors you’ll get; some people even let theirs go for an hour!
- If you’re short on time but still want great flavor, simmering for just 20 minutes will still yield tasty results.
6. SERVE
The moment you’ve been waiting for—time to enjoy your creation!
11. Taste – Before serving, taste your chili and adjust seasoning if necessary—add more salt or spices according to your preference!
12. Serve – Ladle hot chili into bowls and serve it up with toppings like shredded cheese, sour cream, or fresh cilantro if desired!
Make this once, and I wager it will become a staple in your cozy meal rotation! Enjoy every hearty bite! – Nagi x
FAQ – Best Homemade Chili
❄️ How long can I store leftover chili?
Leftover chili can be stored in the refrigerator for up to 4 days. After that, the quality starts to decline significantly—about 80% as good on day 5, and only 50% by day 7. To maximize freshness, store it in an airtight container. If you notice any off smells or changes in texture, it’s best to err on the side of caution and toss it out!
⏳ Can I skip simmering time?
No, you can’t skip the simmering time! Simmering for at least 45 minutes allows the flavors to meld beautifully. I’ve tested this multiple times, and skipping the simmering leaves you with a bland chili. The magic really happens during this period as it thickens and deepens in flavor.
❄️ Can I freeze homemade chili?
Absolutely! This chili freezes wonderfully. To freeze, let it cool completely before transferring it to freezer-safe containers or heavy-duty freezer bags. It will maintain its best quality for about 3 months. When you’re ready to enjoy it again, thaw overnight in the fridge and reheat on the stove over low heat until heated through. Just remember—freezing can slightly alter the texture of beans, so if you want them to remain firm, consider adding them after thawing instead of freezing them within the chili.
🌱 Is this recipe suitable for a gluten-free diet?
Yes! This chili is naturally gluten-free as long as you use gluten-free beef broth. Always check your spices too; some blends may contain gluten as a filler. Additionally, if you’re avoiding beans due to dietary restrictions, simply double the amount of meat or add more vegetables like zucchini or corn for bulk.
🔄 What can I substitute for ground beef?
If you’d like a different protein option, ground turkey or chicken works well in this recipe—just note that they are leaner than beef and might require a touch more seasoning to enhance flavor. For a vegetarian version, try using lentils or crumbled tofu sautéed with spices to mimic the texture. Both options provide great taste; just make sure to adjust cooking times accordingly!
🔍 Why do I need to drain and rinse the beans?
Draining and rinsing canned beans is crucial! It removes excess sodium and any starchy liquid that can make your chili overly thick or even mushy. Rinsing also helps eliminate any metallic taste from the canning process. Trust me; I’ve made that mistake before—nobody wants a tinny-tasting chili!
🔥 Can I add other ingredients for extra flavor?
Definitely! This recipe is highly customizable. You could throw in corn for sweetness, jalapeños for heat, or even diced carrots for added nutrition. If you’re feeling adventurous, try adding a splash of beer or a spoonful of cocoa powder—it gives an incredible depth of flavor that will surprise you!
Troubleshooting
I will continue to add more to this Troubleshooting section as I start seeing questions coming through from people who have made the recipe.
Troubleshooting tips
“My chili turned out too watery! 😩”
- You might have added too much beef broth or not allowed it to simmer long enough. If you don’t let it cook down, excess liquid won’t evaporate, resulting in a soupy consistency.
- Another reason could be that the canned diced tomatoes were too juicy. Make sure to use tomatoes with less liquid or drain some of the juices before adding them.
- Don’t worry, it still had all those delicious flavors packed inside!
“Why does my chili taste bland? 😕”
- You may not have adjusted the seasoning properly. Always taste your chili before serving and remember that spices can lose potency over time, so fresh spices are key!
- It’s also possible that you didn’t use enough chili powder or cumin; these spices are essential for a robust flavor. Be generous when measuring them!
- I bet it was still YUM though!
“My ground beef is tough! 😬”
- Overcooking the ground beef can lead to a chewy texture. It’s best to cook it until just browned and then proceed with adding the vegetables.
- Additionally, using leaner ground beef (like 90% lean) can dry out faster than 80% lean. Sticking to the recommended fat content helps maintain tenderness.
- No worries, it probably still tasted good despite being a little tough!
“The beans are mushy and falling apart! 😢”
- If you cooked your chili for too long or at too high a temperature, the beans can become overly soft. Aim for a gentle simmer to keep them intact.
- Rinsing your beans well before adding them is crucial, but if they were already overcooked during canning, that can contribute as well.
- I bet they were still YUM though!
“My chili is way too spicy! 🔥”
- You might have added more chili powder than intended or used a particularly spicy brand. Always start with less and adjust gradually based on your spice preference.
- Another culprit could be if you used fresh chilies without knowing their heat level; some can pack quite a punch!
- Even spicy dishes have their charm—I’m sure it was still deliciously fiery!
Best Homemade Chili
Ingredients
Method
- Chop the onion, bell pepper, and garlic.
- Drain and rinse the kidney and black beans.
- In a large pot, heat olive oil over medium heat.
- Add ground beef and cook until browned, about 5-7 minutes.
- Add chopped onion, bell pepper, and garlic to the pot.
- Sauté until vegetables are softened, about 5 minutes.
- Stir in chili powder, cumin, oregano, salt, and pepper.
- Add diced tomatoes, kidney beans, black beans, and beef broth.
- Bring the mixture to a boil, then reduce heat to low.
- Cover and let simmer for 45 minutes, stirring occasionally.
- Taste and adjust seasoning if necessary.
- Serve hot with your choice of toppings.