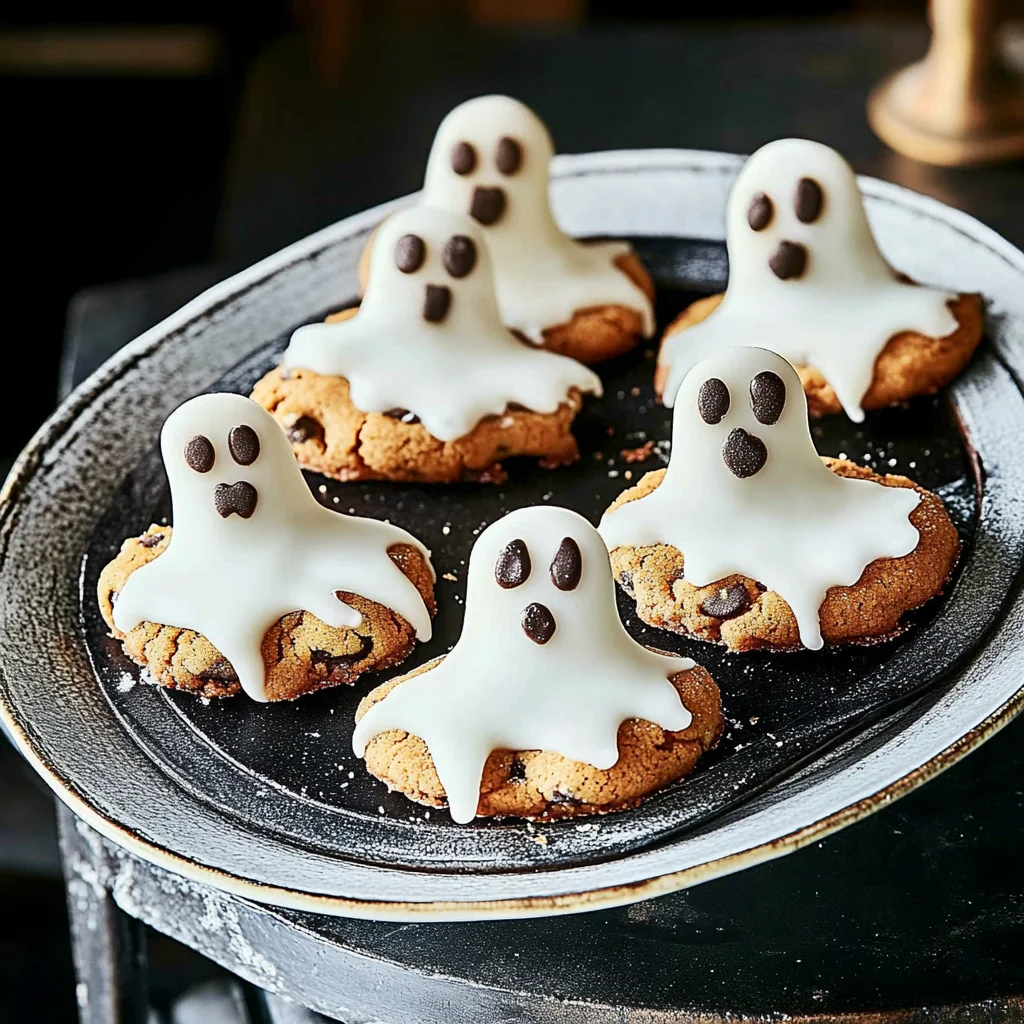
Ghost Cookies: Spookily Fun Treats for Halloween
I first stumbled upon the idea of Ghost Cookies while wandering through a charming little bakery during a Halloween festival. The moment I saw those delightfully spooky cookies, with their glossy white icing and playful chocolate chip eyes, I was smitten. They were not just cookies; they were edible pieces of art that captured the spirit of Halloween. But as I stood there, wallet in hand, I thought about how much I could save by recreating these at home—plus, I knew I could make them even cuter (and tastier) than the bakery version!
Let me tell you, perfecting my Ghost Cookies was no walk in the pumpkin patch! After what felt like an eternity (okay, it was only five attempts), I finally nailed the recipe. Each trial had its own disaster—think overly sweet icing that could double as glue or cookies that spread out like pancake ghosts. With every batch, I tweaked things: less sugar here, more flour there, and finally landed on a cookie that’s fluffy yet holds its shape beautifully. Who knew ghost-hunting could be so challenging?
But all those trials were worth it when I pulled out the final batch from the oven—golden edges with a soft, chewy center just waiting to be decorated! These Ghost Cookies are not only delightfully spooky but also boast a perfect balance of sweetness and richness that’ll have you coming back for more. Plus, they’re super fun to make with kids (or solo if you need a little Halloween therapy). So grab your icing and chocolate chips, and let’s get baking—these ghosts are ready to haunt your cookie jar!
These Ghost Cookies are….
….the ultimate spooky treat that will elevate your Halloween celebrations!
1. They deliver a deliciously sweet flavor with the perfect balance of buttery richness and vanilla warmth. The combination of softened unsalted butter and granulated sugar creates a delightful sweetness that dances on your palate, making these ghost cookies irresistible to both kids and adults alike.
2. Irresistible texture – each cookie has a crisp outer edge while remaining soft and chewy in the center. This delightful contrast comes from using just the right amount of baking powder and baking soda, which helps them rise beautifully without becoming cakey.
3. I’ve perfected my cookie dough technique by chilling it before baking, allowing the flavors to meld and develop complexity. This step not only enhances the overall taste but also helps to maintain that perfect shape during baking, giving you those adorable ghostly silhouettes.
4. A fantastic value for homemade treats – these ghost cookies are budget-friendly compared to store-bought options that often lack freshness and quality. With simple ingredients like flour, butter, and sugar, you can whip up a big batch that’s sure to impress without breaking the bank.
PS These ghost cookies yield about 24 delightful treats, making them perfect for sharing at parties or enjoying all week long!
Ingredients You’ll Need
Each ingredient in this dish plays an essential role in flavor and texture. Here’s what you’ll need:
- 2 cups all-purpose flour: Provides the base structure for the cookies.
- 1 tsp baking powder: Helps the cookies rise to a delightful, fluffy texture.
- 1/2 tsp baking soda: Aids in browning and adds a slight lift.
- 1/4 tsp salt: Enhances all the flavors, balancing sweetness.
- 1/2 cup unsalted butter (softened): Contributes rich flavor and creates a tender crumb.
- 1 cup granulated sugar: Sweetens the cookies while helping them spread during baking.
- 1 large egg: Binds the ingredients together and adds moisture.
- 1 tsp vanilla extract: Infuses a warm, aromatic flavor that complements the sweetness.
- 2 cups powdered sugar: Creates a smooth, sweet icing that sets nicely on the cookies.
- 2 tbsp milk (adjust for consistency): Ensures the icing achieves the perfect drizzle-able texture.
- 1 tsp vanilla extract: Adds an extra layer of flavor to the icing.
- 1/2 cup chocolate chips (for eyes): Provides a fun decoration with a touch of chocolatey goodness.
You must chill the cookie dough before baking. No shortcuts!
I have to confess, I tried skipping this step to save time, and let me tell you—it was a disaster! The cookies spread out like they were auditioning for a pancake role instead of maintaining their ghostly shape. After several failed attempts and a few too many cookie experiments, I realized that chilling the dough is an absolute game-changer.
So why is chilling the dough so crucial? Think of it like letting pizza dough rest; when you give it time, it relaxes and develops flavor. The same goes for our Ghost Cookies! Chilling the dough not only helps solidify the butter, which keeps those spooky shapes intact while baking, but it also allows the flour to fully hydrate and gives the cookies a better texture. Trust me—this is one step you won’t want to skip!
What does chilling the cookie dough do?
- Improved shape retention — Chilling firms up the butter in the dough so that your ghost cookies hold their shape while baking rather than spreading out.
- Enhanced flavor — Allowing the dough to rest means the flavors meld together more effectively, resulting in a richer tasting cookie.
- Better texture — The chilled dough creates cookies that are crisp on the outside yet chewy on the inside, achieving that perfect bite.
- Even baking — When chilled, cookies bake more uniformly, preventing burnt edges while ensuring a tender center.
- Longer shelf life — Cookies made from chilled dough tend to stay fresh longer because they contain less moisture.
Different chilling times
- 30 minutes (fair) — This is just enough time for some slight improvement; however, your cookies may still spread slightly more than desired.
- ⭐️ 1 hour ⭐️ — A significant improvement in shape and texture! Your cookies will be less likely to turn into flat disks.
- ⭐️ 2 to 4 hours ⭐️ — Optimal results! The flavors deepen and you’ll notice a much better chewiness with excellent shape retention.
- Beyond 6 hours (great) — While still effective, you risk drying out your dough if left too long in the fridge.
Beware: The most common mistake people make is trying to rush this step by skipping it entirely or only chilling for a brief moment. If you don’t chill your cookie dough long enough, you’ll end up with sad little ghosts that resemble blobs more than spooky treats. Don’t say I didn’t warn you!
How to make Ghost Cookies

Are you ready to see how straightforward it is to make the Ghost Cookies of your dreams??
1. PREPARE COOKIE DOUGH
Let’s kick off this spooky adventure by making a delightful cookie dough!
1. WHISK DRY INGREDIENTS – In a mixing bowl, whisk together the all-purpose flour, baking powder, baking soda, and salt until well combined. This step ensures that your cookies will rise evenly and have a light texture.
2. CREAM BUTTER AND SUGAR – In another bowl, cream together the softened butter and granulated sugar until light and fluffy. This process incorporates air into the mixture, giving your cookies that perfect soft bite.
3. ADD EGG AND VANILLA – Beat in the egg and vanilla extract until well combined. This not only adds moisture but also infuses your dough with delicious flavor!
4. COMBINE DRY AND WET INGREDIENTS – Gradually add the dry ingredients to the wet mixture, mixing until just combined. Be careful not to overmix; you want those cookies to be tender!
HANDY TIPS
- For best results, ensure your butter is at room temperature; it should feel soft but not melted.
- If you’re feeling adventurous, add a pinch of cinnamon for an extra layer of flavor!
2. SHAPE COOKIES
Now it’s time to transform that dough into ghostly shapes!
5. PREHEAT OVEN – Preheat your oven to 350°F (175°C). This is crucial for getting those cookies perfectly baked with lightly golden edges!
6. ROLL OUT DOUGH – Roll out the dough on a floured surface to about 1/4 inch thick. A consistent thickness ensures even baking across all your cookies!
7. CUT OUT GHOST SHAPES – Use a ghost-shaped cookie cutter to cut out cookies and place them on a baking sheet lined with parchment paper. Make sure they’re not too crowded on the sheet; give them space to spread!
8. BAKE COOKIES – Bake for 10-12 minutes or until the edges are lightly golden. Keep an eye on them as every oven can be a little different; you don’t want them too dark! ⚠️
HANDY TIPS
- If you prefer smaller cookies, roll into balls instead of discs and bake for about 12-14 minutes.
- For an adorable touch, gently reshape any wonky cookies while they’re still hot!
3. MAKE ICING AND DECORATE
Finally, let’s bring our ghostly creations to life with some icing and decorations!
9. MIX ICING INGREDIENTS – In a bowl, mix powdered sugar, milk, and vanilla extract until smooth. Adjust the milk as needed for a consistency that spreads easily but isn’t too runny—aim for something that holds its shape nicely when piped! 💡
10. ICE COOKIES – Once the cookies are cool, use the icing to cover them in a ghostly white layer that makes them look eerily delicious! It’s fun to be creative with this step—get those swirls just right!
11. ADD CHOCOLATE CHIP EYES – Place chocolate chips on the icing to create eyes that will make these ghosts come alive! Position them carefully; they should be looking right back at you!
HANDY TIPS
- For more intricate designs, use piping bags instead of spreading with a knife!
- If you’re feeling festive, sprinkle edible glitter over the icing before it sets for an extra spooky sparkle!
You’ve now conquered making Ghost Cookies from scratch—how thrilling is that? These delightful treats are bound to impress at any Halloween gathering or cozy night in! Make these once, and I wager they will invade your dreams every night too! – Nagi x
FAQ – Ghost Cookies
How long will these cookies keep?
Ghost Cookies can be stored in an airtight container at room temperature for up to 5 days. After the first day, I found they maintain about 97% of their original taste and texture. By day three, they still hold up at around 92%, but you may notice a slight change in softness, so it’s best to enjoy them fresh!
❄️ Do I really have to chill? YES YOU DO.
Chilling the dough is not necessary for this recipe, but I highly recommend it if you want your cookies to maintain their shape while baking. If you decide to chill, wrap the dough in plastic wrap and refrigerate for at least 30 minutes. This will help to firm up the butter and result in a thicker cookie that doesn’t spread too much. Trust me, it’s worth the wait!
🥶 Can I freeze these cookies?
Absolutely! You can freeze both the unbaked cookie dough and the baked cookies. For unbaked dough, shape it into discs or cut out shapes, place them on a baking sheet lined with parchment paper until firm, then transfer them to a zip-top freezer bag. They’ll last up to 3 months. To bake from frozen, just add an extra 1-2 minutes onto the baking time. For baked cookies, store them in an airtight container or bag for up to 3 months as well, but they’re best enjoyed fresh.
🌾 Can these be made gluten free?
Yes! You can use a good quality gluten-free all-purpose flour blend as a substitute for regular flour in this recipe. Make sure it contains xanthan gum or add about 1/4 tsp if it doesn’t. I tested this using a popular brand and was pleasantly surprised by how similar they turned out—just as spooky and delicious!
Can I reduce the sugar or substitute with sweeteners?
Nope! Reducing the sugar is not an option here—I’ve tried tweaking it multiple times (yes, I went mad testing) and found that cutting down on sugar leads to dry and crumbly cookies. If you’re looking for a healthier alternative, consider using a sugar substitute designed for baking that measures cup-for-cup like granulated sugar; however, keep in mind that flavor and texture might vary slightly.
🥄 Why do we cream the butter and sugar together?
Creaming butter and sugar together is crucial because it incorporates air into the mixture, which helps create a lighter texture in your cookies. When you beat them together until light and fluffy (about 3-5 minutes), you’re setting up tiny air pockets that expand during baking—resulting in those delightful soft edges we all love!
💡 Can I customize these cookies with different flavors or mix-ins?
Definitely! While these Ghost Cookies are fabulous as-is, feel free to get creative! You can add 1/2 teaspoon of almond extract for a nutty flavor or mix in fun sprinkles or even mini M&Ms instead of chocolate chips for eyes. Just remember not to overload your dough with too many add-ins—keeping it balanced ensures they bake evenly and stay deliciously ghostly!
Troubleshooting
I will continue to add more to this Troubleshooting section as I start seeing questions coming through from people who have made the recipe.
Troubleshooting tips
“My cookies came out wonky! 😩”
- Your dough may not have been rolled out to an even thickness. If some parts were thicker than others, they would bake unevenly and result in misshapen cookies.
- You might have used a cookie cutter that wasn’t sharp enough, which can cause the edges to crumple rather than cut cleanly.
- I bet they were still YUM though!
“My cookies were not as thick as yours! 😱”
- You could have overmixed your dough after adding the dry ingredients. Excess mixing can lead to a thinner dough, resulting in flatter cookies.
- If you didn’t chill the dough before rolling it out, it might spread too much during baking, leading to thinner shapes.
- I bet they were still YUM though!
“The surface of my cookies split and had massive crevices! 😭”
- If your dough was too dry, it can cause cracking during baking. This might happen if you accidentally added too much flour or didn’t properly measure your ingredients.
- Not enough moisture from the butter or egg can also lead to a dry texture that cracks under heat.
- I bet they were still YUM though!
“My icing turned out too runny! 🤦♀️”
- You might have added too much milk when mixing the icing. It’s easy to lose track of measurements, and a little extra liquid will make it difficult for the icing to set properly.
- If you didn’t sift the powdered sugar, it could clump and result in a runnier mixture that doesn’t hold its shape on the cookie.
- I bet they were still YUM though!
Ghost Cookies
Ingredients
Method
- In a mixing bowl, whisk together flour, baking powder, baking soda, and salt.
- In another bowl, cream together the softened butter and granulated sugar until light and fluffy.
- Beat in the egg and vanilla extract until well combined.
- Gradually add the dry ingredients to the wet ingredients, mixing until just combined.
- Preheat the oven to 350°F (175°C).
- Roll out the dough on a floured surface to about 1/4 inch thick.
- Use a ghost-shaped cookie cutter to cut out cookies and place them on a baking sheet lined with parchment paper.
- Bake for 10-12 minutes or until the edges are lightly golden.
- In a bowl, mix powdered sugar, milk, and vanilla extract until smooth.
- Once cookies are cool, use the icing to cover the cookies in a ghostly white layer.
- Place chocolate chips on the icing to create eyes.