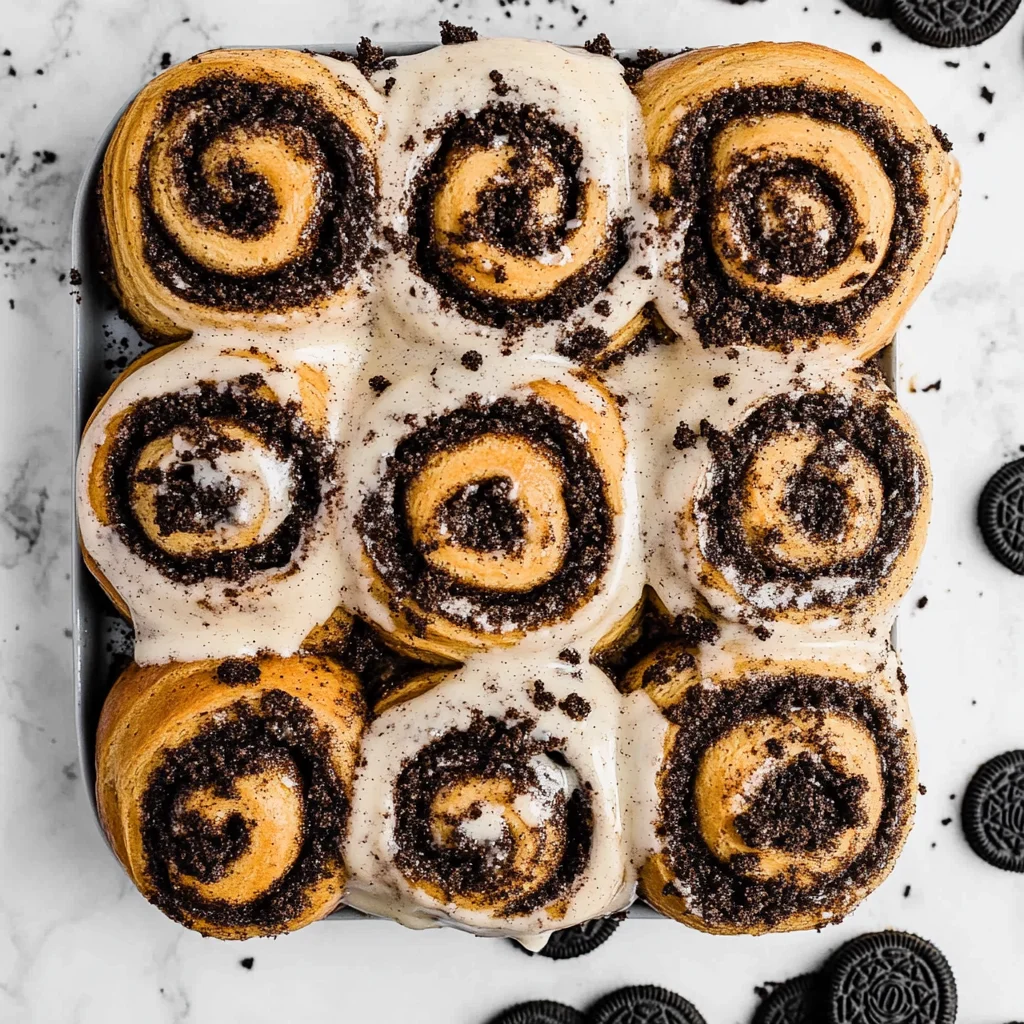
Oreo Cinnamon Rolls: Sweetest Breakfast Twist Ever
When I first stumbled upon Oreo-infused cinnamon rolls at a quirky little café, my taste buds did a happy dance that was hard to forget. The idea of combining two beloved treats—cinnamon rolls and Oreos—was practically genius! But as much as I loved those rolls, I couldn’t help but think about how I could make them even better at home, not to mention save a few bucks while doing it. Let’s be honest, bakery prices can add up quickly, and who doesn’t love the satisfaction of creating something delicious from scratch?
After several (and I mean several) attempts in my kitchen, during which my family probably wondered if I’d ever stop torturing their taste buds with mediocre dough, I finally cracked the code for these Oreo Cinnamon Rolls. Each iteration was a learning experience; one time the dough was too dry, another batch turned out more like a flat pancake than a fluffy roll. It took me a good week to perfect the dough’s texture and find just the right balance between the rich chocolatey Oreo filling and that signature cinnamon sweetness. Spoiler alert: there were definitely some very sad-looking rolls along the way!
But oh boy, was it worth it! These Oreo Cinnamon Rolls are everything you want them to be—soft, pillowy, and bursting with that delightful crunch of crushed Oreos mixed into the gooey filling. The best part? They’re drizzled with a creamy frosting that takes them over the top! Trust me when I say you’ll want to make these for brunch or just because it’s a Tuesday. So roll up your sleeves and let’s get baking—I promise you’re going to love this twist on a classic!
These Oreo Cinnamon Rolls are…
…a game changer in the world of cinnamon rolls, delivering an unforgettable flavor experience that’s simply out of this world!
1. They offer an irresistible flavor explosion thanks to the unique infusion of crushed Oreo cookies. This delightful twist combines the classic warmth of cinnamon with the rich, chocolaty taste of Oreos, creating a mouthwatering blend that elevates these rolls to a whole new level.
2. Perfectly pillowy texture – each roll is soft and fluffy on the inside while boasting a slightly crisp exterior. By incorporating warm milk and melted butter into the dough, I ensure that every bite melts in your mouth, leaving you craving just one more piece.
3. The quick and easy technique using instant yeast simplifies the process without sacrificing quality. It allows for a faster rise time, making it easier to achieve those soft, airy rolls without waiting hours, so you can enjoy your delicious creations sooner.
4. Incredible value – making these at home saves you money compared to buying gourmet cinnamon rolls from a bakery. With just a few simple ingredients that are easy to find, you can whip up a batch of these Oreo Cinnamon Rolls for a fraction of the cost while impressing friends and family with your baking skills.
PS These rolls yield about 12 generous pieces—perfect for sharing or enjoying throughout the week!
Ingredients You’ll Need
Each ingredient in this dish plays an essential role in flavor and texture. Here’s what you’ll need:
Dough
2 cups all-purpose flour (plus more for dusting): Provides the structure and base for fluffy rolls.
1 packet instant yeast: This activates the dough, helping it rise to perfection.
1 tablespoon sugar: Enhances the overall sweetness and aids in browning the rolls.
1/2 teaspoon salt: Balances flavors and strengthens the dough’s structure.
3/4 cup milk (warm): Hydrates the dough and activates the yeast for a soft texture.
2 tablespoons butter (melted): Adds richness and moisture to the dough.
Filling
1/2 cup brown sugar (packed): Infuses a deep caramel flavor that complements the cinnamon.
1 tablespoon cinnamon: Brings warmth and a classic spice note to the filling.
1 cup crushed Oreo cookies: Introduces a unique chocolatey crunch that elevates the rolls.
Icing
1 cup powdered sugar: Creates a sweet, smooth icing that perfectly tops off your rolls.
2 tablespoons milk: Thins the icing to achieve a drizzle-worthy consistency.
1 teaspoon vanilla extract: Adds a comforting aromatic flavor that enhances the icing.
You MUST Let the Dough Rise! No Skipping This Step!
I’ll be honest, I tried to skip this step. I thought, “How much difference could it really make?” Spoiler alert: a LOT. After several batches of sad, flat cinnamon rolls, I learned the hard way that letting dough rise is an absolute must for fluffy, pillowy rolls. Trust me on this one; your taste buds will thank you!
When you let the dough rise, you’re allowing the yeast to do its magic. The yeast ferments and produces gas, which causes the dough to expand and develop a lighter texture. Think of it like blowing air into a balloon — without that air, all you have is a deflated mess. In our case with the Oreo Cinnamon Rolls, that rise is what transforms simple ingredients into the softest, most delightful rolls you’ll ever bite into.
What Does Letting the Dough Rise Do?
- Fluffiness — The yeast creates air pockets in the dough, leading to light and airy rolls instead of dense bricks.
- Flavor development — As the yeast ferments, it develops complex flavors that enhance every bite of your rolls.
- Texture improvement — Proper rising gives the dough structure and chewiness; skip it, and you’ll end up with something akin to cardboard.
- Better icing absorption — A well-risen roll has a spongier surface that soaks up icing beautifully for that sweet finish we all crave.
- Even baking — When dough rises properly, it bakes more evenly in the oven, ensuring all rolls come out golden brown rather than unevenly cooked.
Different Rising Times
- 30 minutes (fair) — The bare minimum; your rolls will be decent but dense and slightly chewy.
- 1 hour (good) — Better results with noticeable fluffiness and improved flavor; this is where you want to be!
- 1.5 hours (great) — Maximum flavor and texture benefits; airy rolls that melt in your mouth.
- Beyond 2 hours (diminishing returns) — While they’ll still taste good, you risk over-proofing and losing structure.
Be warned: One of the most common mistakes is underestimating the importance of rising time. Don’t rush it! If you see your dough hasn’t doubled in size after an hour, give it more time. Your cinnamon rolls depend on it!
How to make Oreo Cinnamon Rolls

Are you ready to see how straightforward it is to make the Oreo Cinnamon Rolls of your dreams??
1. PREPARE THE DOUGH
Let’s get that dough rising! You’ll be amazed at how simple it is.
1. COMBINE – In a mixing bowl, combine 2 cups of all-purpose flour, 1 packet of instant yeast, 1 tablespoon of sugar, and 1/2 teaspoon of salt. This mixture creates the foundation for your fluffy rolls.
2. ADD – Pour in 3/4 cup of warm milk and 2 tablespoons of melted butter, mixing until a dough forms. The warmth from the milk activates the yeast, helping your rolls rise beautifully! ❓ Why does this matter? Because warm milk gives the yeast a boost for that perfect fluffiness!
3. KNEAD – Knead the dough on a floured surface for about 5 minutes until smooth. This step develops gluten, which is crucial for structure and chewiness in your rolls. 💡 TIP: If the dough sticks to your hands, sprinkle a little extra flour as needed while kneading.
4. RISE – Place the dough in a greased bowl, cover it with a damp cloth or plastic wrap, and let it rise for 1 hour in a warm place until it doubles in size. You’ll know it’s ready when you gently press your finger into the dough and it springs back!
HANDY TIPS
- If you’re short on time, try placing the covered bowl in a slightly warm oven (turned off) to speed up the rising process!
- For an extra flavor boost, consider adding a pinch of vanilla extract to the dough!
2. MAKE THE FILLING
Time to whip up that delicious filling! This part adds all the sweet goodness!
5. MIX – In a separate bowl, mix together 1/2 cup of packed brown sugar, 1 tablespoon of cinnamon, and 1 cup of crushed Oreo cookies until well combined. The chocolatey crunch from the Oreos will take your cinnamon rolls to another level! 💡 TIP: Use food processor or blender to crush Oreos quickly without any mess!
HANDY TIPS
- Want an even richer filling? Try adding a bit of softened cream cheese along with the other ingredients for extra creaminess!
- Adjust sweetness by adding more or less brown sugar based on your taste preference; just remember that Oreos are already sweet!
3. ASSEMBLE THE ROLLS
Now comes the fun part – assembling those delicious rolls!
6. PREHEAT – Preheat your oven to 350°F (175°C). Make sure it’s nice and hot before baking to get that golden crust! ⚠️ Important: Don’t skip this step; rolling out cold dough yields less satisfying results!
7. ROLL OUT – On a floured surface, roll out the risen dough into a rectangle about 12×18 inches in size. Try to keep it even so all rolls bake uniformly! 💡 TIP: Dusting flour on your rolling pin can help prevent sticking!
8. SPREAD – Spread the filling evenly over the rolled-out dough using a spatula or your hands—just make sure you cover every inch for maximum flavor!
9. ROLL – Roll the dough tightly into a log starting from one long side and cut into 8 equal pieces using a sharp knife or dental floss for clean cuts without squishing them down.
10. RIZE AGAIN – Place the rolls in a greased baking dish, cover them again with plastic wrap or cloth, and let them rise for another 30 minutes until puffy.
HANDY TIPS
- If you want larger rolls, feel free to cut them into fewer pieces; just adjust baking time slightly if needed.
- You can also prepare these rolls ahead by refrigerating overnight after cutting them—just allow them to rise again before baking!
4. BAKE AND ICE
The moment you’ve been waiting for – baking and icing those beauties!
11. BAKE – Bake the rolls in your preheated oven for about 25 minutes or until they are golden brown on top and smell absolutely heavenly! Keep an eye on them towards the end; nobody likes burnt edges!
12. MIX ICING – While they are baking, mix together 1 cup of powdered sugar, 2 tablespoons of milk, and 1 teaspoon of vanilla extract in a bowl until smooth and slightly thickened.
13. DRIZZLE – Once baked, remove them from the oven and drizzle icing generously over the warm rolls before serving—they’ll soak it up beautifully!
HANDY TIPS
- For an even sweeter experience, double the icing recipe if you’re feeling indulgent!
- Serve these warm right out of the oven; they’re best enjoyed fresh!
You’ve just created some scrumptious Oreo Cinnamon Rolls that are sure to impress everyone around you with their unique flavor twist! I can’t wait for you to enjoy every gooey bite—you might just find yourself dreaming about these tonight! – Nagi x
FAQ – Oreo Cinnamon Rolls
❓ How long will these cinnamon rolls keep?
Oreo Cinnamon Rolls can be stored at room temperature in an airtight container for about 2 days. After that, their quality begins to decline, and by day 3, they are about 90% as good as when freshly made. If you want to keep them longer, I recommend refrigerating them, where they will stay fresh for up to a week. Just remember to warm them up before enjoying again—there’s nothing like a warm cinnamon roll!
⏳ Can I skip the dough rising time?
No, you cannot skip the rising time! The first rise is essential for developing flavor and texture in the dough. During this hour, the yeast activates and helps the dough become light and fluffy. If you’re pressed for time, you might try a quick-rise method by using slightly warmer milk (around 110°F/43°C), but I wouldn’t recommend cutting corners on the resting period altogether. Trust me—your taste buds will thank you!
❄️ Can I freeze these cinnamon rolls?
Absolutely! You can freeze these rolls before baking them. Once you’ve cut them into pieces and placed them in a greased dish, cover tightly with plastic wrap and freeze for up to 2 months. When you’re ready to bake, let them thaw in the fridge overnight, then allow them to rise at room temperature for about 30 minutes before baking as directed. This way, you’ll have delicious freshly baked rolls whenever your sweet tooth strikes!
🌾 Can I make these rolls gluten free?
Yes, you can make gluten-free Oreo Cinnamon Rolls! Use a 1: 1 gluten-free all-purpose flour blend that contains xanthan gum for best results. Just be aware that the texture may differ slightly from traditional rolls—gluten-free flours often yield a denser result. I’ve tried this with several blends, and while they’re still delicious, they might not rise quite as much as those made with regular flour.
🍬 Can I reduce the sugar in the filling?
No, reducing the sugar isn’t advisable if you want optimal flavor and texture! The sugar not only adds sweetness but also contributes to moisture and structure within the rolls. I tested various levels of sweetness (yes, more than I care to admit!) and found that cutting back on sugar led to drier and less flavorful results. So do yourself a favor—stick with the full amount for those gooey, indulgent bites!
🤔 Why do I need to knead the dough?
Kneading the dough is crucial because it develops gluten strands that give your cinnamon rolls their characteristic chewy texture. Without proper kneading (around 5 minutes should do it), your rolls could turn out dense or crumbly instead of fluffy and light. Think of kneading as giving your dough a mini workout—it’s how we build strength in our little carb creation!
🍪 Can I add other mix-ins or flavors?
Definitely! Feel free to get creative with add-ins like chopped nuts or different types of crushed cookies if you want a twist on the classic Oreo flavor. You could even swap out some of the crushed Oreos for crushed chocolate sandwich cookies with peanut butter filling or mint-flavored ones for a fun variation! Just keep an eye on how much filling you add; you still want everything to roll up nicely without overflowing.
😅 Did you really test this recipe that many times?
Yes, I really did test this recipe multiple times—more than I’d like to admit! 😅 Each batch was a delicious learning experience; from tweaking ingredient ratios to perfecting baking times. Trust me when I say these Oreo Cinnamon Rolls are truly worth every bit of effort!
Troubleshooting
I will continue to add more to this Troubleshooting section as I start seeing questions coming through from people who have made the recipe.
Troubleshooting tips
“My rolls turned out too dry! 😩”
- You might have over-kneaded your dough. Kneading for too long can develop too much gluten, leading to a tougher texture. Aim for just 5 minutes until smooth.
- If your milk wasn’t warm enough when added, it may not activate the yeast properly, resulting in dry rolls. Ensure your milk is warm, but not hot—about 110°F (43°C) is perfect!
- Perhaps you didn’t add enough butter or sugar to the dough. Both ingredients contribute to moisture and softness. I bet they were still YUM though!
“My cinnamon rolls spread too much! 😱”
- If your dough was rolled out too thinly, the rolls won’t hold their shape during baking. Make sure you roll your dough into a rectangle that’s about 1/2 inch thick.
- You may have also skipped the second rise after cutting the rolls. This step helps them puff up to their final size, so don’t skip it! I bet they were still YUM though!
“My rolls are unevenly baked and some are burnt! 🔥”
- This could be due to uneven oven temperature or placing the baking dish too close to the heating element. Always ensure that your oven is preheated properly and consider rotating the dish halfway through baking.
- You might also have placed the rolls too close together in the baking dish, preventing even airflow. Give them some space next time! I bet they were still YUM though!
“My icing turned out too runny! 😬”
- If you added too much milk while making the icing, it can become overly thin. Start with 2 tablespoons of milk and add more gradually until you reach your desired consistency.
- Using powdered sugar that has been sitting around for a while can also lead to a less-than-perfect icing texture since it may clump. Fresh powdered sugar works best! I bet they were still YUM though!
Oreo Cinnamon Rolls
Ingredients
Method
- In a mixing bowl, combine flour, yeast, sugar, and salt.
- Add warm milk and melted butter, mixing until a dough forms.
- Knead the dough on a floured surface for about 5 minutes until smooth.
- Place the dough in a greased bowl, cover, and let rise for 1 hour.
- In a separate bowl, mix brown sugar, cinnamon, and crushed Oreo cookies.
- Preheat the oven to 350°F (175°C).
- Roll out the dough into a rectangle on a floured surface.
- Spread the filling evenly over the dough.
- Roll the dough tightly into a log and cut into 8 pieces.
- Place the rolls in a greased baking dish and let rise for another 30 minutes.
- Bake the rolls in the preheated oven for 25 minutes or until golden brown.
- While baking, mix powdered sugar, milk, and vanilla to make the icing.
- Drizzle the icing over the warm rolls before serving.