Creamy Garlic Chicken: A Velvety Delight You’ll Crave
I first fell in love with creamy garlic chicken at a charming little bistro tucked away in a quiet corner of my neighborhood. The moment I took my first bite, I was enveloped in a velvety sauce that danced with rich garlic flavor and tender chicken that practically melted in my mouth. It was one of those dishes that made me realize I had to recreate it at home—not just because I wanted to relive that dining experience, but also because let’s be honest, eating out every night can really put a dent in the wallet! So, I set out on a mission to make a version that captured all the magic but was both cost-effective and convenient for busy weeknights.
After what felt like an eternity (okay, maybe just eight attempts), I finally nailed the recipe for my creamy garlic chicken. Each round was an experiment—too much cream, not enough garlic, or oh no, is that burnt? But hey, who hasn’t had their fair share of kitchen blunders? I meticulously worked on getting the balance just right; I wanted a dish that didn’t just taste good but also made you feel like you were indulging in something truly special without any fuss.
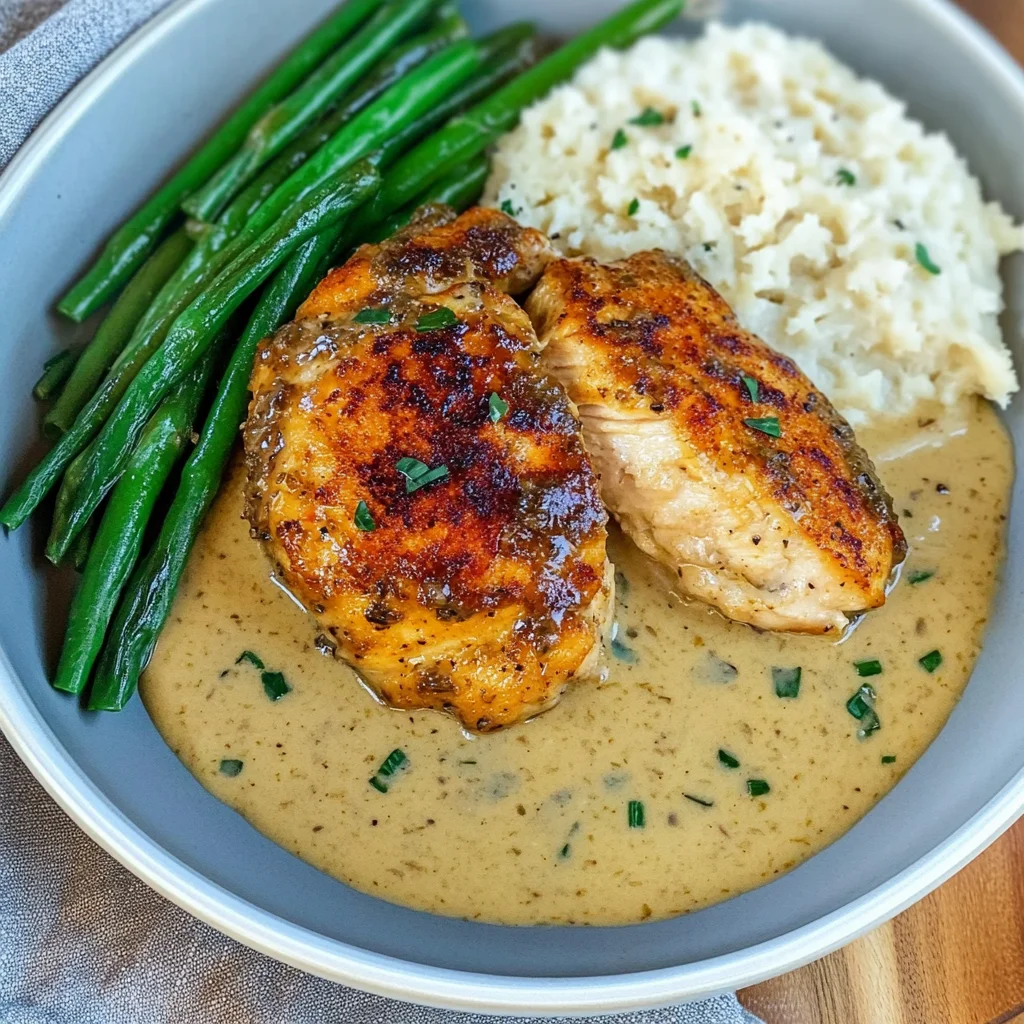
Let me tell you, all those trials were absolutely worth it! The final result is a creamy garlic chicken dish that’s not only easy to whip up but also incredibly satisfying—the sauce is luxuriously thick and coats each piece of chicken perfectly while infusing every bite with bold garlic flavor. It’s the kind of meal you’d expect from a fancy restaurant but can serve at your dining table on a Tuesday night. So grab your skillet and get ready to impress; this dish is going to become your new weeknight favorite!
These Creamy Garlic Chicken are….
….the ultimate comfort food that will have your taste buds dancing with joy!
1. They deliver an irresistible garlic aroma that fills your kitchen and invites everyone to the table. The combination of four cloves of freshly minced garlic sautéed in olive oil creates a rich, fragrant base that elevates the entire dish, making it perfect for garlic lovers like me.
2. Luxuriously creamy texture – each bite is a delightful experience thanks to the heavy cream blended with chicken broth and Parmesan cheese. This creamy sauce envelops the chicken breasts, providing a velvety richness that contrasts beautifully with the tender meat, ensuring every mouthful feels indulgent.
3. A simple yet effective technique is searing the chicken breasts before simmering them in the sauce. This method locks in juices and creates a lovely golden crust while infusing flavor throughout, making sure your chicken remains moist and flavorful, unlike many other recipes out there.
4. Incredible value – this dish is not only easy on the wallet but also quick to prepare at home. With just a few affordable ingredients, you can whip up a restaurant-quality meal in under 30 minutes, proving that you don’t need to spend a fortune for deliciousness.
PS This recipe serves 4 hearty portions, making it perfect for family dinners or meal prep for the week ahead!
Ingredients You’ll Need
Each ingredient in this dish plays an essential role in flavor and texture. Here’s what you’ll need:
4 pieces boneless, skinless chicken breasts: These provide a lean and tender base for the creamy sauce.
2 tablespoons olive oil: Used to sear the chicken and enhance its richness.
4 cloves garlic, minced: Infuses the dish with aromatic depth and savory goodness.
1 cup heavy cream: Creates a luscious, creamy texture that envelops the chicken.
1 cup chicken broth: Adds moisture and a savory backbone to the sauce.
1 teaspoon Italian seasoning: A blend of herbs that elevates the overall flavor profile.
1 teaspoon salt: Essential for enhancing all the flavors present in the dish.
1/2 teaspoon black pepper: Provides a subtle warmth that complements the creaminess.
1/2 cup parmesan cheese, grated: Introduces a salty, nutty element that enriches the sauce.
2 tablespoons fresh parsley, chopped: Adds a pop of color and fresh brightness as a garnish.
You Must Sear the Chicken. No Shortcuts!
I know, I know – searing the chicken adds a few extra minutes to your cooking time, and part of me wished I could just skip it and dive straight into that creamy sauce. But after testing this recipe more times than I can count (seriously, my kitchen has seen better days), I learned that there’s simply no way around it. Trust me, you don’t want to miss this step!
Searing the chicken is essential for building flavor and achieving that beautiful golden crust. Think of it like making a great pizza: if you skip the preheating of the oven, the crust will just be sad and soggy. The same goes for your chicken! That initial sear locks in moisture while creating a rich, caramelized exterior that enhances every bite of your Creamy Garlic Chicken.
What does searing do?
- Flavor — Searing creates a Maillard reaction that develops deep, complex flavors you can’t get by simply cooking through.
- Texture — A good sear gives your chicken a crispy exterior while keeping it juicy inside, providing a delightful contrast in each mouthful.
- Color — The gorgeous golden-brown color not only makes the dish visually appealing but also signifies that those flavorful compounds have been formed on the surface.
- Moisture retention — Searing helps seal in juices, preventing your chicken from drying out during cooking and ensuring it stays tender.
- Enhanced sauce absorption — The caramelization from searing allows the sauce to adhere better to the chicken, making every bite packed with flavor.
Different searing times
- 3 minutes per side (good) — Your chicken will have some color and flavor but won’t reach its full potential; it’s merely surviving.
- 6 to 7 minutes per side (great) — This is the sweet spot! A perfect golden crust forms while keeping the inside juicy and tender.
- 8 minutes or longer (overcooked risk) — While you might achieve an even deeper color, there’s a fine line before dryness sets in; monitor closely!
Don’t even think about skipping or rushing the searing step! The most common mistake is trying to flip the chicken too early or overcrowding the pan. This leads to steaming instead of searing, which leaves you with pale, sad pieces of poultry instead of perfectly browned bliss. Trust me – it’s worth those extra moments of patience!
How to make Creamy Garlic Chicken

Are you ready to see how straightforward it is to make the Creamy Garlic Chicken of your dreams??
1. COOK THE CHICKEN
First things first, let’s get your chicken beautifully browned and cooked to perfection!
🔪 Heat – Start by heating 2 tablespoons of olive oil in a skillet over medium heat. This temperature is ideal for achieving that lovely golden brown color without burning the oil.
🧂 Season – While the oil heats up, season 4 pieces of boneless, skinless chicken breasts with 1 teaspoon of salt and 1/2 teaspoon of black pepper. This adds flavor right from the get-go!
🍗 Cook – Add the seasoned chicken breasts to the skillet, cooking for about 6-7 minutes on each side until they are golden brown and cooked through (internal temperature should reach 165°F or 74°C). Once done, remove them from the skillet and set aside while we whip up that creamy sauce.
HANDY TIPS
- For juicier chicken, try to let it rest for a few minutes before slicing.
- If using thicker chicken breasts, you may need to adjust cooking time slightly; ensure they’re thoroughly cooked but not dry.
2. MAKE THE SAUCE
Get ready for that irresistible garlic aroma!
🧄 Sauté – In the same skillet (don’t wash it yet!), add in 4 cloves of minced garlic and sauté for about 1 minute until fragrant. This step is crucial; it builds that deep flavor foundation!
🥣 Simmer – Pour in 1 cup of chicken broth and bring it to a gentle simmer. This will help deglaze the pan, lifting all those tasty bits left from cooking the chicken.
HANDY TIPS
- Use low-sodium chicken broth if you want more control over the saltiness of your dish.
- Don’t skip on sautéing the garlic; burnt garlic can ruin the sauce!
3. COMBINE THE FLAVORS
Now we’re going to create that creamy goodness!
🥛 Stir In – Stir in 1 cup of heavy cream along with 1 teaspoon of Italian seasoning and 1/2 cup of grated parmesan cheese. The creaminess combined with cheese will create a rich sauce you’ll love!
⏳ Thicken – Cook for another 3-4 minutes until the sauce thickens slightly. You want it nice and luscious but not too thick—think coat-the-back-of-a-spoon consistency!
HANDY TIPS
- If you want a little kick, consider adding a pinch of red pepper flakes when mixing in the cream.
- For an even richer flavor, replace some broth with white wine!
4. FINISH DISH
Let’s bring this all together into a meal worth celebrating!
🔄 Return Chicken – Return the cooked chicken breasts to the skillet, ensuring they are coated with that creamy sauce. Let them simmer here for an additional 2 minutes just to heat through. This is where all those flavors meld beautifully!
🌿 Garnish & Serve – Finally, garnish with 2 tablespoons of chopped fresh parsley before serving. A pop of green not only looks beautiful but adds freshness to balance out the richness.
HANDY TIPS
- Pair this dish with pasta or rice to soak up every last drop of that delicious sauce!
- Leftovers (if any!) can be stored in an airtight container in the fridge for up to three days.
You’ve just mastered a delightful Creamy Garlic Chicken dish perfect for any weeknight dinner! With just four simple phases and about half an hour, you’re ready to wow your family or friends at your next dinner gathering! Enjoy every creamy bite! – Nagi x
FAQ – Creamy Garlic Chicken
🥡 How long will leftover creamy garlic chicken keep in the fridge?
Leftover creamy garlic chicken will keep in the refrigerator for about 3-4 days. I recommend storing it in an airtight container to maintain its creaminess and flavor. After day 3, the quality starts to decline—I’d say it’s about 90% as good. On day 4, you might notice a bit of separation in the sauce, but it should still be safe to eat if stored properly.
⏱️ Can I skip resting the chicken after cooking?
No, you cannot skip resting the chicken! Resting allows the juices to redistribute throughout the meat, resulting in a more tender and juicy bite. I recommend letting it rest for at least 5 minutes after cooking before slicing or serving. This small step makes a big difference—trust me!
❄️ Can I freeze creamy garlic chicken?
Yes, you can freeze creamy garlic chicken! To do this, let it cool completely and then transfer it to a freezer-safe container. It can be frozen for up to 2-3 months. When you’re ready to enjoy it again, thaw it overnight in the fridge and reheat gently on the stove over low heat, adding a splash of chicken broth if needed to revive the sauce.
🌾 Is there a way to make this recipe gluten-free?
Absolutely! To make creamy garlic chicken gluten-free, simply ensure that your chicken broth is labeled as gluten-free. Most brands offer gluten-free options nowadays. Additionally, if you want to thicken the sauce further without using flour or cornstarch, consider blending some cooked cauliflower into the sauce for extra creaminess without any gluten involved.
🧀 Can I substitute the heavy cream with something else?
While heavy cream gives this dish its rich texture, I understand that not everyone wants that much creaminess. You can substitute half-and-half or whole milk for a lighter version; however, keep in mind that this may alter the thickness of your sauce—so you might need to simmer it longer. Alternatively, you could use coconut cream for a dairy-free option; it will impart a slight coconut flavor but still create a creamy sauce.
🔍 Why do I need to sauté garlic before adding other ingredients?
Sautéing garlic before adding other ingredients is crucial because it helps release its essential oils and flavors. When cooked briefly over medium heat, garlic becomes fragrant and deliciously caramelized rather than raw and sharp. Just be careful not to burn it—garlic can go from golden to bitter very quickly!
🍗 How many times did you test this creamy garlic chicken recipe?
I tested this creamy garlic chicken recipe seven times (yes, I’m a little mad 😅). Each time I tweaked something slightly—from seasoning levels to cooking times—to ensure every bite was perfect. The balance of flavors has been meticulously honed so that you’ll be thrilled with your dish every time!
🌶️ Can I add vegetables or other ingredients to customize this dish?
Definitely! Customizing this dish is part of the fun! You can add sautéed mushrooms, spinach, or sun-dried tomatoes for extra flavor and nutrition. Just toss them into the skillet along with the minced garlic so they have time to soften and infuse their flavors into the sauce. Feel free to get creative—this recipe is versatile enough to accommodate your taste!
Troubleshooting
I will continue to add more to this Troubleshooting section as I start seeing questions coming through from people who have made the recipe.
Troubleshooting tips
“My chicken is dry and tough! 😭”
- The chicken was overcooked. Cooking the chicken breasts for too long can cause them to lose moisture, resulting in a dry texture. Aim for 6-7 minutes per side, but use a meat thermometer to check that they reach 165°F (75°C) for perfect doneness.
- The chicken breasts were too thick. If your chicken breasts are thicker than average (over 1 inch), they may need additional cooking time, which can lead to dryness. You can pound them to an even thickness before cooking.
I bet they were still YUM though!
“My sauce turned out way too thin! 😩”
- You didn’t simmer it long enough. The sauce needs about 3-4 minutes of simmering after adding the heavy cream and parmesan cheese to thicken properly. If it’s still too thin, give it a little extra time on the heat.
- Not enough parmesan cheese. Parmesan not only adds flavor but also helps thicken the sauce. Make sure you’re using the full 1/2 cup of grated parmesan as listed in the ingredients.
I bet they were still YUM though!
“My sauce broke and went grainy! 😱”
- The heat was too high while combining ingredients. If your skillet is too hot when you add the heavy cream and parmesan, it can cause the sauce to curdle instead of creating a smooth texture. Always lower the heat when adding cream.
- You added cold cream directly from the fridge. Cold dairy can cause sauces to separate if added to a hot pan suddenly. Let your cream sit at room temperature for about 10 minutes before using it.
I bet they were still YUM though!
“The chicken is unevenly browned! 🤔”
- The skillet wasn’t hot enough initially. If your skillet isn’t preheated properly, your chicken won’t get that lovely golden-brown color. Make sure the olive oil is shimmering before adding the chicken.
- Crowding in the pan. If you add all four chicken breasts at once and they’re touching, they will steam instead of brown properly. Cook them in batches if necessary, ensuring there’s space between each piece.
I bet they were still YUM though!
Creamy Garlic Chicken
Ingredients
Method
- Heat olive oil in a skillet over medium heat. Season chicken breasts with salt and pepper. Add chicken to the skillet and cook for 6-7 minutes on each side until golden brown and cooked through. Remove chicken from skillet and set aside.
- In the same skillet, add minced garlic and sauté for about 1 minute until fragrant. Pour in chicken broth and bring to a simmer.
- Stir in heavy cream, Italian seasoning, and parmesan cheese. Cook for another 3-4 minutes until the sauce thickens.
- Return the chicken to the skillet, coating it with the creamy sauce. Cook for an additional 2 minutes to heat through.
- Garnish with fresh parsley before serving.