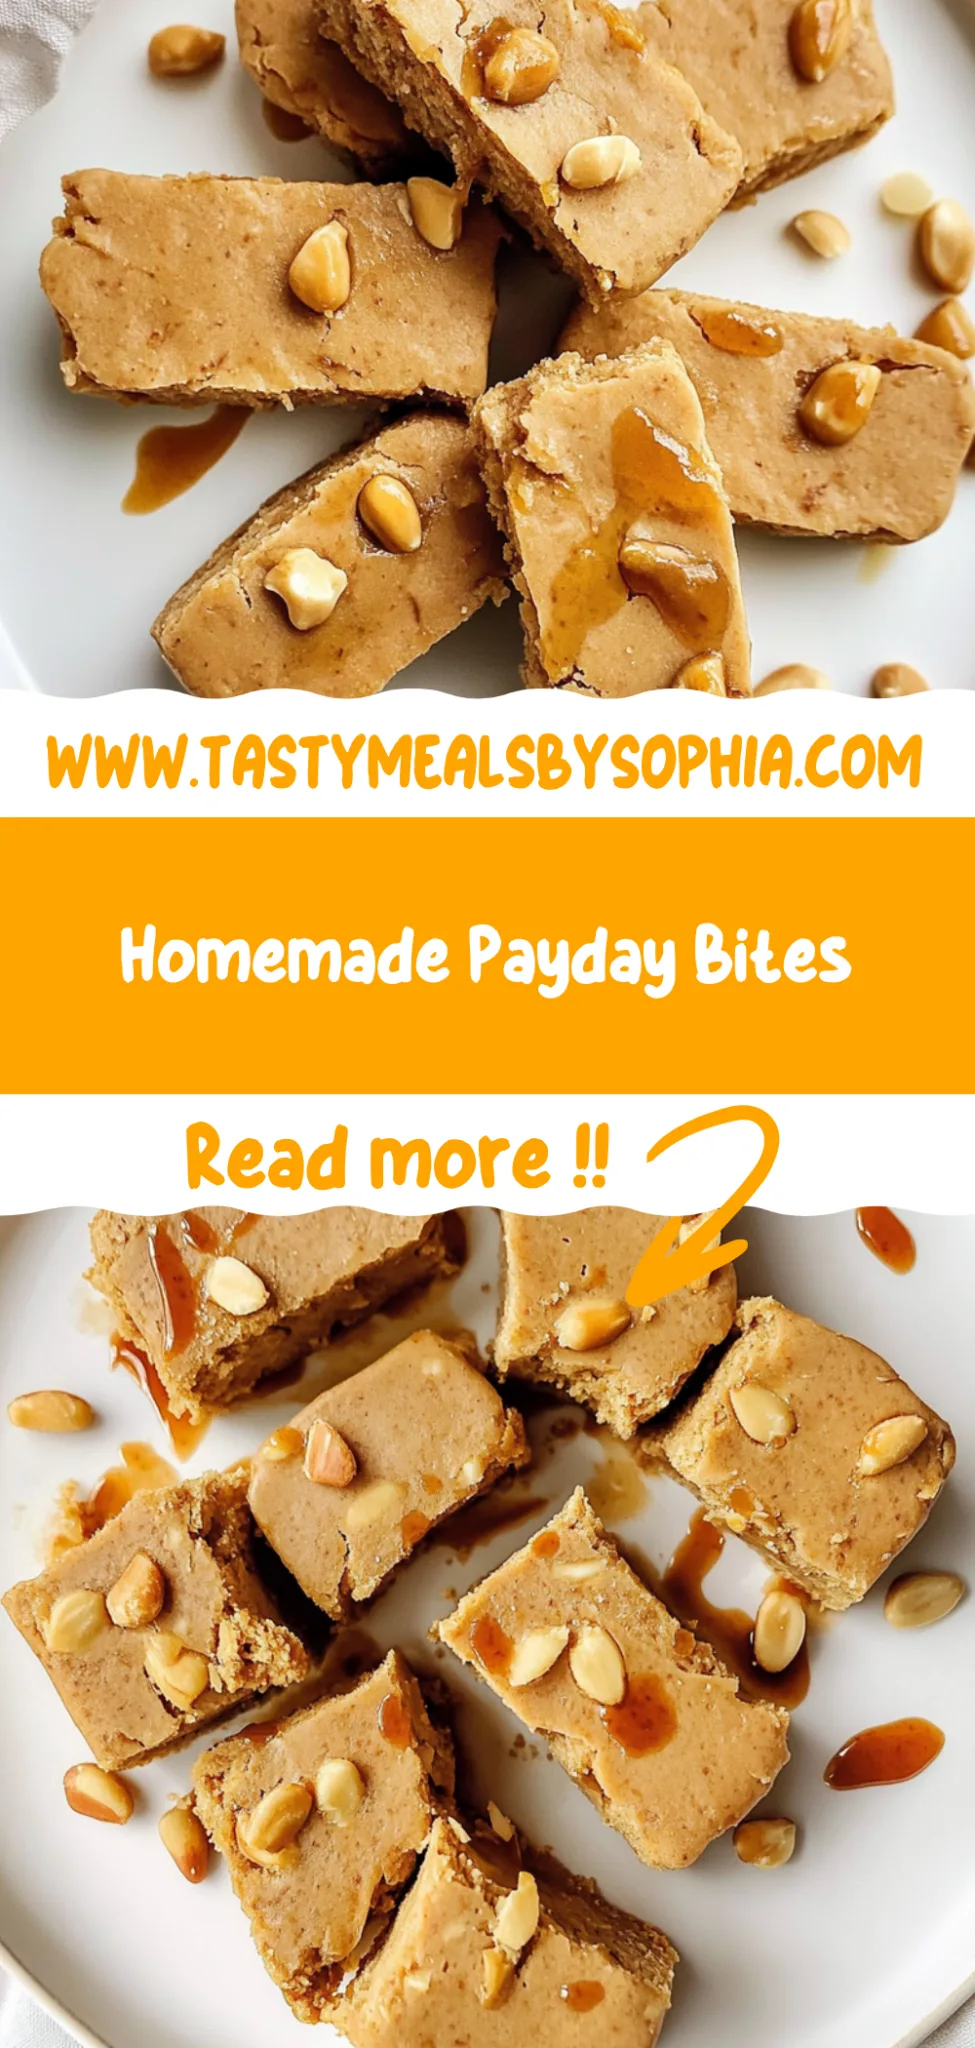
Homemade Payday Bites: Irresistibly Sweet & Salty Treats
I’ve always had a soft spot for those sweet and salty treats that are both indulgent and nostalgic, and nothing hits the spot quite like a Payday bar. It’s like they knew my love for crunchy peanuts and chewy caramel, perfectly balanced in each bite. After a particularly intense craving hit me one afternoon, I decided it was high time I tried my hand at making my own version—Homemade Payday Bites. Plus, let’s be honest: I wanted to whip up something that tasted better than store-bought and didn’t cost an arm and a leg!
Let me tell you, perfecting this recipe was no walk in the park. I went through five different iterations over the course of a week, each one more sticky and nutty than the last. The first batch resembled peanut butter soup—definitely not ideal! But with each attempt, I learned what worked (and what definitely didn’t), fine-tuning the ratio of peanuts to caramel until I finally landed on the ultimate combination that made my taste buds sing. Who knew playing mad scientist in the kitchen could be so entertaining?
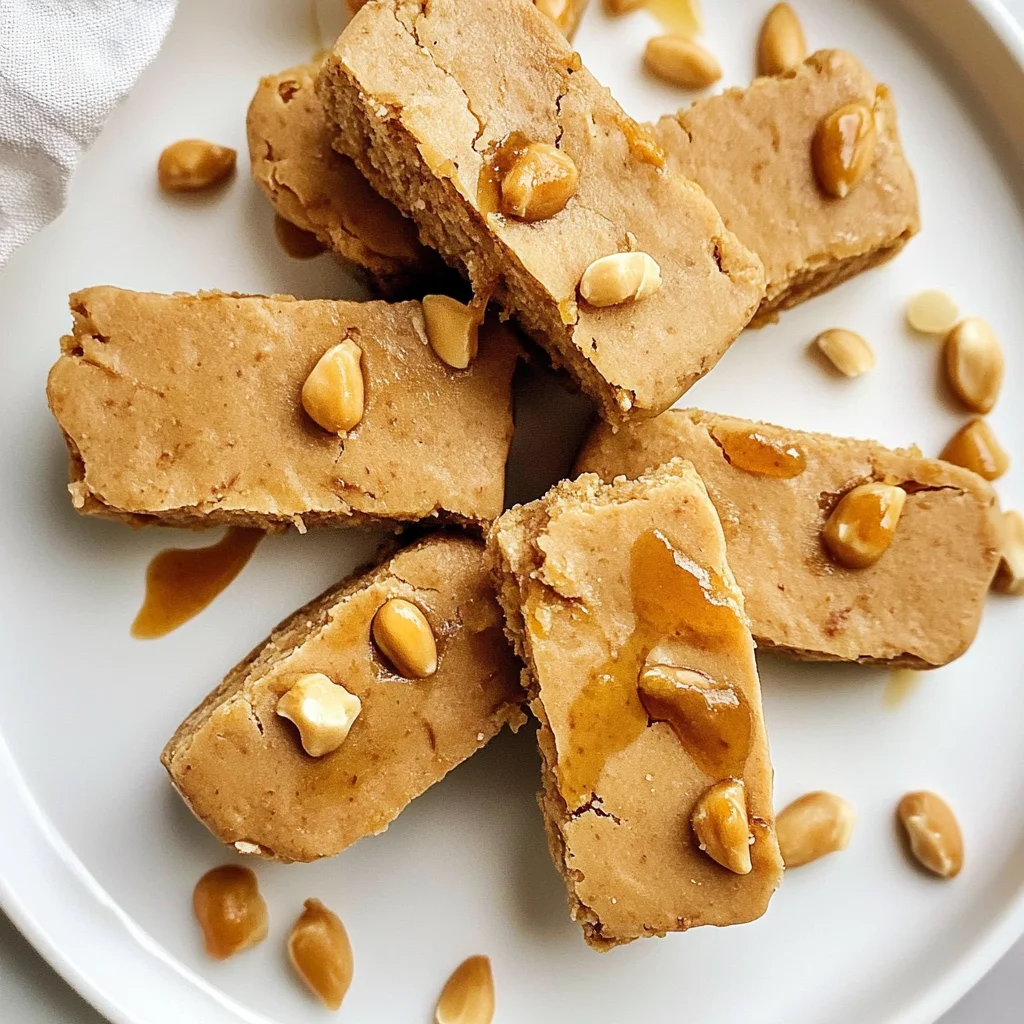
But oh boy, was it worth every sticky mess! These Homemade Payday Bites are everything you’d hope for: soft yet chewy with that delightful crunch of roasted peanuts and a luscious caramel flavor that dances on your tongue. They’re not just delicious; they keep well in an airtight container, making them perfect for snacking throughout the week—or for sharing with friends (if you can bear to part with them!). So grab your apron and let’s make some magic happen—you won’t regret diving into these little bites of bliss!
These Homemade Payday Bites are….
….the ultimate treat for anyone who craves that perfect balance of sweet and salty!
1. They deliver a delectable sweet and salty flavor that’s simply irresistible. The combination of creamy peanut butter and honey creates a rich, satisfying taste, while the chopped peanuts add a delightful crunch that enhances each bite.
2. Irresistibly chewy texture – these bites boast a satisfying chewiness thanks to the rolled oats, which provide just the right amount of substance without being too dense. You’ll love how they hold together perfectly yet still offer a tender mouthfeel.
3. No-bake convenience – I adore how easy these bites are to whip up! By simply mixing together the base ingredients, I can have these Homemade Payday Bites ready in minutes without turning on the oven, making them a go-to snack for busy days.
4. Budget-friendly indulgence – with just a few simple ingredients like peanut butter and oats, these bites rival any store-bought treat at a fraction of the price. Plus, they’re easy to make in bulk, ensuring you always have a delicious snack on hand!
PS These bites are small but mighty—perfect for popping into your mouth whenever you need a quick energy boost!
Ingredients for the Homemade Payday Bites
Each ingredient in this dish plays an essential role in flavor and texture. Here’s what you’ll need:
1 cup peanut butter (creamy or crunchy): Provides rich, nutty flavor and a creamy texture to bind the bites together.
1 cup rolled oats (old-fashioned): Offers a hearty base and chewy texture that complements the sweetness.
1/2 cup honey (or maple syrup): Adds natural sweetness and helps to hold all the ingredients together.
1/2 cup chocolate chips (optional): Introduces a touch of indulgence with a sweet contrast to the salty peanuts.
- 1 cup chopped peanuts (for rolling): Enhances the overall crunch and adds a savory note to each bite.
You MUST refrigerate these before serving. Trust me!
I’ll be honest with you — I tried to skip the chilling step when making these Homemade Payday Bites, thinking I could save time. Spoiler alert: it didn’t work out as planned! The bites were a gooey mess instead of the perfectly firm treats I envisioned. Lesson learned: no shortcuts here!
So, why is this chilling step so crucial? Think of it like letting cookie dough rest before baking; it helps the flavors meld and gives you a better texture. In our case, refrigerating the bites allows the peanut butter and honey to firm up, creating that ideal chewy yet sturdy consistency. Without this step, you might find yourself with a bowl of tasty slop instead of delightful bites!
What does refrigerating do?
- Improves texture — Chilling helps solidify the peanut butter and honey mixture, giving your bites a firm yet chewy texture that’s satisfying to eat.
- Enhances flavor — Allowing the mixture to chill lets the flavors blend together more harmoniously, resulting in a richer taste that’s better than if served immediately.
- Reduces stickiness — As the mixture firms up, it becomes less gooey, making it easier to handle when forming into balls.
- Increases shelf life — Refrigerated bites will keep longer in the fridge without becoming too soft or spoiled, allowing you to enjoy them for days!
- Promotes better coating adherence — Chilling helps the rolled peanuts stick better to the surface of each bite, resulting in an even crunchier exterior.
Different chilling times
- 15 minutes (okay) — The bites are slightly firmer than at room temperature but still too soft for my liking; they may fall apart easily.
- 30 minutes (good) — A decent chill time that results in firmer bites but can still be a bit on the softer side; definitely better than nothing!
- 1 hour (better) — The bites become much more manageable and hold their shape well while still maintaining some chewiness.
- ⭐️ 2 hours⭐️ — Ideal! The perfect balance between firmness and chew; your bites will have an excellent texture and flavor.
- Overnight (best) — If you can wait, this is ultimate bliss. The flavors deepen beautifully, and you’ll achieve a fantastic bite with great texture!
If there’s one critical mistake to avoid here, it’s skipping or shortening the chilling time. Trust me! If you rush it, your Homemade Payday Bites will end up as sad little blobs instead of the delicious treats they’re meant to be. Don’t say I didn’t warn you!
How to make Homemade Payday Bites
Are you ready to see how straightforward it is to make the Homemade Payday Bites of your dreams??
1. PREPARE THE MIXTURE
Let’s get started with a deliciously simple base that combines all the goodness!
1. COMBINE – In a mixing bowl, combine 1 cup of peanut butter, 1 cup of rolled oats, and 1/2 cup of honey (or maple syrup). Stir until well combined. You want the mixture to be thick but evenly blended, so it holds together nicely later on!
2. FOLD IN – If you’re feeling a little extra, fold in 1/2 cup of chocolate chips at this stage. This adds a delightful hint of sweetness and richness to your bites!
HANDY TIPS
- 💡 TIP: For a more intense peanut flavor, use crunchy peanut butter instead of creamy!
- 💡 TIP: If using maple syrup instead of honey, be sure to stir thoroughly for consistent sweetness throughout.
2. FORM THE BITES
Now comes the fun part—shaping these bites into perfect little morsels!
3. FORM – Using your hands, scoop out portions of the mixture and roll them into small balls, about 1 inch in diameter. This is where you can really get creative with size—smaller bites are perfect for snacking on the go!
4. COAT – Roll each ball in 1 cup of chopped peanuts until they are evenly coated. This not only adds crunch but also enhances that delicious peanut flavor we love!
HANDY TIPS
- 💡 TIP: If you want to avoid sticky hands, lightly wet your palms before rolling!
- 💡 TIP: For varied textures, try mixing in crushed pretzels along with the chopped peanuts.
3. CHILL AND SERVE
The final step is essential for achieving that perfect bite-sized firmness!
5. PLACE – Once coated, place the bites on a baking sheet lined with parchment paper. Give them some space so they don’t stick together while chilling!
6. REFRIGERATE – Refrigerate for at least 30 minutes to firm up before serving. This helps them hold their shape and makes for a satisfying bite!
HANDY TIPS
- 💡 TIP: If you’re short on time, you can freeze these bites for about 15 minutes instead—perfect when you’re craving something sweet fast!
- 💡 TIP: Store any leftovers in an airtight container in the fridge for about a week (if they last that long!).
You’ve just created your own Homemade Payday Bites—sweet, salty, and incredibly satisfying! With just a handful of ingredients and minimal effort, you’ve made a snack that’s bound to please everyone around you (even if it’s just yourself!). Make these once, and I wager they will invade your dreams every night too! – Nagi x
FAQ – Homemade Payday Bites
🥜 How long will these bites keep?
Homemade Payday Bites can last up to one week when stored correctly in an airtight container in the refrigerator. After the first few days, they maintain about 90% quality on day four and drop to around 80% by day seven. I recommend enjoying them within the week for the best flavor and texture. If you find them lingering that long, it’s time to reevaluate your snacking habits! 😄
❄️ Do I really have to chill? YES YOU DO.
Yes, chilling is crucial for these bites! Refrigerating them for at least 30 minutes allows the mixture to firm up, making them easier to handle and giving them the perfect texture. Skipping this step means you’ll end up with a gooey mess instead of delightful bites that hold their shape. Trust me, I’ve tried skipping it, and it just doesn’t work!
❄️ Can I freeze these bites for later?
Absolutely! You can freeze Homemade Payday Bites for up to three months. To do this, place the formed and coated bites in a single layer on a baking sheet and freeze until solid. Then transfer them to an airtight container or freezer-safe bag. When you’re ready to enjoy, simply thaw them in the fridge overnight or at room temperature for about 30 minutes. Just be aware that they might lose a bit of their original crunch after freezing.
🌾 Can these be made gluten free?
Yes, you can easily make these bites gluten-free! Just ensure that you use certified gluten-free rolled oats. Most brands offer this option now, so it’s quite accessible. Additionally, double-check any other ingredients like peanut butter or chocolate chips for gluten-containing additives—though most of these are naturally gluten-free.
🔄 Can I substitute peanut butter with something else?
You can substitute peanut butter with other nut butters like almond or cashew butter; just note that the flavor profile will change slightly. If you’re looking for a nut-free option, sunflower seed butter works well too! However, if you go this route, be cautious of potential allergens if serving to others. In my testing, I found almond butter gives a delightful twist while still maintaining that creamy consistency we love.
🤔 Why do I mix the honey with peanut butter first?
Mixing honey with peanut butter before adding the oats helps achieve an even distribution of sweetness throughout the mixture. If you add oats first, they tend to clump together rather than combine smoothly with the sticky honey. This method ensures every bite is perfectly sweetened and deliciously sticky—just how we want our Homemade Payday Bites!
🎉 What can I add for extra flavor or texture?
Feel free to get creative! You can mix in ingredients like shredded coconut, dried fruit (like cranberries or raisins), or even protein powder if you’re looking to boost nutrition. Just keep in mind that adding too much may affect the binding power of your mixture—so balance is key! In my opinion, tossing in some mini marshmallows gives a fun chewy texture without sacrificing any essence of those classic Payday flavors!
Troubleshooting
I will continue to add more to this Troubleshooting section as I start seeing questions coming through from people who have made the recipe.
Troubleshooting tips
“My bites turned out too soft and won’t hold their shape! 😩”
- You may have used too much honey or maple syrup. These liquid sweeteners can make the mixture overly sticky, preventing it from forming into solid balls.
- If your peanut butter was too creamy, that could also contribute to the softness. Creamy peanut butter has more oil, which can lead to a softer texture.
- I bet they were still YUM though!
“My bites are way too dry and crumbly! 🤔”
- If you didn’t use enough honey or maple syrup, the mixture won’t bind properly. Make sure to stick to the 1/2 cup measurement for the best results.
- Using old-fashioned oats that are too finely ground can absorb more moisture and lead to a drier mixture. Ensure your oats are rolled and not instant or quick oats.
- I bet they were still YUM though!
“The coating didn’t stick well to my bites! 😬”
- If your bites weren’t chilled long enough before rolling in chopped peanuts, they might be too soft and unable to hold onto the coating. Make sure to chill them for at least 30 minutes!
- Not enough peanut butter in the mixture can mean there isn’t enough adhesive for the nuts. Double-check you used a full cup of peanut butter.
- I bet they were still YUM though!
“My bites look uneven and misshapen! 😅”
- Not rolling them into uniform balls can result in some bites being larger than others. Try using a small cookie scoop to help maintain consistent size!
- If your mixture is overly wet or crumbly, it can be difficult to form neat shapes. Ensure you’re following the ingredient ratios closely for the right consistency.
- I bet they were still YUM though!
Homemade Payday Bites
Ingredients
Method
- In a mixing bowl, combine peanut butter, rolled oats, and honey. Stir until well combined.
- If using, fold in chocolate chips.
- Using your hands, form the mixture into small balls, about 1 inch in diameter.
- Roll each ball in chopped peanuts to coat evenly.
- Place the coated bites on a baking sheet lined with parchment paper.
- Refrigerate for at least 30 minutes to firm up before serving.