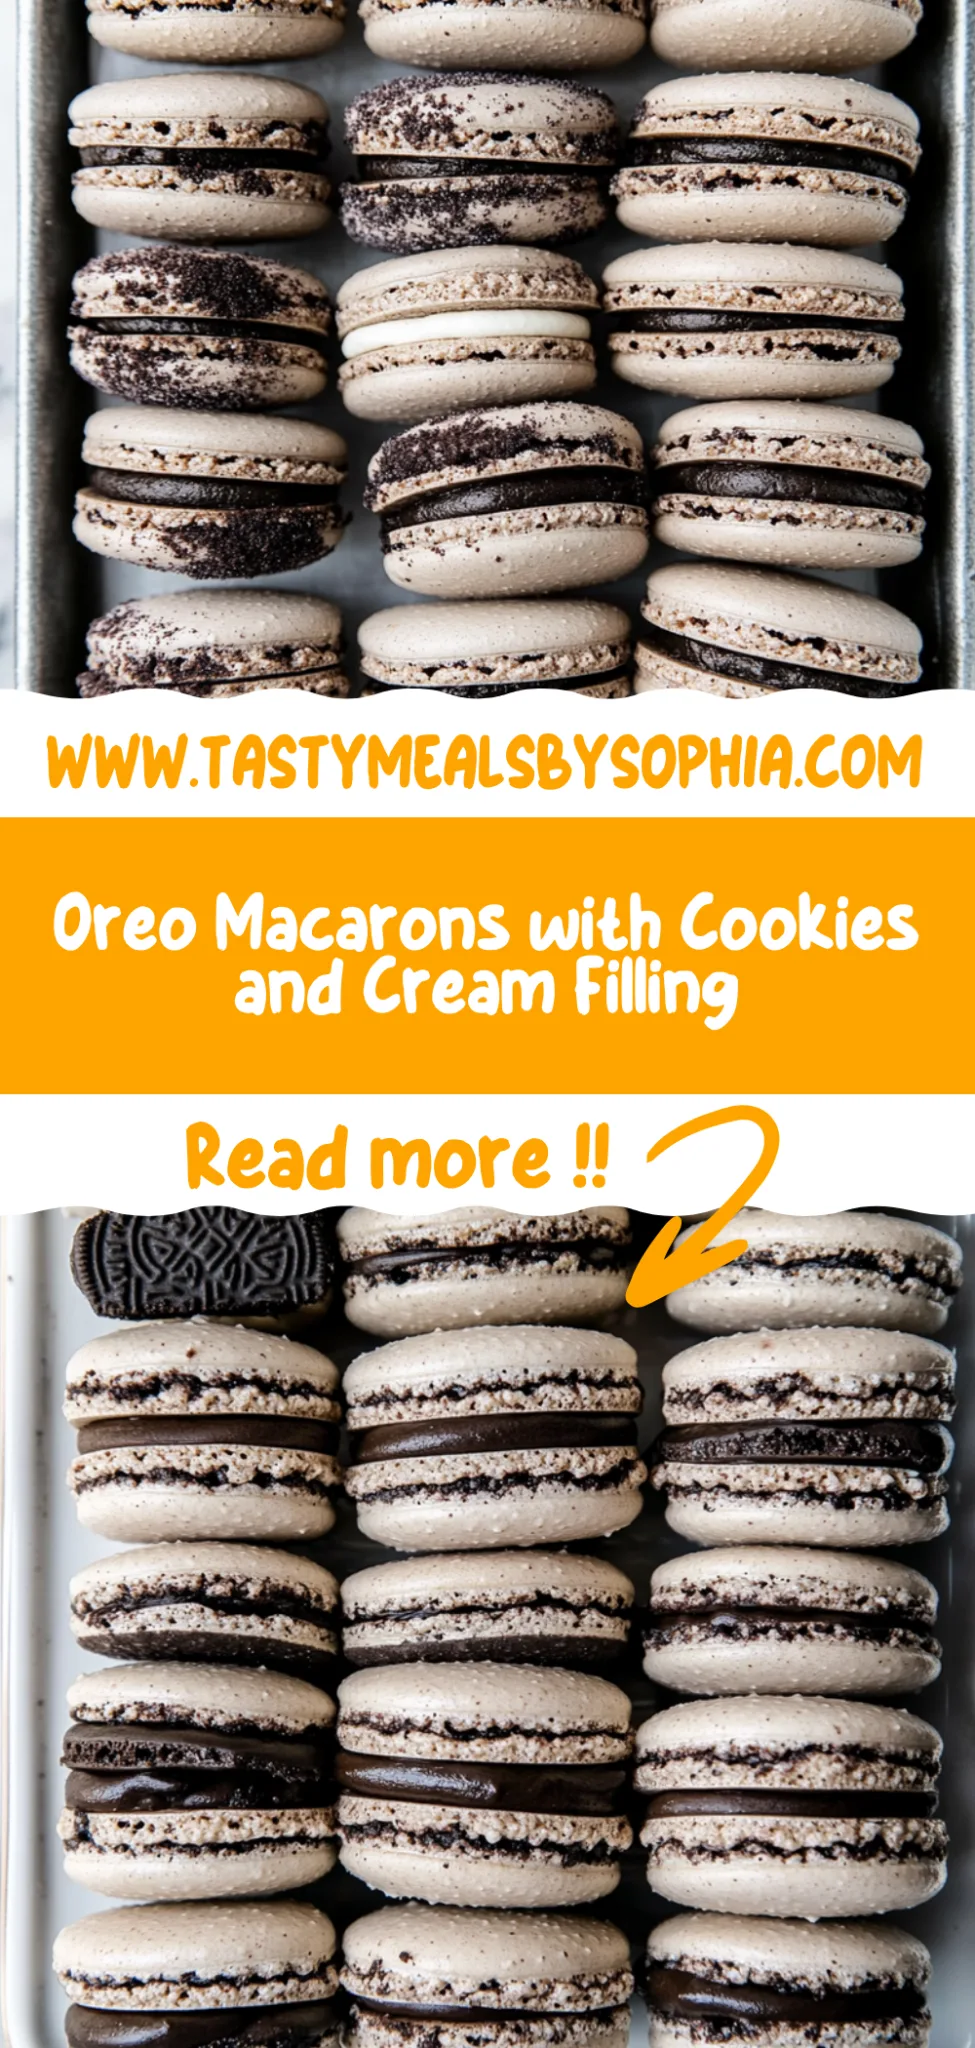
Oreo Macarons: Creamy Delights You Can Make at Home
I first came across the idea of Oreo Macarons during a late-night binge on one of my favorite dessert blogs. The sheer genius of combining two beloved treats in one bite blew my mind — I mean, who wouldn’t want a macaron bursting with that classic Oreo flavor? It was a revelation! But as I stared at my wallet and thought about the price of fancy macarons at gourmet shops, I couldn’t help but think, “Why not try to recreate these creamy delights at home for a fraction of the cost?” Plus, there’s just something so satisfying about making your own treats that you can brag about to friends, right?
Let me tell you, perfecting Oreo Macarons was no walk in the park. I must have gone through at least six batches before I finally nailed it; my kitchen looked like a flour bomb went off and my patience wore thinner than a badly made macaron shell! Each attempt brought its own set of challenges — from shells that cracked like they were auditioning for a horror movie to buttercream that tasted more like sugar than anything remotely resembling an Oreo. But every trial taught me something new, and eventually, I figured out how to get that perfect balance of chewy texture and rich creaminess.
Oh boy, was it worth it! The final result is nothing short of magical: delicate shells with a crisp exterior giving way to a soft center, all filled with dreamy Oreo buttercream that hits you right in the nostalgia. These Oreo Macarons boast that unmistakable chocolate-cookie flavor paired with just the right amount of sweetness, plus they keep beautifully for days! So roll up your sleeves and get ready to impress your taste buds — trust me, you won’t regret diving into this delightful adventure!
These Oreo Macarons are…
…a delightful twist on classic French treats that bring the beloved flavor of Oreos right to your palate!
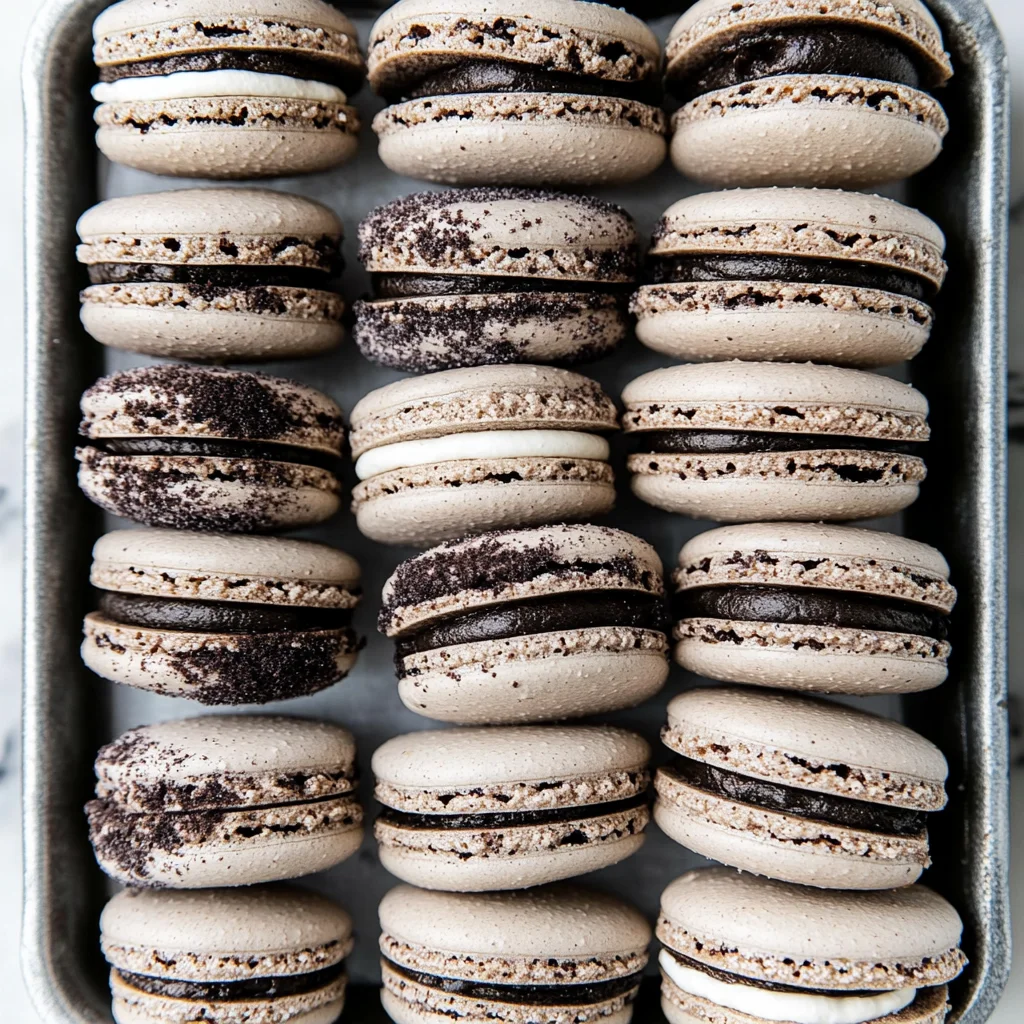
1. They deliver an indulgent Oreo flavor that’s truly unforgettable, thanks to the crushed Oreo cookies in the buttercream filling. This not only infuses the macarons with a rich and creamy taste but also pays homage to the iconic cookie we all love, making each bite a nostalgic experience.
2. Perfectly textured – these macarons feature a delicate, crisp shell with a soft, chewy center. The combination of almond flour and aged egg whites creates an airy structure that contrasts beautifully with the luscious buttercream filling, ensuring you get that satisfying crunch followed by a melt-in-your-mouth moment.
3. A key technique I swear by is aging the egg whites for 1-2 days before using them. This practice helps stabilize the meringue, resulting in beautifully risen shells that hold their shape perfectly during baking. It’s this small step that transforms these Oreo Macarons into a professional-quality dessert you’d be proud to serve.
4. They’re an affordable treat that brings bakery-quality macarons into your home kitchen. With just a handful of accessible ingredients—almond flour, powdered sugar, and Oreo cookies—you can create a luxurious dessert without breaking the bank or needing specialized equipment.
PS These macarons yield about 12 pairs, making them perfect for sharing (if you can resist!). Just be sure to let your egg whites age properly for optimal results!
What You’ll Need for Oreo Macarons
Each ingredient in this dish plays an essential role in flavor and texture. Here’s what you’ll need:
Macaron Shells
100 g almond flour: Provides a delicate texture and nutty flavor.
100 g powdered sugar: Sweetens the shells while contributing to their fine consistency.
90 g egg whites (aged for 1-2 days): Helps create a stable meringue for a perfect rise.
30 g granulated sugar: Stabilizes the meringue and adds sweetness.
1 g black cocoa powder: Enhances color and adds a rich chocolatey undertone.
Oreo Buttercream Filling
100 g unsalted butter (softened): Creates a creamy base with rich flavor.
200 g powdered sugar: Sweetens the filling and gives it a smooth texture.
2 tbsp heavy cream: Adds richness and helps achieve the perfect consistency.
- 4 Oreo cookies crushed: Infuses the filling with iconic Oreo flavor and texture.
You Must Let the Macarons Rest. No Shortcuts!
I know, I know—letting the macarons sit for 30 minutes before baking feels like an eternity when you’re itching to get to that creamy Oreo buttercream filling. I tried to skip this step, thinking I could just rush to the baking part, and let me tell you, it was a disaster! The shells cracked and didn’t develop that perfect crisp texture. So trust me when I say: this step is non-negotiable.
So, what’s the big deal about resting? Just like a good steak needs time to relax after cooking, macarons need that moment to form a skin. This skin helps create a beautiful outer layer while ensuring the insides remain soft and chewy. Without it, your macarons will puff up unevenly and lose that charming little foot we all love. It’s all about getting that balance right in the oven!
What does resting do?
- Improves texture — Resting allows the surface of the batter to dry out slightly, resulting in a crisp shell that contrasts beautifully with the soft interior.
- Enhances appearance — The formation of a skin leads to even rising and helps achieve those coveted feet—the little ruffled edge at the bottom of each macaron.
- Promotes even baking — A rested batter bakes more uniformly, preventing cracks and ensuring consistent shape across all your macaron shells.
- Retains moisture — The rest period helps lock in moisture during baking, so you get that perfect chewy center instead of a dry, crumbly mess.
- Boosts flavor — Just like dough benefits from resting, allowing flavors to meld together in macarons during this time enhances their overall taste.
Different Resting Times
- 15 minutes (okay) — Bare minimum; some improvement in texture but still prone to cracking.
- 30 minutes (good) — Optimal resting time; achieves a nice skin and decent rise for most successful batches.
- 45 minutes (great) — A bit longer ensures an even crisper shell and less chance of cracks during baking.
- 1 hour or more (fantastic) — Maximum benefit; shells are consistently stunning with a great balance of chewiness and crispness.
Be warned: skipping or skimping on rest time is the most common mistake I see! If you try to bake those macarons too soon, they might puff up into sad little domes instead of those lovely shells. Trust me on this one—it’s worth the wait!
How to make Oreo Macarons
Are you ready to see how straightforward it is to make the Oreo Macarons of your dreams??
1. PREPARE THE MACARON SHELLS
Let’s get started on creating those delightful, airy shells that will hold all that creamy goodness!
1. Preheat – Preheat the oven to 300°F (150°C) and line a baking sheet with parchment paper. This ensures even baking and helps prevent sticking.
2. Sift – In a mixing bowl, sift together the almond flour, powdered sugar, and black cocoa powder. Sifting helps eliminate lumps and creates a fine mixture, which is crucial for achieving that smooth macaron surface.
3. Whip – In another bowl, whip the egg whites until foamy. Gradually add the granulated sugar, continuing to whip until stiff peaks form. This step is essential as it captures air into the egg whites, giving your macarons their light texture.
4. Fold – Gently fold the dry ingredients into the whipped egg whites until the batter flows like lava. Be careful not to overmix; you want to preserve that airiness while ensuring everything is well incorporated!
5. Pipe – Transfer the batter to a piping bag and pipe small circles onto the prepared baking sheet, about 1-2 inches in diameter. This is where you can get creative with shapes if you desire!
6. Rest – Let the macarons sit at room temperature for 30 minutes to form a skin on top. This step is crucial as it prevents cracking during baking by allowing a protective layer to develop on the surface.
7. Bake – Bake in the preheated oven for 15 minutes, or until they have a nice foot formed at the bottom and are firm to touch. Let them cool completely on the baking sheet before removing.
HANDY TIPS
- Make sure your egg whites are aged for 1-2 days in the fridge for best results; this helps stabilize them when whipped.
- If you’re wondering whether it’s time to bake, lightly touch a macaron; if it doesn’t stick to your finger, it’s ready!
2. MAKE THE OREO BUTTERCREAM FILLING
Now that your shells are cooling, let’s whip up that rich Oreo buttercream filling!
8. Beat – In a mixing bowl, beat the softened unsalted butter until creamy and fluffy, about 2-3 minutes. This helps create a light and spreadable consistency for your filling.
9. Add Sugar – Gradually add in powdered sugar while mixing until combined and smooth; this prevents clouds of sugar from exploding everywhere!
10. Mix – Add heavy cream and crushed Oreo cookies into the mixture, then mix until smooth and well combined. The crushed Oreos will give your buttercream that delicious cookie flavor!
HANDY TIPS
- If you find your buttercream too thick after adding cream, simply add more heavy cream a teaspoon at a time until you reach your desired consistency.
- Love more crunch? Consider reserving some crushed Oreos as an optional garnish on top of each macaron!
3. ASSEMBLE THE MACARONS
Time to bring it all together—let’s assemble those beautiful treats!
11. Pair – Pair up the macaron shells by size so they fit nicely together when assembled—this is where precision pays off! Spread or pipe the Oreo buttercream filling onto the flat side of one shell generously but avoid going overboard so you don’t have an overflow situation!
12. Top – Top with another shell, pressing gently to adhere without squishing out all that creamy goodness inside!
13. Chill – Refrigerate the assembled macarons for at least 24 hours to develop flavor; this aging process enhances their taste and texture significantly.
HANDY TIPS
- Want smaller cookies? They work really well too—just adjust your baking time down to about 12-14 minutes!
- For added fun, roll your batter into logs instead of discs; chill overnight before slicing into thick rounds.
Congratulations—you’ve just created deliciously creamy Oreo-flavored macarons filled with rich Oreo buttercream! That’s one batch of mouthwatering treats ready for sharing (or indulging all by yourself!). Make these once, and I wager they will invade your dreams every night too! – Nagi x
FAQ – Oreo Macarons
How long will these cookies keep?
Oreo macarons can typically last for about 5 days in the refrigerator. After that, they start to lose their texture and flavor. On day 3, I’d say they’re still about 97% as good, but by day 5, you might notice a decline in their freshness. If you need them to last longer, I recommend freezing them, which can preserve their taste and texture for up to a month!
❄️ Do I really have to chill? YES YOU DO.
Absolutely! Chilling the assembled macarons in the fridge for at least 24 hours is essential for developing the flavors and achieving that perfect texture. This resting period allows the filling to meld with the shells, softening them just right while maintaining that delightful crispness on the outside. So no skipping this step if you want macarons that truly shine!
🥶 Can I freeze these macarons?
Yes, you can! To freeze your Oreo macarons, place them in an airtight container with parchment paper between layers to prevent sticking. They can be frozen for up to one month. When you’re ready to enjoy them, simply remove them from the freezer and let them thaw in the fridge for a few hours. This way, they’ll retain their lovely texture.
🌾 Can these be made gluten free?
Unfortunately, traditional macaron recipes rely on almond flour, which is naturally gluten-free; however, if you’re aiming for a completely gluten-free treat due to cross-contamination concerns (like using Oreos), you’ll need to opt for gluten-free Oreo cookies instead. Many brands now offer gluten-free alternatives that work nicely in this recipe!
Can I reduce the sugar or substitute with sweeteners?
Nope, you cannot reduce the sugar — trust me, I tried! The sugar not only adds sweetness but also contributes significantly to the structure of the macaron shells. If you’re looking for lower-sugar options or sweeteners like stevia or erythritol, I’ve found that they don’t yield successful results in this delicate recipe. Macarons are finicky little devils!
Why do we age egg whites?
Aging egg whites is crucial for macarons because it helps reduce moisture content and improves aeration when whipped. By letting your egg whites sit uncovered in the fridge for 1-2 days (I usually go with 2), you’re allowing some of that moisture to evaporate. This leads to a better meringue texture and ultimately fluffier macaron shells!
💡 Can I add flavors or variations?
Absolutely! You can customize these Oreo macarons by adding different flavors or extracts into your buttercream filling—think peppermint extract for a minty twist or vanilla extract for classic flavor enhancement. Just remember not to overdo it; a teaspoon is usually enough so it doesn’t overpower the delightful Oreo taste!
Troubleshooting
I will continue to add more to this Troubleshooting section as I start seeing questions coming through from people who have made the recipe.
Troubleshooting tips
“My macarons spread out too much! 😩”
- Your batter might have been too runny because you over-folded the dry ingredients into the egg whites. This can break down the meringue structure, leading to a loose batter that spreads instead of holds its shape.
- You may not have let your macarons rest long enough before baking. If they don’t form a skin, they can spread out during baking.
I bet they were still YUM though!
“My macarons cracked on top! 😭”
- The oven temperature could be too high. Baking at 300°F (150°C) is important; if it’s hotter, the shells can rise quickly and crack before the inside has set.
- You might not have aged your egg whites long enough. Fresh egg whites retain more moisture which can cause cracking. Aged whites are ideal for better stability.
I bet they were still YUM though!
“My macarons turned out too dark! 😱”
- Using too much black cocoa powder can lead to overly dark shells. Ensure you measure accurately with just 1 g for color; a little goes a long way!
- If your oven runs hot or unevenly, it might cause uneven browning. Always check with an oven thermometer to ensure accurate temperature.
I bet they were still YUM though!
“My macarons came out flat and misshapen! 🤔”
- This can happen if your piping technique was inconsistent, causing some shells to be thinner than others. Aim for even circles and consistent pressure on your piping bag.
- If you didn’t allow them to sit at room temperature long enough to form a skin, they may not hold their shape while baking.
I bet they were still YUM though!
Oreo Macarons
Ingredients
Method
- Preheat the oven to 300°F (150°C) and line a baking sheet with parchment paper.
- In a mixing bowl, sift together almond flour, powdered sugar, and cocoa powder.
- In another bowl, whip the egg whites until foamy, then gradually add granulated sugar and whip until stiff peaks form.
- Gently fold the dry ingredients into the egg whites until the batter flows like lava.
- Transfer the batter to a piping bag and pipe small circles onto the prepared baking sheet.
- Let the macarons sit at room temperature for 30 minutes to form a skin.
- Bake in the preheated oven for 15 minutes, then let cool completely.
- In a mixing bowl, beat the softened butter until creamy.
- Gradually add powdered sugar and mix until combined.
- Add heavy cream and crushed Oreo cookies, then mix until smooth.
- Pair the macaron shells by size and spread or pipe the Oreo buttercream filling onto the flat side of one shell.
- Top with another shell, pressing gently to adhere.
- Refrigerate the assembled macarons for at least 24 hours to develop flavor.