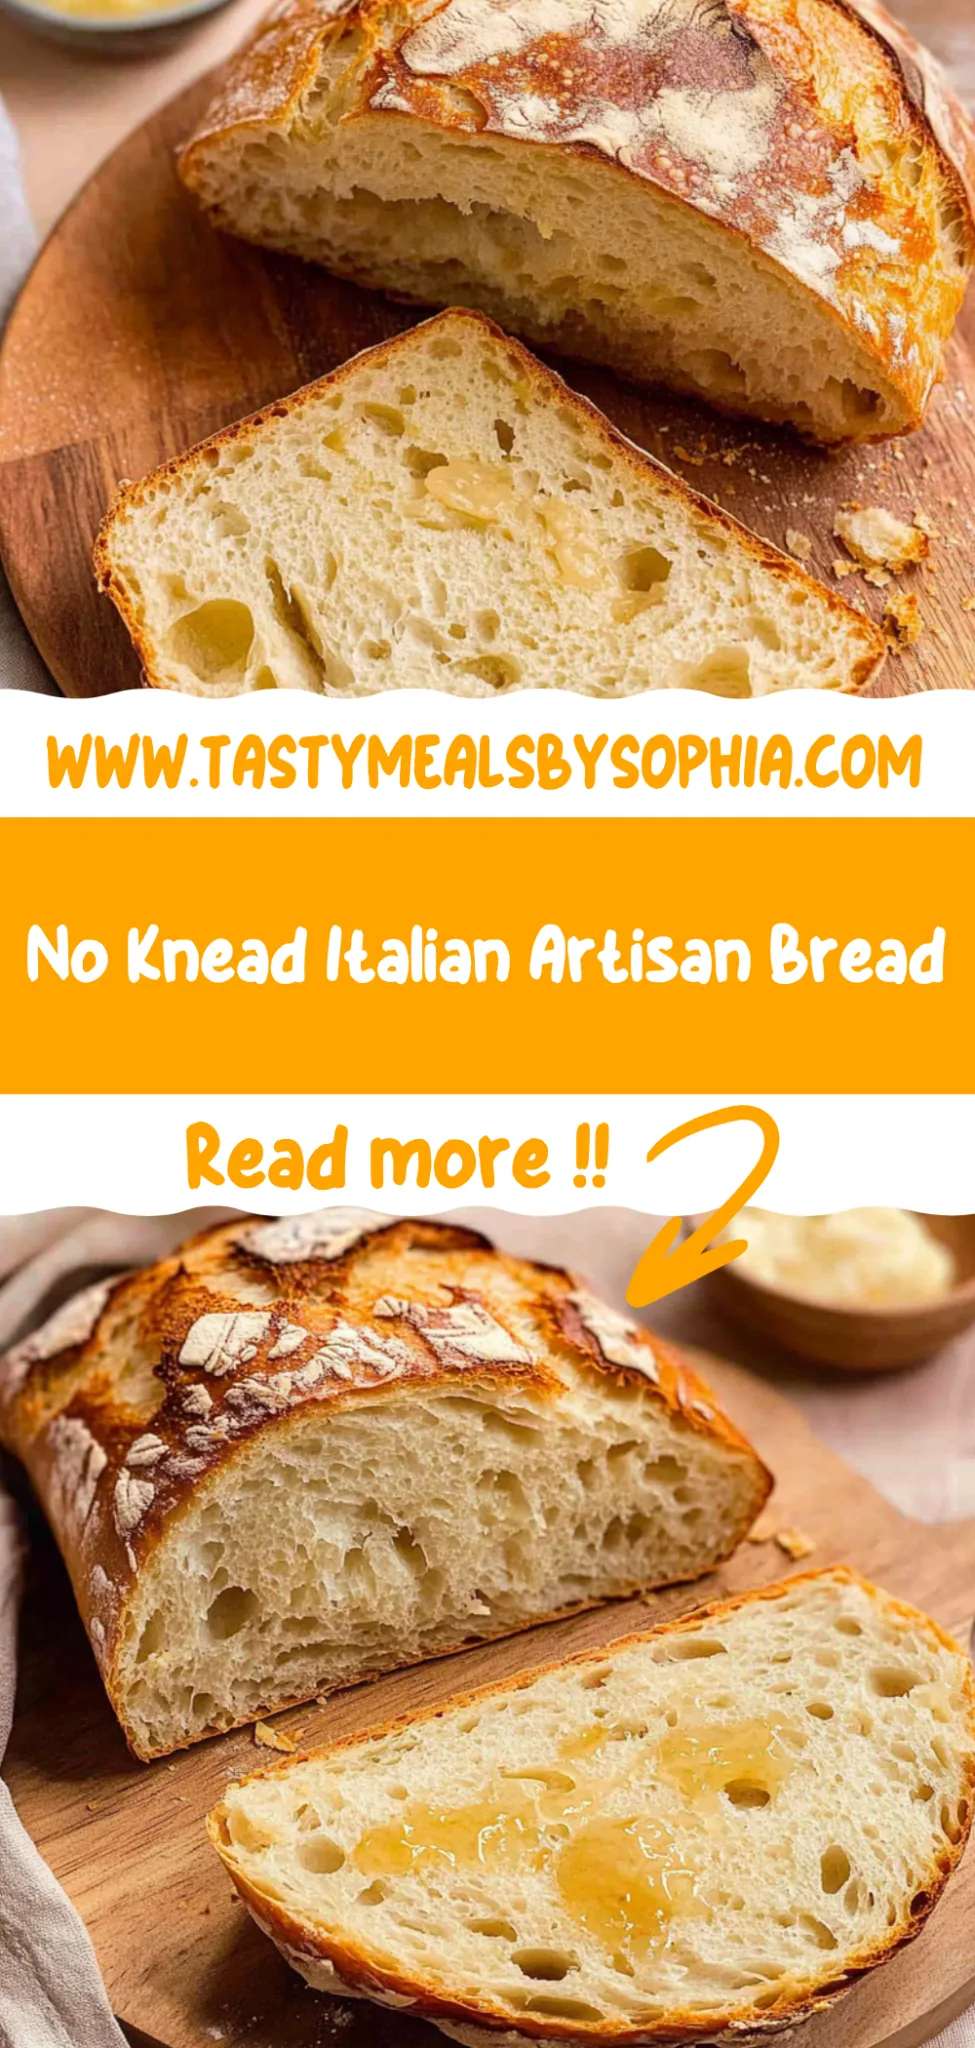
No Knead Italian Artisan Bread: Effortlessly Delicious
I first fell in love with artisan bread during a trip to a cozy little Italian café, where the aroma of freshly baked loaves wafted through the air like a warm hug. The crust was perfectly crunchy, giving way to an airy, soft interior that made each bite feel like a celebration. After splurging on one too many overpriced loaves, I decided it was high time to bring that magic home — not just because my wallet was crying but also because I wanted to prove I could make something even better right in my own kitchen.
Let me tell you, perfecting this No Knead Italian Artisan Bread turned out to be quite the adventure. I don’t know how many times I ended up with bread that looked more like a sad pancake than the golden-brown masterpiece I envisioned. It took me over a week and at least six attempts (yes, there were some epic flour explosions) before I finally nailed the perfect texture and flavor balance. Each iteration was an experiment in patience — tweaking hydration levels and resting times until I could almost hear my dough whispering “I’m ready!”
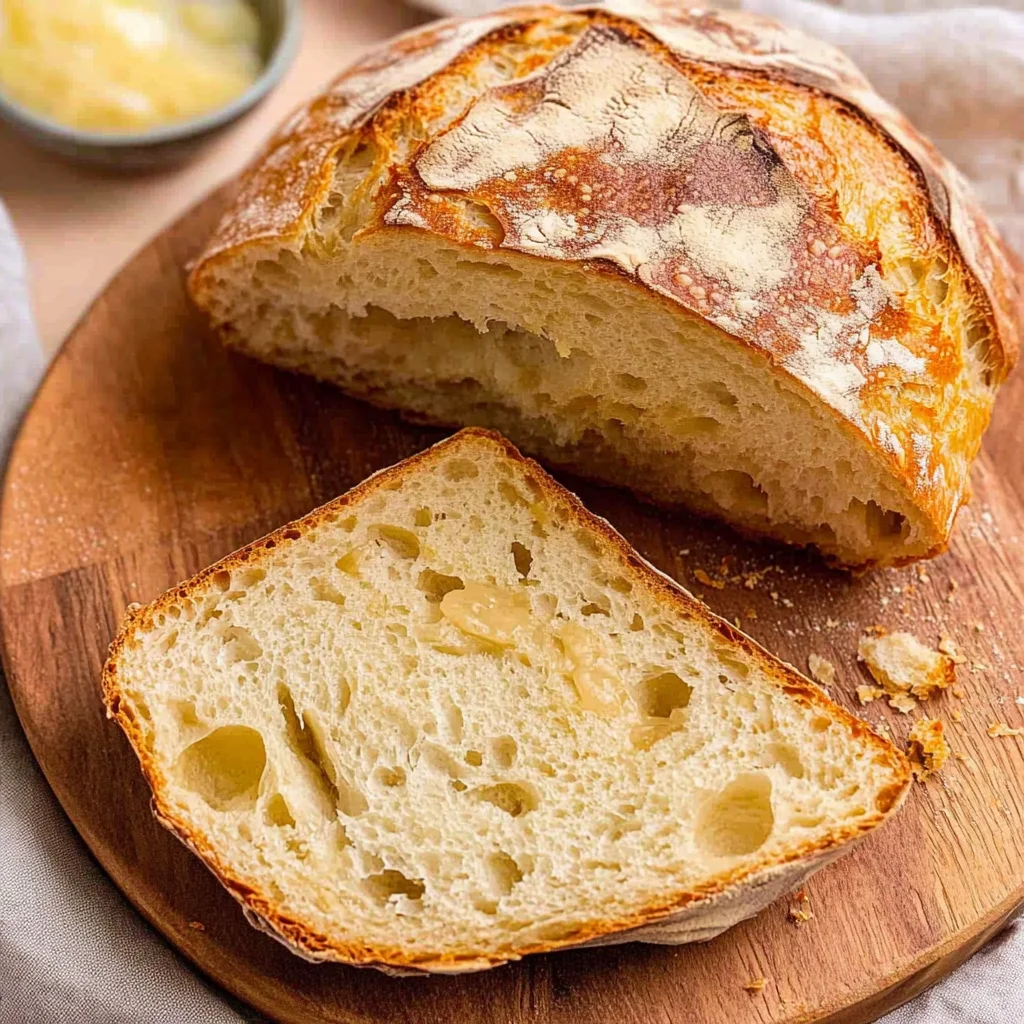
But oh boy, was it worth every misstep! The final result is a loaf so crusty and chewy that you’ll feel like you’ve been transported straight to that charming café in Italy. With its golden crust crackling under your fingers and a warm, airy crumb that’s begging for butter or olive oil, this No Knead Italian Artisan Bread is pure bliss. Trust me, your kitchen will fill with an intoxicating aroma that’s impossible to resist. So grab your apron and let’s get baking — you’re going to love this!
These No Knead Italian Artisan Bread are…
…an absolute game changer in the world of homemade bread!
1. They deliver a full-bodied flavor that’s truly irresistible, thanks to the perfect balance of salt and a touch of instant yeast. This combination not only enhances the natural taste of the flour but also creates a depth that makes every bite memorable.
2. Expect an incredible texture with a thick, crusty exterior and a delightfully chewy interior. Achieved through a long fermentation period and the use of room-temperature water, this method allows the dough to develop those beautiful air pockets, giving you that artisan-quality loaf right at home.
3. The no-knead technique is what sets this recipe apart from traditional bread-making methods. By simply mixing the ingredients and letting them rest for an extended period, you allow gluten to develop naturally without any strenuous kneading, making it accessible for anyone to create bakery-style bread.
4. You’ll find this bread offers fantastic value, as it uses simple everyday ingredients that are easy to find and budget-friendly. With just three cups of all-purpose flour, you can create an impressive artisan loaf that rivals what you’d pay at a bakery, all while enjoying the satisfaction of homemade goodness.
PS This recipe yields one beautifully round loaf that’s perfect for sharing or enjoying over several days!
Ingredients You’ll Need
Each ingredient in this dish plays an essential role in flavor and texture. Here’s what you’ll need:
3 cups all-purpose flour (plus extra for dusting): Forms the structure and provides a chewy texture.
1 teaspoon salt: Enhances the overall flavor and strengthens the dough.
1/4 teaspoon instant yeast: Helps the bread rise and develop airy pockets.
1.5 cups water (room temperature): Hydrates the flour for the perfect dough consistency.
You MUST let the dough rise for 12 to 18 hours. No shortcuts!
I’ll be honest with you—I tried to find a way around this. I thought maybe I could speed things up with a quick rise or use warm water to cut down the time. Spoiler alert: it didn’t work! After multiple attempts and one over-proofed disaster, I learned that patience is key when making this no-knead Italian artisan bread.
So why is this long rising time so crucial? Think of the dough as a sponge soaking up flavor and building structure. During those 12 to 18 hours, the flour absorbs the water fully, while the instant yeast gets busy creating air pockets, resulting in that beautiful crusty texture we all crave. Plus, the extended fermentation allows for deeper flavors to develop—trust me, it’s worth the wait!
What does letting the dough rise do?
- Flavor development — The extended rise allows for natural fermentation, enhancing the bread’s taste far beyond what you can achieve in a rush.
- Texture improvement — A slow rise creates a lighter, airier crumb by allowing gluten to form without kneading.
- Crustiness — The longer proofing period results in a thicker crust that’s perfectly golden and crunchy.
- Shelf life enhancement — Bread that has fermented longer tends to stay fresher for days due to natural preservatives formed during fermentation.
- Aroma boost — The fermentation process produces compounds that make your kitchen smell divine and your bread irresistible.
Different rising times
- 1 hour (okay) — You’ll have bread, but it will be dense and lacking in flavor; not what we’re going for!
- 3 hours (meh) — Better than an hour but still underdeveloped; expect some chewiness but minimal complexity.
- 6 hours (good) — A noticeable improvement in flavor and texture, but you’re still missing that artisan quality.
- ⭐️ 12 to 18 hours⭐️ — The sweet spot! This is where magic happens: flavorful, airy bread with a crust you’d find at a bakery.
- Beyond 24 hours (risk) — While you might get some interesting tanginess, there’s a higher chance of drying out or over-fermentation.
Beware: The most common mistake is trying to rush this rise. Trust me; if you cut corners here, you’ll end up with flat, flavorless bread. Don’t say I didn’t warn you!
How to make No Knead Italian Artisan Bread
Are you ready to see how straightforward it is to make the No Knead Italian Artisan Bread of your dreams??
1. MIX THE DOUGH
This is where the magic begins with just a few simple ingredients!
1. Combine – In a large mixing bowl, combine the 3 cups of all-purpose flour, 1 teaspoon of salt, and 1/4 teaspoon of instant yeast. Stir them together until evenly mixed for an even rise.
2. Stir – Add in 1.5 cups of room temperature water and stir with a wooden spoon until a shaggy dough forms. The dough should be sticky and rough in texture as this will help create that beautiful crust later on.
2. FIRST RISE
Letting the dough rest is essential for developing flavor and texture!
3. Cover – Cover the bowl tightly with plastic wrap to keep moisture in, then let it sit at room temperature for 12 to 18 hours. You’ll know it’s ready when the surface is bubbly and the dough has doubled in size, which can take up to 18 hours depending on your environment.
3. SHAPE THE DOUGH
This step helps create that perfect artisan shape!
4. Flour – Lightly flour a clean work surface and turn the risen dough out onto it. Be gentle; you don’t want to deflate it too much.
5. Shape – With floured hands, shape the dough into a ball by tucking the edges towards the center. Once shaped, place it on a floured piece of parchment paper for easy transfer later.
4. SECOND RISE
Allowing the dough to rise again enhances its texture.
6. Cover – Cover the dough with a clean kitchen towel and allow it to rise for another 1 to 2 hours. This second rise will help develop gluten structure, giving your bread that airy crumb.
5. PREHEAT THE OVEN
Get ready for baking perfection!
7. Preheat – About 30 minutes before you plan to bake, place a Dutch oven (with its lid) in your oven and preheat to 450°F (232°C). This hot environment will give your bread an amazing crust while keeping the inside tender.
6. BAKE THE BREAD
The moment of truth is finally here!
8. Remove – Carefully remove the hot Dutch oven from your oven using oven mitts—it’s very hot!
9. Transfer – Lift the dough using the parchment paper and gently place it into the hot Dutch oven (be careful not to touch those sides!).
10. Cover & Bake – Cover with the lid and bake for 30 minutes; this traps steam that helps form a great crust.
11. Uncover & Finish Baking – After 30 minutes, carefully remove the lid (watch out for steam!) and bake for an additional 15 minutes until the bread is golden brown and fragrant.
7. COOLING
Patience is key as your kitchen fills with delightful aromas!
12. Cool – Remove the bread from the Dutch oven and let it cool on a wire rack for at least 1 hour before slicing—this allows the crumb structure to set properly.
HANDY TIPS
- For extra flavor, consider adding herbs or garlic powder into your dry ingredients.
- If you want more pronounced air pockets in your bread, try letting it rise longer during both phases.
- Don’t skip cooling! Cutting into warm bread may result in gummy slices instead of perfect ones.
Congratulations! You’ve created a stunning loaf of No Knead Italian Artisan Bread that’s sure to impress everyone around you! That’s a glorious crusty exterior hiding soft, fluffy goodness inside waiting for butter or olive oil! Make this once, and I wager they will invade your dreams every night too! – Nagi x
FAQ – No Knead Italian Artisan Bread
❄️ How long does this bread last after baking?
This No Knead Italian Artisan Bread is best enjoyed fresh, but it can last for up to 3 days at room temperature. After day 1, I’d say it’s about 97% as good on day 2 and drops to around 90% on day 3. To store it, simply wrap the bread in a clean kitchen towel or place it in a paper bag to maintain its crusty exterior. Avoid plastic bags as they can make the crust soggy. If you want to keep it longer, consider freezing it!
⏳ Can I skip the first rise?
No, you cannot skip the first rise! This step is crucial for developing flavor and achieving that lovely airy texture you expect from artisan bread. The dough needs a gentle fermentation period of 12 to 18 hours at room temperature. I’ve tested this multiple times, and trust me—if you rush it, you’ll miss out on those beautiful bubbles and depth of flavor.
🥶 Can I freeze the dough or baked bread?
Yes, you can freeze both the dough and the baked bread! For freezing dough:
- After the first rise, shape it into a ball and wrap tightly in plastic wrap before placing it in an airtight freezer bag. It will keep for up to 3 months.
- To use, thaw in the fridge overnight and then proceed with the second rise as usual.
For baked bread:
- Let it cool completely before wrapping tightly in plastic wrap or aluminum foil. It can be frozen for up to 3 months as well. Thaw at room temperature or pop it back into a warm oven (wrapped) for a few minutes to refresh.
🌾 Is there a gluten-free option for this recipe?
Unfortunately, I haven’t found a suitable gluten-free flour that gives the same crusty result as this all-purpose flour-based recipe. Gluten-free flours behave quite differently due to their composition. If you’re set on making gluten-free bread, you’ll need to seek out specific gluten-free bread recipes that are formulated for that purpose.
🍞 Can I substitute all-purpose flour with whole wheat flour?
You can substitute whole wheat flour for all-purpose flour; however, remember that whole wheat absorbs more water than all-purpose flour. Start by substituting 1 cup of all-purpose flour with ¾ cup of whole wheat flour, then adjust the water slightly if necessary until you achieve a shaggy consistency while mixing. Keep in mind that this may affect the texture slightly—whole wheat will make your loaf denser with a nuttier flavor.
🧑🍳 Why do I need to use instant yeast instead of active dry yeast?
I recommend using instant yeast because it doesn’t require proofing beforehand; you can mix it directly with your dry ingredients! It has smaller granules than active dry yeast, which allows it to dissolve quickly and work faster—perfect for our no-knead method where time is key. If you only have active dry yeast on hand, just dissolve it in warm water (not hot!) before adding it to your flour mixture.
🌶️ Can I add herbs or spices to customize my bread?
Absolutely! Adding herbs like rosemary or thyme or spices such as garlic powder can elevate your artisan loaf beautifully. Just mix in about 1-2 tablespoons of dried herbs or spices when combining your dry ingredients. Be cautious not to overdo it; too many add-ins could alter the dough’s hydration balance and affect rising. Experimenting is half the fun—I often find myself tossing in whatever’s available!
Troubleshooting
I will continue to add more to this Troubleshooting section as I start seeing questions coming through from people who have made the recipe.
Troubleshooting tips
“My bread came out flat and didn’t rise! 😭”
- Your dough may not have had enough time to rise during the first rise. If it didn’t sit for at least 12 hours, the yeast wouldn’t have had sufficient time to develop and create those lovely bubbles.
- If you used water that was too cold, it could have slowed down the yeast activity, making it less effective in leavening your bread. Always use room temperature water!
- I bet it still tasted great, even if it was a bit flat!
“The crust of my bread is way too hard! 🔥”
- You might have overbaked your bread or baked it at too high a temperature. Make sure to keep an eye on the color and check for doneness to avoid a rock-hard crust.
- If your dough was too dry before baking, that can also result in a tough crust. Ensure you’re measuring your flour accurately and adding the right amount of water!
- I bet that crust added some character, though!
“My bread looks pale and undercooked on the inside! 😬”
- This could happen if your dough didn’t get enough heat during baking. Make sure your Dutch oven is preheated properly before adding the dough.
- Not allowing the second rise long enough can lead to dense bread, which might not cook through properly in the center. Give it that 1 to 2 hours of rising time!
- I’m sure it still tasted like homemade goodness!
“There are cracks all over my bread’s surface! 😱”
- If the dough was shaped too tightly into a ball, it can create tension that leads to cracking as it bakes. Gently shape the dough instead of pulling it too tight.
- Alternatively, if your oven is too hot, this can also cause rapid expansion and cracking on the surface. Try reducing your oven temperature slightly next time.
- I bet those cracks were just begging for some butter!
“My bread ended up with an uneven shape! 🤔”
- This can occur if you didn’t flour your work surface or hands sufficiently when shaping. A sticky surface can cause the dough to lose its shape.
- Not letting your shaped dough rest long enough before baking can also lead to uneven results, so be patient with that second rise!
- Even with an uneven shape, I’m sure it still made for a tasty loaf!
No Knead Italian Artisan Bread
Ingredients
Method
- In a large mixing bowl, combine the flour, salt, and instant yeast.
- Add the water and stir with a wooden spoon until a shaggy dough forms.
- Cover the bowl with plastic wrap and let it sit at room temperature for 12 to 18 hours, until the surface is bubbly and the dough has doubled in size.
- Lightly flour a work surface and turn the dough out onto it.
- With floured hands, shape the dough into a ball and place it on a floured piece of parchment paper.
- Cover the dough with a clean kitchen towel and let it rise for another 1 to 2 hours.
- About 30 minutes before baking, place a Dutch oven in the oven and preheat to 450°F (232°C).
- Carefully remove the Dutch oven from the oven.
- Lift the dough using the parchment paper and place it into the hot Dutch oven.
- Cover with the lid and bake for 30 minutes.
- Remove the lid and bake for an additional 15 minutes, until the bread is golden brown.
- Remove the bread from the Dutch oven and let it cool on a wire rack for at least 1 hour before slicing.