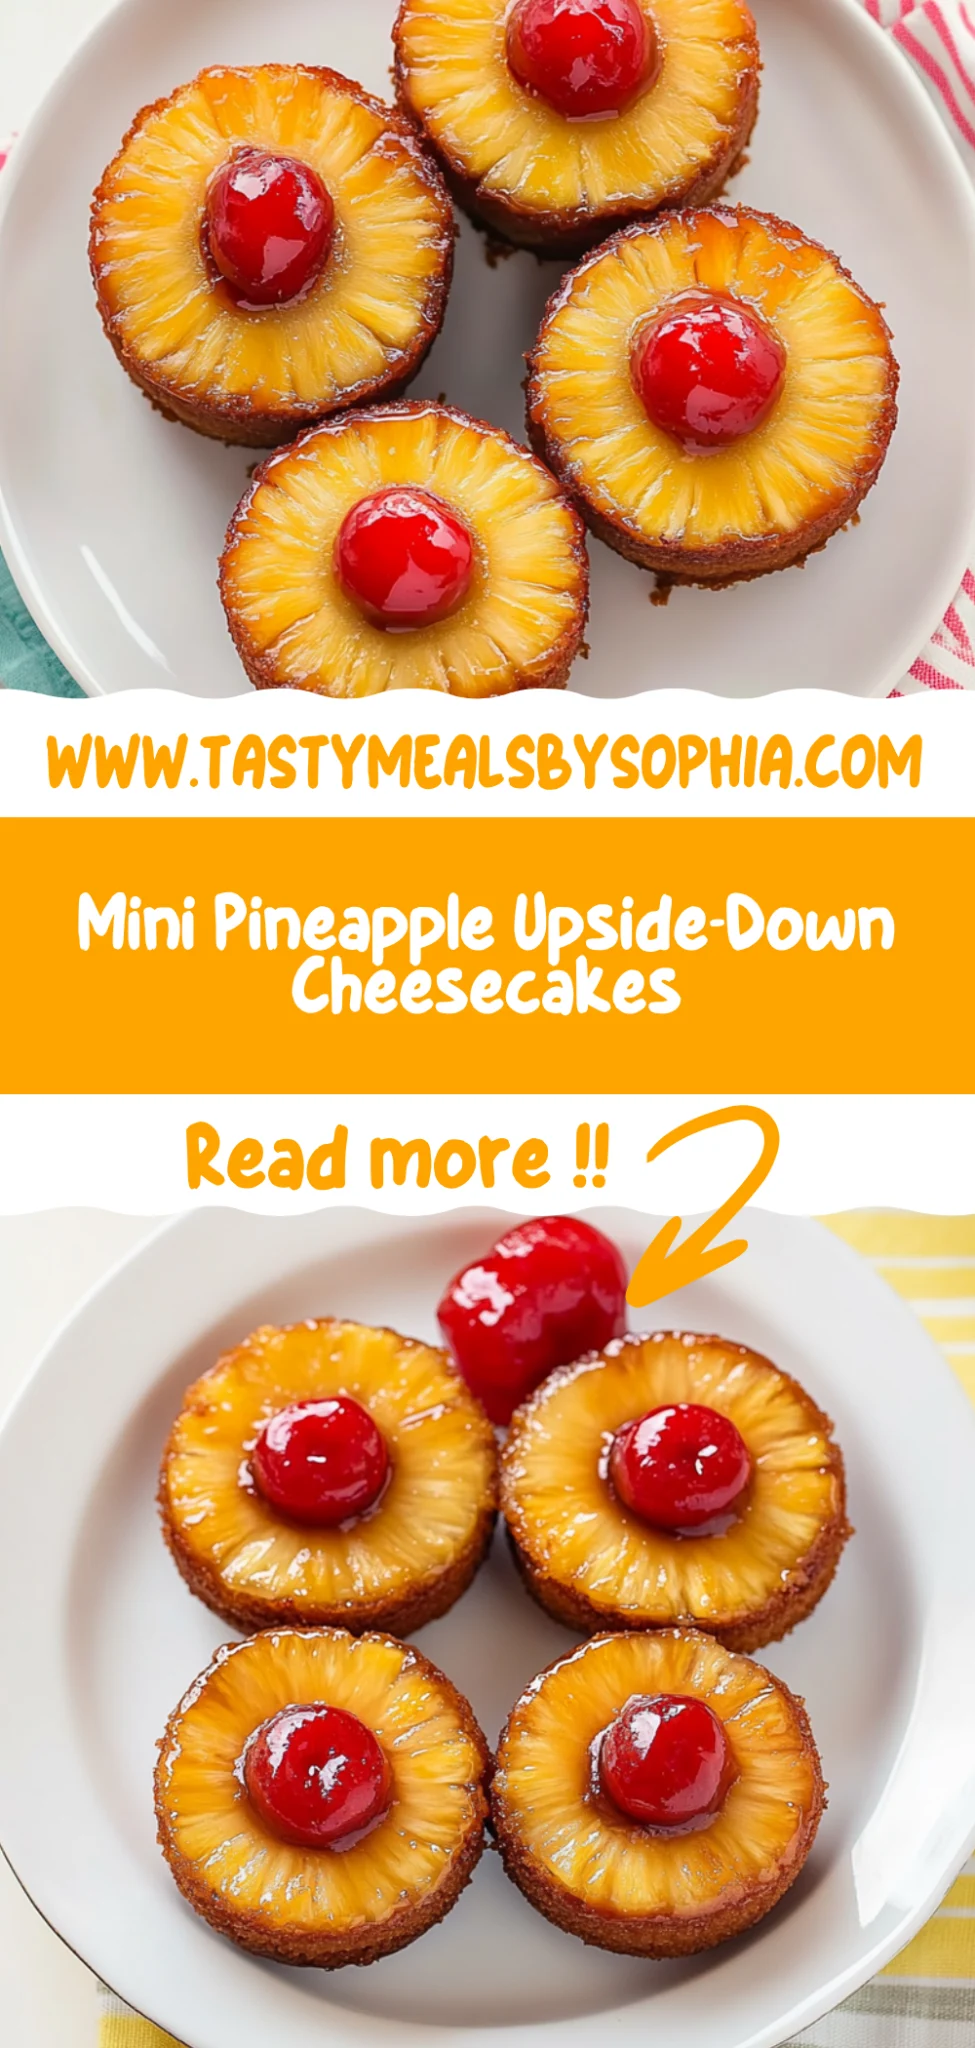
Mini Pineapple Upside-Down Cheesecakes: A Tropical Delight
It all started with a late-night craving for something sweet and tropical, which led me to reminisce about the classic pineapple upside-down cake I adored as a kid. I was flipping through a magazine when I stumbled upon a recipe for mini cheesecakes, and it hit me: why not combine these two beloved desserts? Not only did I want to recreate that nostalgic flavor at home, but I also wanted to whip up something that felt special without breaking the bank or taking up half my weekend. After all, who doesn’t love a dessert that’s both cute and delicious?
Let me tell you, perfecting these Mini Pineapple Upside-Down Cheesecakes was no walk in the park. It took me a solid five attempts before I finally got it right—let’s just say my patience was tested more than my baking skills! Each version seemed promising until the crust crumbled or the cheesecake went rogue, refusing to set properly. I was on a mission to create that perfect balance of creamy texture and buttery crust while ensuring those caramelized pineapples didn’t steal the show (too much) while still being the star.
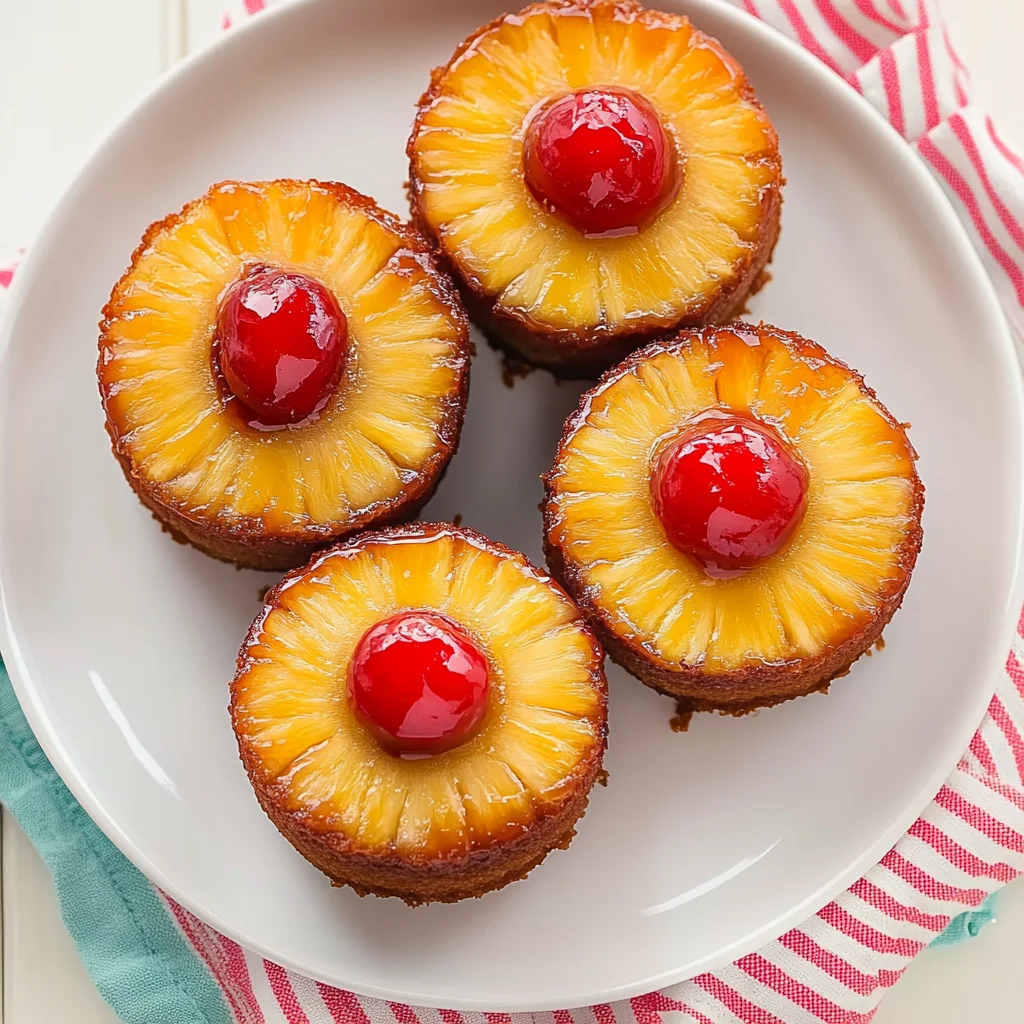
But oh boy, when I pulled that last batch out of the oven, it was worth every minute spent tinkering! These mini cheesecakes are utterly divine—imagine rich, creamy layers complemented by sweet, caramelized pineapple resting atop a buttery crust that’s just firm enough to hold it all together. The flavors come together like a tropical vacation in your mouth, and they’re surprisingly easy to store if you manage to have any left over (which is unlikely!). So grab your mixing bowl and let’s dive into making these show-stoppers—I promise you won’t regret it!
These Mini Pineapple Upside-Down Cheesecakes are….
….the ultimate indulgence that brings a tropical twist to your dessert table!
1. They deliver an exceptional flavor that perfectly balances the sweetness of caramelized pineapple with the creamy richness of cheesecake. The addition of brown sugar in the topping not only enhances the natural sugars in the pineapple but also creates a delightful caramel-like depth that makes each bite a celebration of flavors.
2. The texture is outstanding, featuring a crisp, buttery crust that contrasts beautifully with the luscious smoothness of the cheesecake filling. I use melted unsalted butter to bind the graham cracker crumbs, which ensures that every mini cheesecake has that ideal crunch and crumbly base while remaining rich and satisfying.
3. A key technique used in these cheesecakes is allowing the cream cheese to soften at room temperature before mixing. This step is crucial as it helps achieve a silky-smooth filling without any lumps, elevating these Mini Pineapple Upside-Down Cheesecakes from ordinary to extraordinary.
4. They provide fantastic value, as making these mini treats at home is far more economical than purchasing them from a bakery. With simple ingredients like graham cracker crumbs and butter, you can whip up a batch of these decadent desserts without breaking the bank, plus they’re so easy to make!
PS These cheesecakes yield about 12 mini treats, making them perfect for sharing at gatherings or simply indulging yourself!
Ingredients for the Mini Pineapple Upside-Down Cheesecakes
Each ingredient in this dish plays an essential role in flavor and texture. Here’s what you’ll need:
- 1 cup graham cracker crumbs: Provides a sweet and crunchy base for the cheesecake.
- 1/4 cup granulated sugar: Enhances the sweetness of the crust for a balanced flavor.
- 1/2 cup unsalted butter (melted): Binds the crust ingredients together while adding richness.
- 8 oz cream cheese (softened): Creates a creamy and smooth filling that is essential for cheesecake.
- 1/4 cup sour cream: Adds tanginess and creaminess, enhancing the overall flavor profile.
- 1/4 cup granulated sugar: Sweetens the filling to perfectly complement the tangy cream cheese.
- 1 teaspoon vanilla extract: Infuses a warm aroma and depth of flavor into the cheesecake mixture.
- 1 large egg: Acts as a binding agent, giving structure to the filling while keeping it moist.
- 1 cup pineapple rings (canned or fresh): Topped on each cheesecake, they provide a juicy burst of tropical flavor.
- 1/4 cup brown sugar: Caramelizes with the pineapple, adding depth and sweetness to the topping.
- 2 tablespoons unsalted butter (melted): Helps to create a luscious glaze over the pineapple for extra richness.
Don’t Skimp on Pressing the Crust! Here’s Why
I know, I know—pressing the crust might seem like a tedious extra step, and believe me, I tried to shortcut it. Spoiler alert: it didn’t work. I ended up with a crumbly mess instead of that gorgeous, firm base these mini cheesecakes deserve. Trust me when I say: don’t skip this!
So why is pressing the crust so crucial? Think of it like packing a suitcase. If you just throw everything in loosely, you’ll end up with a jumbled mess rather than a neat stack of outfits. When you compress the graham cracker crumbs, sugar, and butter mixture into those muffin tins, you create a sturdy foundation that holds everything together. It prevents sogginess and ensures that each cheesecake slice comes out beautifully intact.
What does pressing the crust do?
- Texture — A well-pressed crust results in a firm base that supports the creamy filling without crumbling apart.
- Stability — Properly compressed crumb mixture keeps the cheesecake intact during slicing and serving—no sad spills here!
- Flavor — Pressing enhances the flavor by allowing the butter and sugar to meld together, providing a richer taste.
- Color — Even pressure helps achieve an evenly browned crust, giving your cheesecakes that appealing golden hue.
- Shelf Life — A solid crust can help keep moisture from seeping into the cheesecake, extending its freshness.
Different pressing times
- 10 seconds (good) — Just enough to hold together but still crumbly; you’ll risk losing some filling when serving.
- 30 seconds (better) — Creates a more compact base; still not ideal for stability but an improvement over minimal effort.
- 1 minute (great) — Perfectly pressed! You get an even texture and durability for your mini cheesecakes.
- 2 minutes or more (⭐️best⭐️) — Overdoing it can lead to overly compacted crust that is tough to cut through.
Before you dive in, let me warn you about the most common mistake: not pressing hard enough! If your crust isn’t tightly packed, you’ll end up with mini cheesecakes that crumble apart at first slice. Save yourself the heartache—and dessert disaster—by giving it some good elbow grease!
How to make Mini Pineapple Upside-Down Cheesecakes
Are you ready to see how straightforward it is to make the Mini Pineapple Upside-Down Cheesecakes of your dreams??
1. PREPARE THE CRUST
Let’s start with that buttery, crumbly crust that sets the stage for your cheesecakes!
Bold action label – Preheat – Preheat the oven to 350°F (175°C). This temperature is perfect for creating a golden brown crust.
Bold action label – Combine – In a mixing bowl, combine 1 cup of graham cracker crumbs, 1/4 cup of granulated sugar, and 1/2 cup of melted unsalted butter. Mix until well combined; you want a sandy texture that holds together when pressed.
Bold action label – Press – Press the mixture evenly into the bottom of each muffin tin cup to form the crust. Make sure it’s compact so it holds its shape during baking!
HANDY TIPS
- Use a flat-bottomed glass to press down the crust evenly — this helps create a uniform thickness across all cups.
- If you like your crust extra crunchy, consider baking it for 5 minutes before adding the filling!
2. MAKE THE FILLING
Now for that luscious cheesecake filling that will melt in your mouth!
Bold action label – Beat – In another mixing bowl, beat 8 oz of softened cream cheese until smooth using an electric mixer. This ensures there are no lumps in your filling—smooth is key!
Bold action label – Add and mix – Add 1/4 cup sour cream, 1/4 cup granulated sugar, 1 teaspoon vanilla extract, and 1 large egg to the cream cheese. Mix until fully combined and smooth; this will give your cheesecake its rich flavor and creamy texture.
HANDY TIPS
- Make sure your cream cheese is properly softened at room temperature; this prevents clumps in your filling!
- For added flavor, consider using flavored extracts or citrus zest—like lemon or orange—for a refreshing twist.
3. ASSEMBLE AND BAKE
The exciting part: assembling these delightful mini cheesecakes!
Bold action label – Melt and caramelize – In a small saucepan over medium heat, melt 2 tablespoons of unsalted butter and add in 1/4 cup brown sugar. Stir until combined, then add in your pineapple rings and cook for 2-3 minutes until caramelized. The sugars should be slightly thickened and fragrant—this step adds that irresistible sweetness! ❓ Why does this matter? Because caramelizing enhances the flavor profile of the pineapple.
Bold action label – Place pineapple – Place a piece of caramelized pineapple in each muffin tin cup on top of the crust. Make sure they sit nicely atop the crust for maximum presentation!
Bold action label – Pour filling – Pour the cheesecake filling over the pineapple in each cup, filling them about three-quarters full so they have room to rise slightly during baking.
Bold action label – Bake – Bake in the preheated oven for 20-25 minutes or until the filling is set and slightly puffed up around the edges. You’ll know they’re done when they look firm but still have a slight jiggle in the center!
HANDY TIPS
- Keep an eye on them as they bake; if they start browning too quickly, cover them loosely with foil.
- These can also be made in larger portions if you don’t have a muffin tin — just adjust baking time accordingly!
4. COOL AND SERVE
The final phase where patience pays off — cooling and serving!
Bold action label – Cool down – Remove from the oven and let cool at room temperature for about 10 minutes. This helps them set further without cracking.
Bold action label – Refrigerate – Refrigerate for at least 2 hours before serving to set completely. This step is crucial for achieving that perfect cheesecake texture!
Bold action label – Remove and serve – Carefully remove the cheesecakes from the muffin tin by gently running a knife around each edge if needed, then serve chilled. They should pop out easily if you’ve pressed that crust firmly!
HANDY TIPS
- These can be made ahead of time; they actually taste better after chilling overnight!
- Consider garnishing with whipped cream or fresh mint leaves before serving to add a touch of elegance.
Make these once, and I wager they will invade your dreams every night too! – Nagi x
FAQ – Mini Pineapple Upside-Down Cheesecakes
🥭 Can I make these cheesecakes ahead of time?
Absolutely! You can prepare the mini cheesecakes a day in advance. Once they’re baked and cooled, simply refrigerate them for up to 2 days before serving. They actually taste better as the flavors meld together! Just be sure to cover them tightly with plastic wrap to avoid any absorption of odors from your fridge.
❄️ Can I freeze these mini cheesecakes?
Yes, you can freeze them! After they have cooled completely, wrap each cheesecake tightly in plastic wrap and then place them in an airtight container. They can be frozen for up to 2 months. To thaw, simply transfer them to the refrigerator overnight before serving. ⚠️ Avoid leaving them out at room temperature for too long after thawing — they’re best enjoyed chilled.
🌾 Are these cheesecakes gluten-free?
To make these mini cheesecakes gluten-free, you can substitute the graham cracker crumbs with gluten-free crumbs or even crushed nuts like almonds or pecans mixed with a bit of sugar and melted butter. Just keep in mind that the texture may vary slightly, but they will still be delicious!
🍯 Can I reduce the sugar or substitute it with sweeteners?
No, unfortunately, you cannot reduce the sugar in this recipe without affecting the texture and taste. I tried numerous variations using less sugar and even different sweeteners like stevia and erythritol, but they didn’t hold up well during baking. The sugar is crucial for balancing the creaminess of the filling and creating that perfect cheesecake consistency.
👩🍳 Why do I need to chill the cheesecakes before serving?
Chilling is essential because it allows the filling to set properly, ensuring a creamy texture when you bite into it. If you skip this step, you might end up with a soupy mess instead of beautifully structured mini cheesecakes. Trust me on this one — patience really pays off!
🥥 Can I add other toppings or flavors?
Definitely! If you’re feeling adventurous, consider adding a splash of coconut extract to the filling or topping them with toasted coconut flakes after baking. You could also swap out the pineapple for other fruits like peaches or berries — just be sure to adjust cooking times if you’re using fresh fruit that requires longer to caramelize.
🔄 What if I don’t have sour cream?
If you don’t have sour cream on hand, Greek yogurt is an excellent substitute! It will provide similar creaminess and tanginess without compromising the flavor profile of your mini cheesecakes. You can use the same amount as specified in the recipe; just make sure it’s plain yogurt without added sugars or flavors.
Troubleshooting
I will continue to add more to this Troubleshooting section as I start seeing questions coming through from people who have made the recipe.
Troubleshooting tips
“My cheesecakes were too flat! 😱”
- You may not have pressed the graham cracker crust firmly enough into the muffin tin. A loose crust won’t provide adequate structure, leading to flat cheesecakes.
- If you didn’t bake the crust long enough, it might not have set properly before adding the filling, resulting in a flat appearance.
I bet they were still YUM though!
“The tops of my cheesecakes cracked! 😭”
- Overmixing the cheesecake filling can incorporate too much air, which causes it to rise during baking and then crack as it cools.
- If you baked them at too high a temperature, that can also lead to cracks forming on the surface. Make sure your oven is preheated to 350°F (175°C) for optimal results.
I bet they were still YUM though!
“My cheesecakes are way too soft and wobbly! 😳”
- If you didn’t let them chill in the refrigerator for at least 2 hours, they won’t firm up properly. Patience is key with cheesecakes!
- Using cream cheese that isn’t fully softened can also prevent a smooth texture, making it harder for the filling to set correctly. Make sure it’s at room temperature before mixing!
I bet they were still YUM though!
“My crust was way too crumbly! 🤔”
- If you didn’t use enough melted butter when combining with the graham cracker crumbs, it could result in a dry and crumbly crust that falls apart easily.
- Not pressing the crust firmly enough into the muffin tin can also lead to crumbling. Make sure it’s compact and even for optimal support!
I bet they were still YUM though!
Mini Pineapple Upside-Down Cheesecakes
Ingredients
Method
- Preheat the oven to 350°F (175°C).
- In a mixing bowl, combine graham cracker crumbs, granulated sugar, and melted butter. Mix until well combined.
- Press the mixture evenly into the bottom of each muffin tin cup to form the crust.
- In another mixing bowl, beat the cream cheese until smooth using an electric mixer.
- Add sour cream, granulated sugar, vanilla extract, and egg. Mix until fully combined and smooth.
- In a small saucepan, melt the butter and brown sugar over medium heat. Add the pineapple rings and cook for 2-3 minutes until caramelized.
- Place a piece of caramelized pineapple in each muffin tin cup on top of the crust.
- Pour the cheesecake filling over the pineapple in each cup.
- Bake in the preheated oven for 20-25 minutes or until the filling is set.
- Remove from the oven and let cool at room temperature for 10 minutes.
- Refrigerate for at least 2 hours before serving to set completely.
- Carefully remove the cheesecakes from the muffin tin and serve chilled.