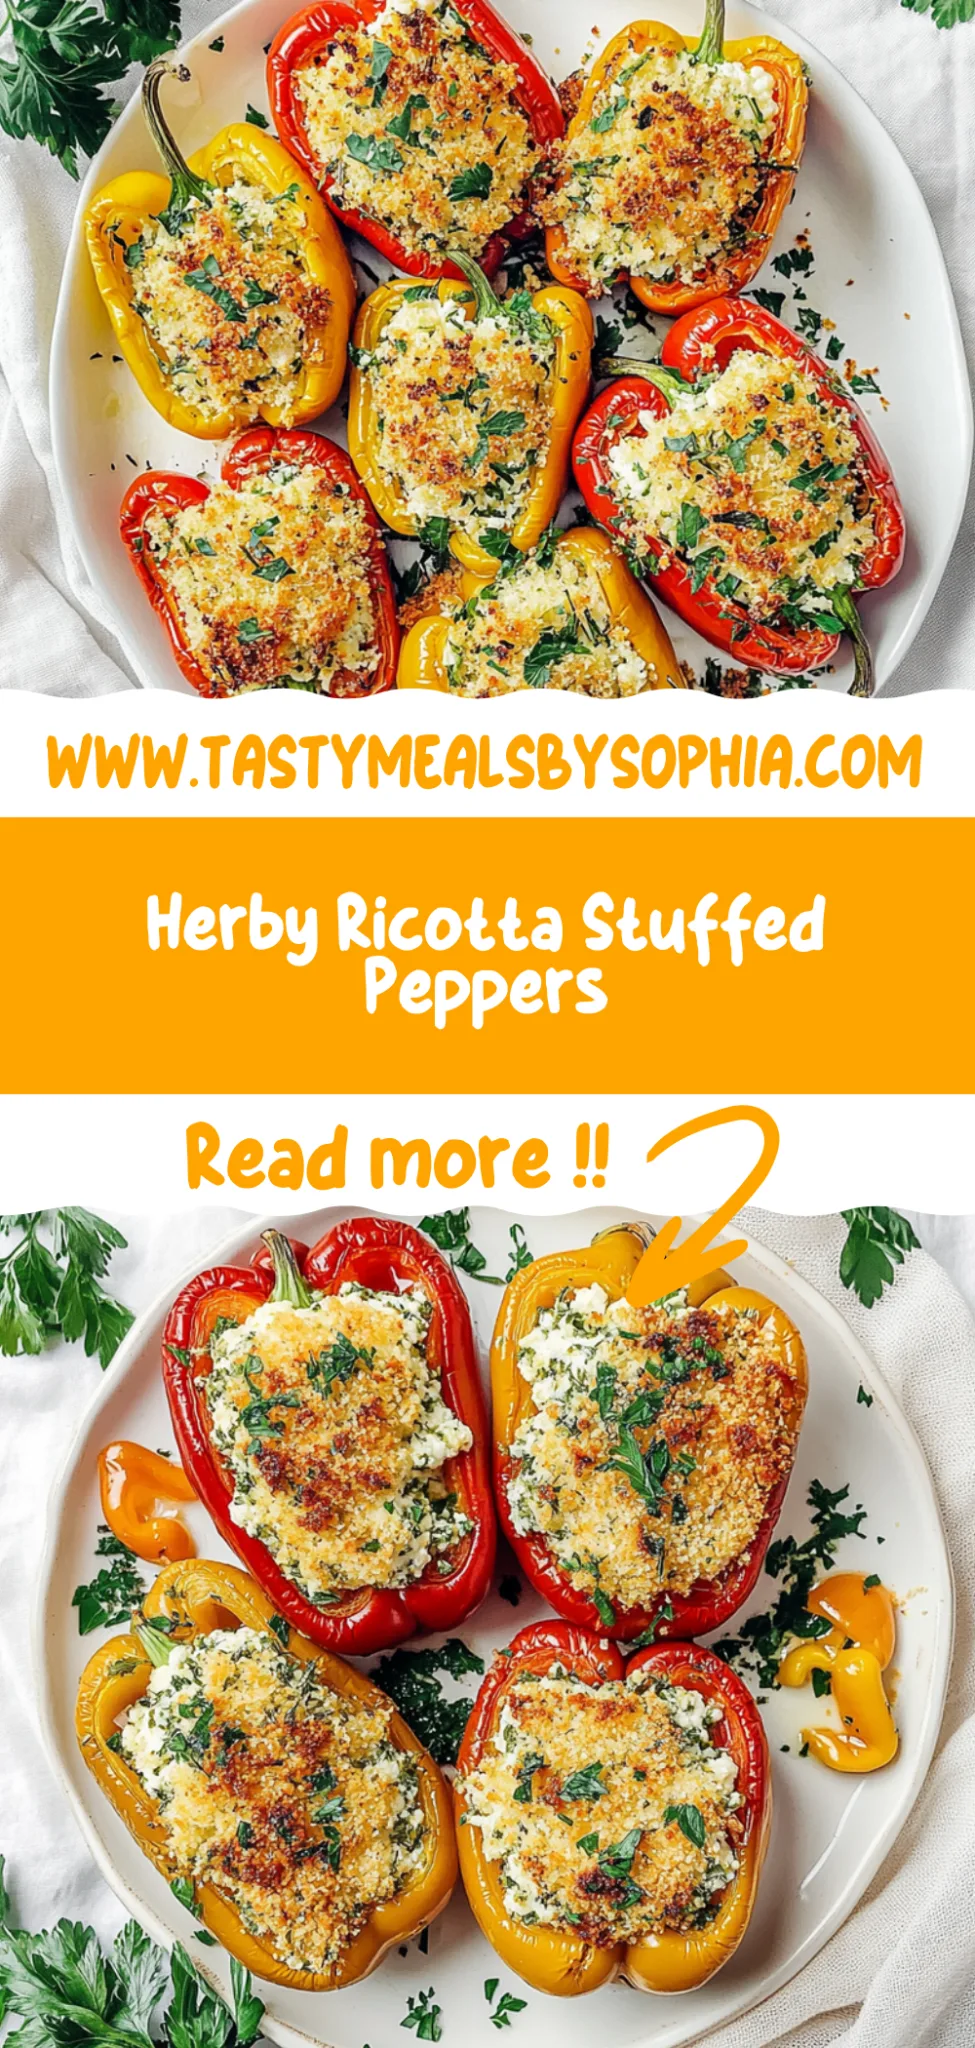
Herby Ricotta Stuffed Peppers: A Creamy Delight at Home
I first stumbled upon the idea for Herby Ricotta Stuffed Peppers while dining at a cozy little Italian bistro in my neighborhood. The moment I took that first bite, I was transported—creamy ricotta mingling with fresh herbs, all nestled inside perfectly roasted bell peppers. It was love at first taste! But as someone who loves to recreate restaurant favorites at home, I couldn’t help but think about how I could make it even better (and more affordable) in my own kitchen. Plus, let’s be real—who doesn’t want to fill their home with the irresistible aroma of baking peppers?
As with most of my culinary adventures, perfecting this recipe turned into a delightful journey of trial and error. Let’s just say, there were more than a few questionable batches—I mean, one time I accidentally seasoned them with way too much salt and ended up with a mouthful of regret! After four attempts (yes, four!), I finally got the balance just right: creamy ricotta, aromatic herbs, and that satisfying pop of sweetness from the bell peppers. Each iteration brought me closer to that heavenly bite I had fallen in love with.
Oh boy, was it worth it! The final result is nothing short of spectacular—imagine vibrant bell peppers bursting with a luscious herbed ricotta filling that’s both creamy and refreshing. With a texture that’s soft yet slightly crisp from baking, and flavors that dance on your palate, these Herby Ricotta Stuffed Peppers are bound to impress anyone lucky enough to snag one. Trust me; you’re going to want to whip these up ASAP because they’ll have you dreaming about them long after the last bite!
These Herby Ricotta Stuffed Peppers are…
…the ultimate comfort food that brings a fresh twist to your dinner table!
1. They offer a vibrant burst of flavor from the combination of herbed ricotta and fresh vegetables. The rich creaminess of the ricotta, paired with aromatic basil and parsley, elevates the dish, giving each bite a delightful freshness that dances on your palate, courtesy of the sweet bell peppers.
2. Heavenly texture – perfectly tender yet slightly firm bell peppers. By baking them just right, you achieve a delightful contrast between the soft, creamy filling and the slightly crisp exterior of the peppers, resulting in a satisfying mouthfeel that keeps you coming back for more.
3. They utilize a smart technique by par-baking the peppers before stuffing them. This step ensures that the peppers are just tender enough to hold their shape while allowing the flavors of the herbed ricotta to meld beautifully during baking, creating an irresistible dish that’s far from ordinary.
4. Incredible value – these Herby Ricotta Stuffed Peppers are not only easy to make but also budget-friendly! Using fresh ingredients like bell peppers and simple cheeses ensures you can whip up this wholesome meal at home without breaking the bank while enjoying restaurant-quality flavors.
PS These stuffed peppers are a wonderful way to enjoy a healthy meal packed with flavor and nutrition — perfect for meal prep or serving at gatherings!
What You’ll Need for Herby Ricotta Stuffed Peppers
Each ingredient in this dish plays an essential role in flavor and texture. Here’s what you’ll need:
4 whole Bell Peppers (Any color): These provide a sweet, crunchy vessel for the creamy filling.
1 cup Ricotta Cheese (Fresh): Creates a rich and creamy base that binds the filling together.
1/2 cup Grated Parmesan Cheese: Adds a savory depth and enhances the overall flavor profile.
1 tablespoon Fresh Basil (Chopped): Infuses the dish with a fragrant herbal note that brightens each bite.
1 tablespoon Fresh Parsley (Chopped): Contributes a fresh, vibrant touch that complements the cheese.
1 clove Garlic (Minced): Introduces a robust aroma and subtle kick to elevate the filling’s taste.
1 teaspoon Salt: Balances flavors and enhances the natural sweetness of the peppers.
1/2 teaspoon Black Pepper: Provides a gentle warmth that rounds out the savory elements.
1/4 cup Breadcrumbs (For topping): Adds a delightful crunch that contrasts beautifully with the creamy filling.
1 tablespoon Olive Oil (For drizzling): Helps achieve a golden, crispy topping while adding richness.
You Must Cut the Tops Off the Peppers. Seriously!
Confession time: I really thought I could skip cutting the tops off the peppers to save a couple of minutes. The idea of just stuffing them whole seemed so tempting — until I realized that I was left with uneven cooking and filling disasters. Trust me, you don’t want to make the same mistake I did!
Now, let me explain why this step is so crucial. When you cut the tops off the bell peppers, you create a larger opening for that luscious herbed ricotta filling. This not only allows for generous stuffing but also ensures that each pepper cooks evenly, resulting in a tender texture throughout. Think of it like a cozy hug for your filling — without that top, it’s just a sad little pepper trying to hold everything in!
What does cutting the tops off do?
- Improved Filling Distribution: Cutting the tops creates ample space for more filling, ensuring every bite is packed with flavor.
- Even Cooking: Exposing more surface area helps the peppers cook uniformly, preventing any crunchy surprises in your dish.
- Enhanced Flavor Absorption: The open tops allow flavors from the ricotta filling and spices to meld into the pepper itself, infusing deliciousness throughout.
- Better Texture: Removing the tops helps prevent any sogginess in parts of the pepper by allowing steam to escape during cooking.
- Visual Appeal: A neatly stuffed pepper with its vibrant top cut off looks infinitely more appetizing on your dinner table.
Different Cutting Techniques
- Top Off Completely (best) — This method offers maximum exposure for stuffing and ensures even cooking throughout.
- Cutting Just a Small Hole (average) — You’ll get some filling inside but risk uneven cooking and less flavor absorption.
- No Cutting at All (poor) — The ultimate disaster! You’ll end up with hard peppers and undercooked filling.
Be warned: skipping this simple yet critical step can lead to an epic fail in both presentation and taste. Don’t be that person who serves half-cooked stuffed peppers; cut those tops off and enjoy perfection!
How to make Herby Ricotta Stuffed Peppers
Are you ready to see how straightforward it is to make the Herby Ricotta Stuffed Peppers of your dreams??
1. PREPARE THE PEPPERS
Let’s start by getting those beautiful bell peppers ready for their delicious filling!
1. Preheat – Preheat the oven to 375°F (190°C). This temperature is perfect for baking the peppers evenly and ensuring they become tender while the filling warms through.
2. Cut – Cut the tops off the bell peppers and remove the seeds. Make sure to create a clean opening so you can fill them generously with that creamy ricotta mixture!
3. Place – Place the peppers upright in a baking dish. This helps maintain their shape during baking and makes it easier to stuff them later.
HANDY TIPS
- If you want to add a bit of color, mix and match your bell pepper colors! Red, yellow, and green will not only look vibrant but also provide slightly different flavor profiles.
- To ensure stability, you can slice a tiny bit off the bottom of each pepper if they wobble too much.
2. MAKE THE FILLING
Now for the star of the show—the herbed ricotta filling!
1. Combine – In a mixing bowl, combine ricotta cheese, grated Parmesan, chopped basil, chopped parsley, minced garlic, salt, and black pepper. Mixing these ingredients will create a creamy and flavorful filling that’s packed with freshness!
2. Mix – Mix until well combined. You want all those herbs and seasonings to blend beautifully into the ricotta—this is where all the flavor magic happens!
HANDY TIPS
- For an even creamier texture, use whole milk ricotta instead of part-skim.
- Feel free to experiment with additional herbs like oregano or thyme for an extra flavor boost!
3. STUFF THE PEPPERS
It’s time to give those peppers a delicious makeover!
1. Spoon – Spoon the ricotta mixture into each bell pepper, filling them generously. Don’t be shy—fill them up! The more filling, the better!
HANDY TIPS
- Using a small spatula or spoon can help pack down the filling for a snug fit.
- If you have leftover filling, consider using it as a dip or spread!
4. ADD TOPPING AND BAKE
Let’s add that crunchy topping and get these beauties in the oven!
1. Mix – In a small bowl, mix breadcrumbs with olive oil until they are well coated. This helps achieve that lovely golden brown color when baked.
2. Sprinkle – Sprinkle the breadcrumb mixture on top of the stuffed peppers for added crunch and texture.
3. Cover – Cover the baking dish with foil and bake for 25 minutes. This step traps steam inside to soften the peppers while keeping moisture in.
4. Uncover & Bake – Remove the foil and bake for an additional 5 minutes until the tops are golden brown. It’s this final push that gives you that irresistible crispy topping!
HANDY TIPS
- Want deeper flavor? Try adding some Italian seasoning or crushed red pepper flakes into your breadcrumb topping!
- If you’re using larger peppers, you might need to extend baking time by a few minutes—just check for tenderness.
5. SERVE
The moment you’ve been waiting for—time to enjoy your creation!
1. Remove – Remove from the oven and let cool for a few minutes before serving. This cooling period allows everything to set just right so you don’t burn your mouth on that delicious cheesy goodness!
Make these once, and I wager they will invade your dreams every night too! – Nagi x
FAQ – Herby Ricotta Stuffed Peppers
❓ How long do Herby Ricotta Stuffed Peppers last in the fridge?
These stuffed peppers will keep well in the refrigerator for about 3–4 days. On day 1, they’re at their best, maintaining about 97% quality. By day 3, they drop to around 90%, and by day 4, you might notice a decline to about 85%. After that, while it may still be safe to eat, the flavors can start to fade and the texture may become a bit mushy. Always store them in an airtight container to maximize freshness!
⏳ Can I skip letting the stuffed peppers rest before serving?
Nope, you can’t skip this part! It’s essential to let the peppers rest for about 5 minutes after taking them out of the oven. This resting time helps the filling set slightly, making it easier to slice and serve without everything spilling out. Plus, it allows the flavors to meld a little more, which is always a good thing!
❄️ Can I freeze Herby Ricotta Stuffed Peppers for later?
Absolutely! You can freeze these stuffed peppers before or after baking. If freezing before baking, simply stuff them as directed and then wrap each pepper tightly in plastic wrap and place them in a freezer-safe bag. They’ll keep well for up to 3 months. To bake from frozen, just add an extra 10-15 minutes of baking time at 375°F (190°C). If you choose to freeze them after baking, ensure they are completely cooled before wrapping.
🌱 Can I make these stuffed peppers dairy-free or vegan?
Yes! For a dairy-free version, substitute the ricotta cheese with a plant-based alternative like cashew cream or tofu blended with nutritional yeast for that cheesy flavor. You can also replace Parmesan with nutritional yeast or a dairy-free cheese option. Just make sure your breadcrumbs are also vegan if you’re opting for that route!
🔄 What can I substitute for ricotta cheese if I don’t have any?
If you find yourself without ricotta cheese, there are several alternatives you can use:
- Cottage cheese: Just blend it until smooth for a similar texture.
- Cream cheese: This will give you a richer filling; just mix it with some milk or water to soften.
- Greek yogurt: Use plain Greek yogurt for tanginess—it’s thicker but works well in this recipe.
Just keep in mind that each substitution might slightly alter the final flavor and texture!
🤔 Why should I cover the baking dish with foil while baking?
Covering the dish with foil during the initial baking period traps steam inside, which helps cook the peppers evenly and prevents them from drying out. It also keeps the filling moist as it bakes. After 25 minutes of covered baking, removing the foil allows the tops to brown beautifully! Trust me; this step is key to getting those golden edges that we all love.
🎨 Can I customize the filling with different herbs or ingredients?
Definitely! The beauty of this recipe is its versatility. You can swap out herbs like basil and parsley for others such as thyme or oregano depending on your preference. You could even add sautéed vegetables like spinach or mushrooms into the ricotta mixture for added flavor and nutrition! Just be mindful not to overload it too much; balance is key!
Troubleshooting
I will continue to add more to this Troubleshooting section as I start seeing questions coming through from people who have made the recipe.
Troubleshooting tips
“My peppers came out too soft and mushy! 😭”
- Your bell peppers might have been overcooked. When baking, if they are covered for too long, they can release excess moisture that leads to a mushy texture.
- Make sure to follow the baking times precisely and check for doneness at the minimum time so you can pull them out while still firm.
- I bet they were still YUM though!
“The tops of my stuffed peppers are uneven and look wonky! 🤔”
- This can happen if the tops of your bell peppers were cut unevenly or if they weren’t placed upright properly in the baking dish. If they’re leaning or not stable, they can cook unevenly.
- Next time, try to trim the tops in a straight line and ensure they stand up securely in the dish.
- I bet they were still YUM though!
“My ricotta filling was way too runny! 😬”
- If your ricotta cheese is too watery, it can lead to a filling that’s not thick enough. This often happens with fresh ricotta that hasn’t been drained properly.
- For next time, consider draining your ricotta in a fine mesh sieve for about 30 minutes before mixing it with other ingredients.
- I bet they were still YUM though!
“My breadcrumbs burned on top but the filling is undercooked! 🔥”
- This usually occurs if your oven runs hot or if the baking dish was placed too close to the heating element. The breadcrumbs can brown quickly while the filling needs more time.
- Keep an eye on them during the last few minutes of baking and adjust the oven rack accordingly so everything cooks evenly.
- I bet they were still YUM though!