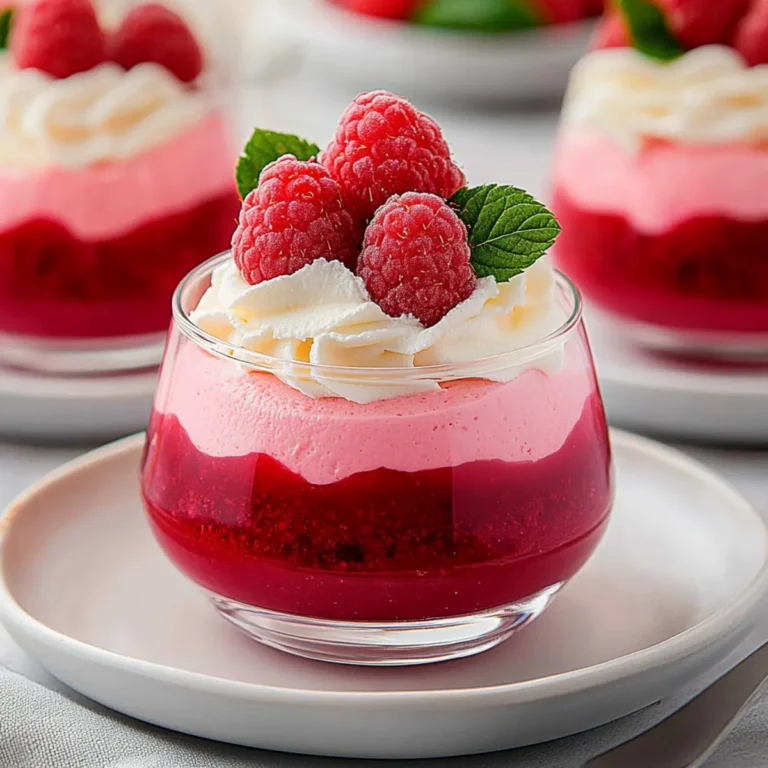
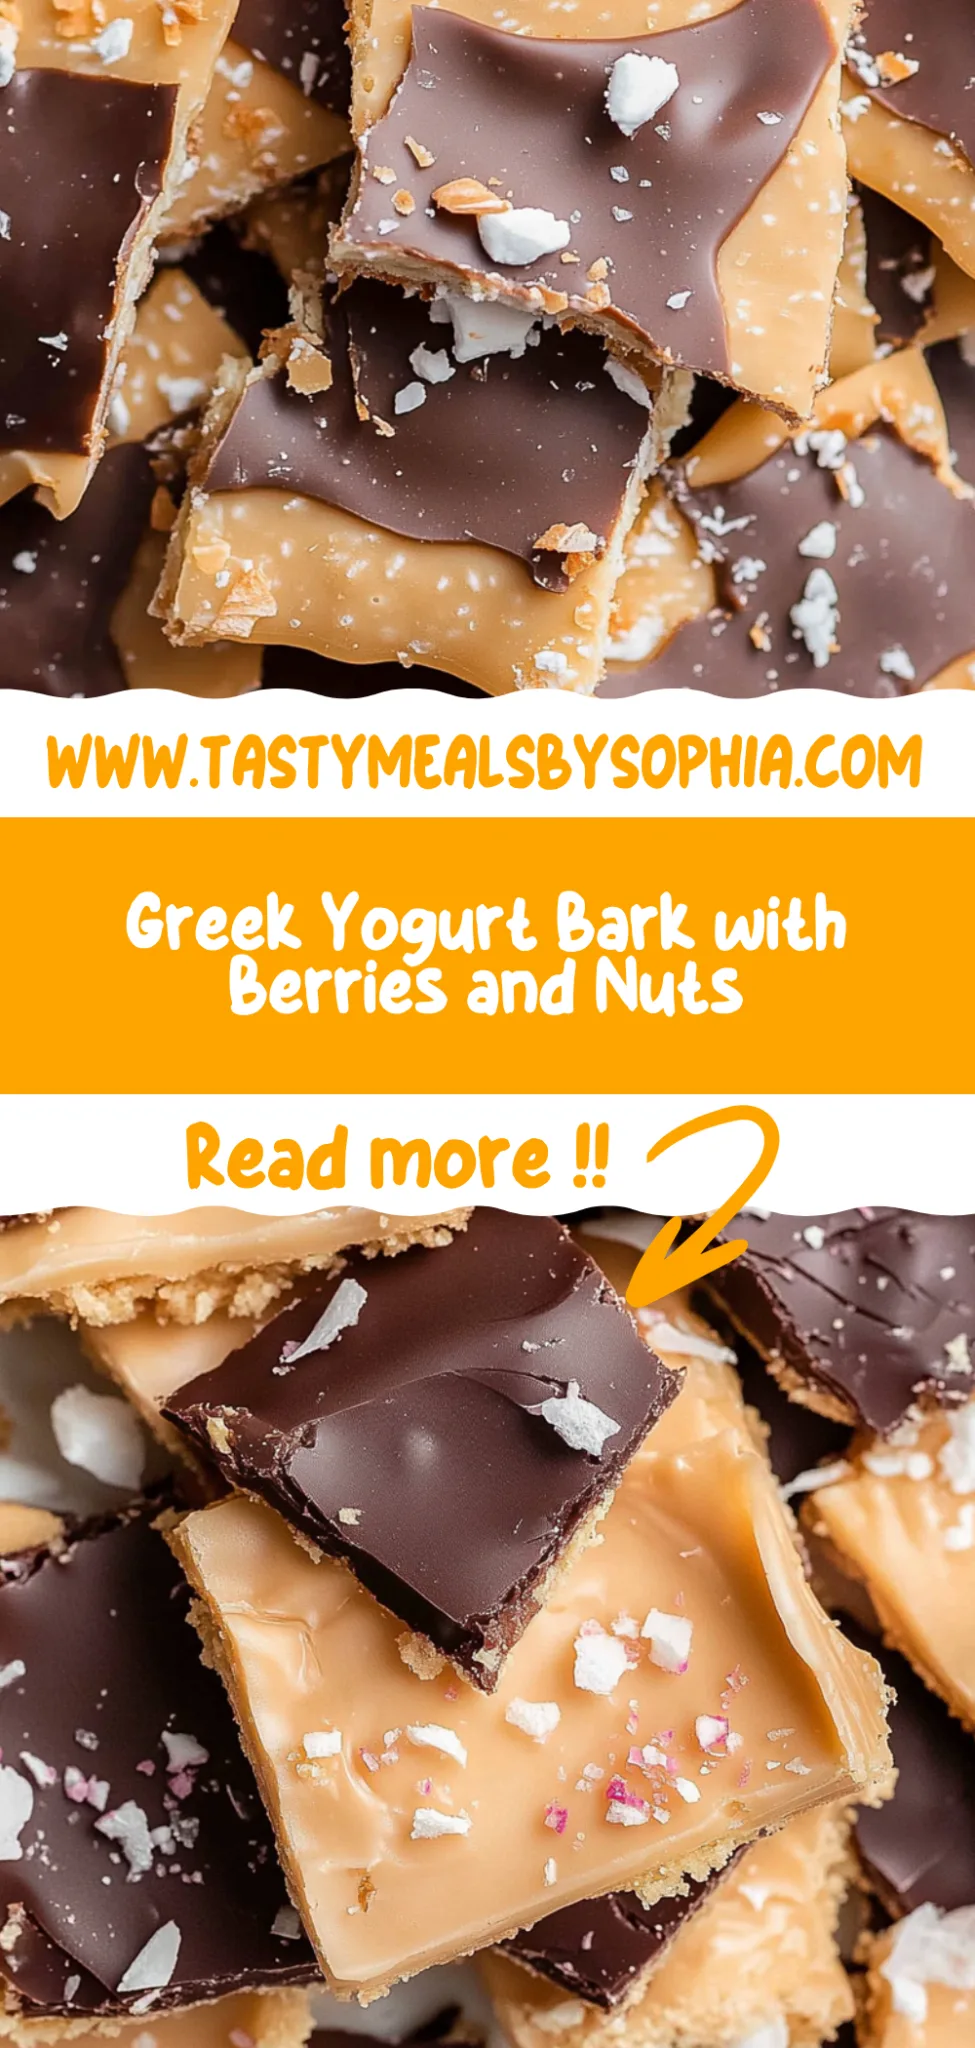
Greek Yogurt Bark: A Refreshing and Easy Snack Idea
I first stumbled upon the idea of Greek Yogurt Bark during a late-night snack craving while scrolling through social media. It looked so vibrant and refreshing, with all those colorful fruits and crunchy nuts, that I couldn’t resist giving it a try. The original version I saw was from a trendy health café that charged an arm and a leg for a tiny square, and I thought, “I can totally make this at home!” Plus, there’s something satisfying about crafting a treat that’s not just delicious but also good for you—who wouldn’t want to elevate their snacking game?
After several attempts (and let’s be real, some hilarious failures), I finally nailed down my recipe. I think I went through at least five batches before I figured out just the right balance of creamy Greek yogurt to sweet toppings. Every time I’d experiment, I was trying to achieve that perfect harmony of flavors and textures—something that was both indulgent and healthy without sacrificing taste. Let’s just say my kitchen looked like a fruit salad exploded in it more times than I’d like to admit!
But oh boy, was it worth all the trial and error! My final version of Greek Yogurt Bark is not just eye-catching with its vibrant mix of fruits and nuts; it’s also got that dreamy creamy texture paired with delightful crunchiness that’ll have you coming back for more. Not to mention, it stays fresh in the freezer for ages, making it an ideal treat whenever you need a quick snack or light dessert. Trust me, once you take your first bite, you’ll be hooked—and you’ll find yourself making this again and again!
These Greek Yogurt Bark are…
…a delightful explosion of flavor and nutrition that will revolutionize your snacking routine!
1. They offer a tangy yet sweet flavor profile that’s simply irresistible, thanks to the creamy Greek yogurt base and the fresh burst of mixed berries. The combination of plain, unsweetened yogurt provides a perfect canvas for the natural sweetness of the honey and fruits, creating a taste sensation that feels indulgent without the guilt.
2. Incredible texture – each bite combines the smooth creaminess of Greek yogurt with the juicy pop of berries and the satisfying crunch of nuts. This play between soft and crunchy keeps every mouthful exciting, making it an enjoyable experience rather than just a snack.
3. The no-bake technique is what makes this Greek Yogurt Bark exceptionally easy to whip up. Simply spread the yogurt on a baking sheet, top it with your favorite fruits, nuts, and maybe even chocolate chips, then freeze. This method not only saves time but also retains all the nourishing benefits of each ingredient without any complicated cooking processes.
4. Cost-effective and healthy – this recipe uses readily available ingredients like Greek yogurt and seasonal berries, making it a budget-friendly option compared to store-bought snacks or desserts. Plus, you can easily customize it based on what you have on hand or your dietary preferences, ensuring you get maximum value out of every batch.
PS This recipe yields about 12 pieces, depending on how you slice it. Perfect for meal prepping or satisfying that sweet craving anytime!
Ingredients for the Greek Yogurt Bark
Each ingredient in this dish plays an essential role in flavor and texture. Here’s what you’ll need:
2 cups Greek yogurt (plain, unsweetened): Serves as the creamy base that provides protein and tanginess.
1 cup mixed berries (strawberries, blueberries, raspberries): Adds natural sweetness and vibrant color with a refreshing burst.
1/4 cup honey (or maple syrup for sweetness): Enhances the overall flavor with a touch of natural sweetness.
1/4 cup chopped nuts (almonds or walnuts): Offers a satisfying crunch and nutty richness to the bark.
- 1/4 cup dark chocolate chips (optional): Brings a hint of indulgent sweetness that perfectly complements the tartness of yogurt.
You Must Freeze the Yogurt Bark. No Shortcuts!
I have to confess: I tried to shortcut the freezing part of this Greek Yogurt Bark recipe, thinking it wouldn’t make much difference. Spoiler alert: I was wrong! After multiple attempts (and quite a few melted yogurt puddles), I learned that patience really is a virtue when it comes to achieving the perfect texture and flavor.
Freezing the yogurt bark allows all those delicious toppings—plump berries, crunchy nuts, and that optional chocolate—to meld beautifully with the yogurt base. Think of it like ice cream: if you don’t freeze it long enough, you end up with a soupy mess instead of creamy delight. The firming up process creates a delightful balance of flavors and textures that can’t be rushed!
What does freezing do?
- Texture — The freezing process transforms the creamy yogurt into a delightful, scoopable treat, making each bite refreshing and satisfying.
- Flavor Concentration — As the yogurt freezes, the flavors intensify, allowing the sweetness of honey and tartness of berries to shine through.
- Stability — Freezing ensures that every piece holds together well when you cut it, preventing a messy situation that could lead to joyless snacking!
- Color Retention — A proper freeze helps keep those vibrant berry colors intact—who doesn’t want their snack to look as good as it tastes?
- Shelf Life — Well-frozen yogurt bark can last longer in your freezer without losing its quality, so you can enjoy it over days or even weeks!
Different freezing times
- 1 hour (fair) — Barely frozen; you’ll end up with yogurt bark that’s soft and messy—good luck cutting it!
- 2 hours (good) — Better but still not quite firm enough; you’ll get some structure but will likely end up with drippy dessert.
- ⭐️ 4 hours⭐️ — This is where magic happens—firm enough to hold its shape while still being creamy and delicious!
- Beyond 6 hours (great) — Perfectly frozen yogurt bark; however, after too long in the freezer, it risks becoming overly hard and icy.
Beware! The most common mistake is not freezing the mixture long enough. If you try to cut or serve before it’s fully set, you’ll end up with a gooey disaster instead of beautifully shaped pieces. Trust me; patience is key!
How to make Greek Yogurt Bark
Are you ready to see how straightforward it is to make the Greek Yogurt Bark of your dreams??
1. PREPARE THE BAKING SHEET
Let’s set the stage for your delicious creation!
Bold action label – Line – Start by lining a baking sheet with parchment paper. This will prevent the yogurt from sticking and make it easy to remove once frozen.
HANDY TIPS
- Make sure the parchment paper hangs over the edges for easier removal.
- Use a rimmed baking sheet to contain any potential drips!
2. MIX THE YOGURT
Get that creamy goodness ready!
Bold action label – Mix – In a bowl, combine the Greek yogurt and honey (or maple syrup) until well blended. The honey not only sweetens but also adds a lovely gloss to your yogurt, making it even more appealing.
HANDY TIPS
- For a lower-calorie option, reduce the amount of honey or use a sugar substitute.
- If you prefer a tangier flavor, opt for plain unsweetened yogurt without adding too much sweetness!
3. SPREAD THE YOGURT
Time to create your yogurt canvas!
Bold action label – Spread – Pour the yogurt mixture onto the prepared baking sheet, and spread it evenly using a spatula. Aim for about 1/2 inch thick; this ensures it freezes nicely without being too thick.
HANDY TIPS
- If you want thicker pieces, keep it at 1 inch, but remember, they’ll take longer to freeze!
- Smooth out any bumps for an even surface – it’ll look more appetizing when serving!
4. ADD TOPPINGS
This is where all the fun comes in!
Bold action label – Evenly distribute – Sprinkle the mixed berries, chopped nuts, and optional dark chocolate chips over the yogurt layer. Ensure an even distribution so each piece has a bit of everything when served.
HANDY TIPS
- Feel free to mix and match with your favorite toppings! Try sliced bananas or coconut flakes for different flavors.
- For extra crunch, consider lightly toasting the nuts before adding them on top — so good!
5. FREEZE
Let science do its magic!
Bold action label – Place – Put the baking sheet in the freezer for at least 4 hours or until completely firm. You’re looking for a solidified texture that can hold its shape when cut into pieces.
HANDY TIPS
- If you’re in a hurry, you can speed up freezing by placing it in a flat area in your freezer where cold air circulates well.
- Don’t worry if it looks slightly frosty; that’s normal with Greek yogurt!
6. CUT AND SERVE
It’s finally time to enjoy your masterpiece!
Bold action label – Remove – Once frozen solid, take the Greek Yogurt Bark out of the freezer and carefully lift it from the baking sheet using the edges of the parchment paper. Cut into pieces of your desired size – I recommend bite-sized squares for easy snacking!
HANDY TIPS
- Store any leftovers in an airtight container back in the freezer; they’ll keep well for up to two weeks (if they last that long!).
- For added flair when serving, drizzle with extra honey on top right before eating!
You’ve just created a delightful snack that’s not only healthy but also incredibly delicious! With refreshing fruits and creamy Greek yogurt, this bark is perfect as a light dessert or breakfast treat. Make these once, and I wager they will invade your dreams every night too! – Nagi x
FAQ – Greek Yogurt Bark
🥶 How long can I keep Greek Yogurt Bark in the freezer?
Greek Yogurt Bark can be stored in the freezer for up to 3 months. After that, it will still be safe to eat, but the texture and flavor may degrade—I’d say it’s about 85% as good after 2 months and only around 75% by the 3-month mark. To maintain peak freshness, store it in an airtight container or wrap it tightly with plastic wrap. You don’t want your delicious bark to absorb any unwanted freezer odors!
⏲️ Can I skip the freezing time?
No, you cannot skip the freezing time! I’ve tested this multiple times, and trust me when I say that letting it freeze for at least 4 hours is crucial for achieving the right texture. If you take it out too early, you’ll end up with a mushy mess rather than a delightful bark. So patience is key here—grab a snack and let it do its thing!
❄️ How do I properly freeze Greek Yogurt Bark?
To freeze Greek Yogurt Bark, simply follow these steps:
- After spreading your yogurt mixture and adding toppings, place the baking sheet in the freezer.
- Once frozen solid (after about 4 hours), remove from the freezer.
- Cut into pieces and transfer to an airtight container or zip-top bag.
- Label with the date! For best quality, consume within 3 months.
💡 For easy access, keep some pieces in a smaller container for snacking while keeping the rest stored away.
🌱 Is there a dairy-free option for this recipe?
Absolutely! To make a dairy-free version of Greek Yogurt Bark, substitute plain Greek yogurt with a dairy-free yogurt alternative made from coconut, almond, or cashew bases. Just ensure it’s unsweetened if you’re controlling sugar intake. The texture might be slightly different depending on which one you choose, but it’ll still be delicious! Err…yes. I know. I’m a little mad for experimenting with yogurts! 😅
🍯 Can I substitute honey with something else?
Yes, you can substitute honey! Maple syrup works beautifully as a sweetener if you prefer a vegan option or simply want to switch things up. Keep in mind that maple syrup has a more pronounced flavor than honey; so if you’re aiming for subtle sweetness, use about 2 tablespoons less than what you’d typically use for honey. I’ve tried both versions and find them equally delightful!
🥜 What nuts work best as toppings?
While I recommend chopped almonds or walnuts for their crunchiness and flavor balance, feel free to experiment! Pecans or hazelnuts also make fantastic choices if you’re looking for something different. Just keep in mind:
- Almonds: Mildly sweet and crunchy
- Walnuts: Richer flavor but softer crunch
- Pecans: Naturally sweeter and buttery
Try mixing different nuts together for added texture; it’s like giving your bark a fun little upgrade!
🔍 Why do I need to line the baking sheet with parchment paper?
Lining your baking sheet with parchment paper is essential because it prevents the yogurt mixture from sticking to the surface. Trust me—I’ve made this mistake before! Without parchment paper, you’ll find yourself struggling to get those lovely pieces off without tearing them apart. Plus, clean-up becomes an absolute breeze since nothing will stick—your future self will thank you!
🌈 Can I add more ingredients or customize my Greek Yogurt Bark?
Absolutely! This recipe is incredibly versatile—feel free to add other toppings like shredded coconut, granola, or even slices of banana! Just remember not to overload your bark too much; otherwise, it might not freeze evenly. In my opinion, keeping it simple often leads to perfection—less is sometimes more when it comes to flavors melding together!
Troubleshooting
I will continue to add more to this Troubleshooting section as I start seeing questions coming through from people who have made the recipe.
Troubleshooting tips
“My Greek yogurt bark is too thin and falls apart! 😩”
- You may have spread the yogurt mixture too thinly on the baking sheet. Aim for a layer that’s about 1/2 inch thick to ensure it holds together well when frozen.
- If you didn’t use enough yogurt, your bark will definitely be less stable. Make sure to use the full 2 cups of Greek yogurt for a solid base.
I bet it was still YUM though!
“My yogurt bark is too soft and mushy! 😱”
- It sounds like you didn’t freeze it long enough. Make sure to leave it in the freezer for at least 4 hours, or until it’s completely firm before cutting.
- If your freezer isn’t cold enough, it can take longer to freeze. Ensure it’s at the right temperature (0°F/-18°C) for effective freezing.
I bet it was still YUM though!
“The surface of my Greek yogurt bark cracked when I cut it! 😬”
- You might have overmixed the yogurt with honey, which can introduce air bubbles. Mix gently to keep your mixture smooth and creamy without excess air.
- Cutting while it’s still slightly soft can cause cracks. Let it sit at room temperature for a few minutes after removing from the freezer before slicing for cleaner cuts.
I bet it was still YUM though!
“My toppings sank into the yogurt and didn’t stay on top! 🍓”
- If you added the toppings too soon before freezing, they might not have had time to set atop the yogurt layer. Try adding them just before placing in the freezer.
- Using very wet fruits could also lead to them sinking. Pat your berries dry with a paper towel before adding to minimize moisture.
I bet it was still YUM though!