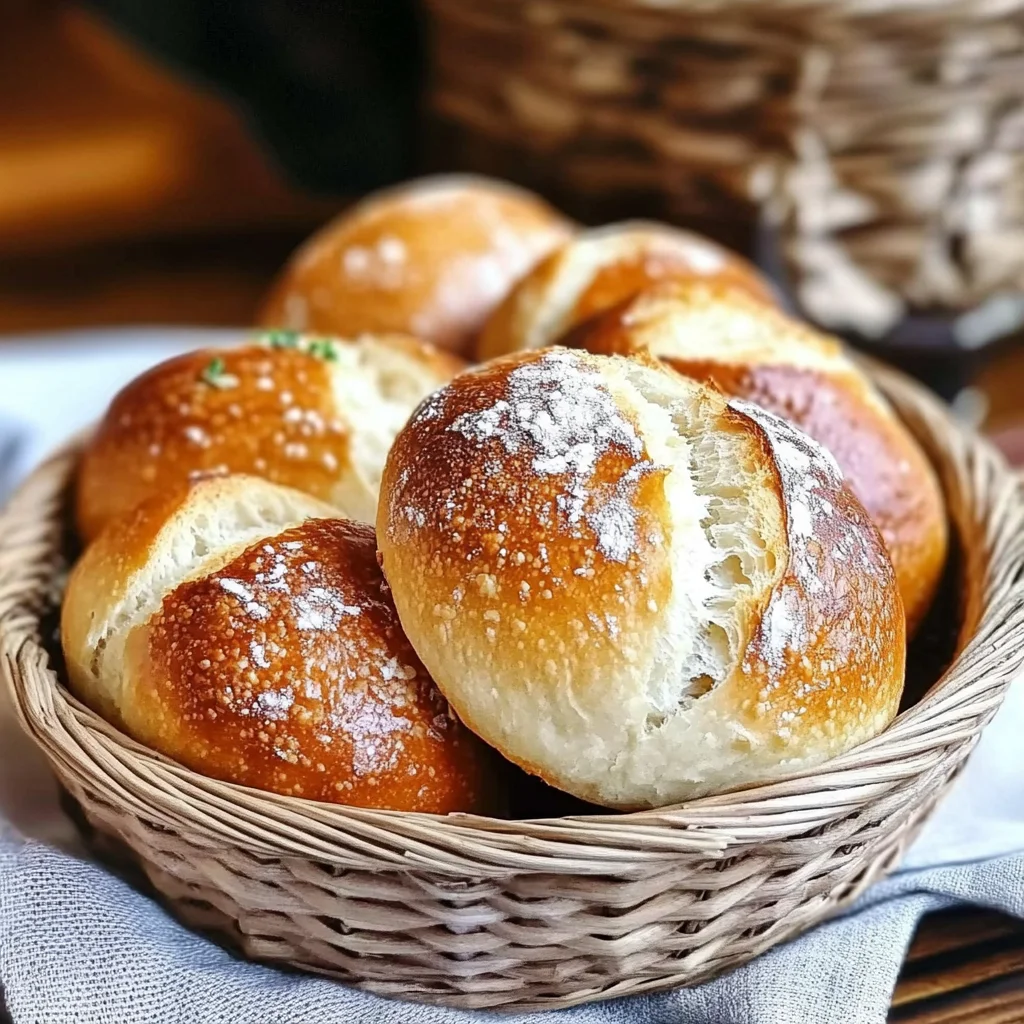
Easy No Knead German Crusty Rolls: Fresh Out of Your Oven
I’ve always had a soft spot for those crusty German rolls you find at bakeries, especially when they’re still warm and fresh out of the oven. One day, after a particularly indulgent meal out, I found myself craving those rolls—crunchy on the outside and delightfully fluffy on the inside. But let’s be real; who wants to pay for a basket of bread when you can make it at home? So, I decided to take on the challenge of recreating these Easy No Knead German Crusty Rolls in my own kitchen. Spoiler alert: I wanted them to be even better than what I’d tasted!
It took me a few (okay, more than a few) attempts to nail down the perfect recipe. I’m talking about flour flying, dough splattering, and me yelling at my oven because it just wasn’t cooperating. Each iteration was an adventure—sometimes the rolls were too dense, other times they looked like sad little pancakes instead of beautiful puffs of golden goodness. But each failure brought me closer to that crisp shell and airy interior I was dreaming of, and honestly, I may have consumed my weight in “test” rolls along the way!
But oh boy, was it worth it! These Easy No Knead German Crusty Rolls finally turned out just how I imagined—golden brown with a crackly crust that gives way to such a soft, airy crumb that it practically melts in your mouth. They’re not just pretty; they boast an incredible flavor that pairs beautifully with any meal and stay fresh for days. Trust me, once you bake these up and fill your kitchen with that irresistible aroma, you’ll be as obsessed as I am. So grab your apron and let’s get rolling!
These Easy No Knead German Crusty Rolls are…
…a game changer in the world of homemade bread!
1. They deliver an incredible depth of flavor that comes from the right balance of salt and yeast. The 1 tablespoon of instant yeast not only helps the dough rise effortlessly but also contributes a subtle, fermented aroma that enhances the overall taste profile, making each bite more delightful.
2. Perfectly crusty yet fluffy texture – these rolls have a beautifully crisp crust with a soft, airy interior. Thanks to the generous 4 cups of all-purpose flour, they rise beautifully, creating that perfect contrast between the chewy exterior and tender inside that you crave in a great roll.
3. No kneading required – this technique elevates the recipe by making it accessible for every home cook. By simply mixing together dry ingredients like flour and instant yeast with warm water, you activate the yeast for a slow rise, resulting in a light and airy texture without the hassle of traditional kneading.
4. Affordable and easy to make – using just basic pantry staples like all-purpose flour, instant yeast, and salt means you can whip up these rolls without breaking the bank. This simplicity not only saves money compared to bakery rolls but also makes them incredibly accessible for anyone looking to enjoy fresh bread at home.
PS These rolls yield about 12 perfectly sized pieces, ideal for serving alongside any meal or enjoying on their own!
Ingredients for the Easy No Knead German Crusty Rolls
Each ingredient in this dish plays an essential role in flavor and texture. Here’s what you’ll need:
4 cups all-purpose flour: Provides the structure and chewy texture of the rolls.
1 tablespoon instant yeast: Helps the dough rise quickly for a light, airy interior.
1 tablespoon salt: Enhances flavor and strengthens the dough.
1.5 cups warm water (about 110°F): Activates the yeast and hydrates the flour for a perfect dough consistency.
The Long Rise is Non-Negotiable. Here’s Why!
I tried to rush this step, thinking I could shave off some time and still end up with decent rolls. Spoiler alert: I was wrong! After several attempts with shorter rises, I quickly learned that the magic really happens during this long fermentation process, and there are no shortcuts to perfecting these crusty rolls.
The reason this long rise is crucial lies in the combination of yeast and flour. When the yeast works its magic over 12 to 18 hours, it produces carbon dioxide gas that gets trapped in the dough. This gives your rolls that lovely airy texture. Think of it like letting a good stew simmer; the longer it cooks, the more developed the flavors become. In our case, it’s not just about flavor—it’s also about achieving that delightful crust and soft interior.
What does the long rise do?
- Flavor development — The extended fermentation time allows the yeast to break down sugars in the flour, enhancing the overall taste of your rolls.
- Texture improvement — The slow rise creates a more open crumb structure, resulting in a light and airy interior that you just can’t achieve with a quick rise.
- Crispier crust — Longer fermentation promotes better gluten formation, which leads to a sturdier outer crust that bakes up wonderfully crispy.
- Better color — The Maillard reaction is amplified with longer rises, giving your rolls a rich golden-brown hue that’s as appealing to the eye as it is to the palate.
- Increased shelf life — Rolls made with this technique tend to stay fresher for longer due to enhanced flavor and moisture retention from the yeast activity.
Different rising times
- 1 hour (poor) — Quick rise leads to dense rolls with minimal flavor and a tough crust; not recommended unless you’re desperate!
- 3 hours (fair) — Better than an hour but still lacking depth; rolls will be heavier with less airiness.
- 6 hours (good) — Noticeable improvement in texture and flavor; still not optimal for those seeking perfection.
- ⭐️ 12 to 18 hours⭐️ (best) — The sweet spot for flavor and texture; these rolls come out light, airy, and full of deliciousness.
Beware: Skipping or shortening this crucial long rise is the most common mistake people make when attempting these rolls. Don’t be tempted by promises of quicker results—you’ll end up with sad little lumps instead of beautifully risen, crusty rolls!
How to make Easy No Knead German Crusty Rolls

Are you ready to see how straightforward it is to make the Easy No Knead German Crusty Rolls of your dreams??
1. MIX THE DOUGH
Start your baking adventure with a simple mix—no fancy equipment needed!
1. WHISK – In a large mixing bowl, whisk together the flour, yeast, and salt until well combined. This step ensures that the yeast is evenly distributed throughout the flour, which is essential for a good rise.
2. ADD – Pour in the warm water (about 110°F) to the dry ingredients and stir until a shaggy dough forms. You want to achieve a sticky, rough texture; this means you’re on the right track!
HANDY TIPS
- Make sure your water is warm enough but not too hot; too high a temperature can kill the yeast! Aim for about 110°F.
- If your dough seems too dry, you can add a splash more water; just remember, it should be shaggy—not smooth.
2. FIRST RISE
Let’s give our dough some time to work its magic!
3. COVER – Cover the bowl with a kitchen towel and let the dough rise at room temperature for 12-18 hours, until it has doubled in size and is bubbly. The long rise time allows for complex flavors to develop and creates that airy texture we love in rolls.
HANDY TIPS
- For best results, choose a warm spot in your kitchen for rising. If your kitchen is cool, consider placing it near an oven or radiator.
- Don’t rush this process—allowing it to rise fully will yield lighter rolls!
3. SHAPE THE ROLLS
Time to transform our dough into beautiful little rolls!
4. TURN OUT – After the dough has risen, turn it out onto a well-floured surface and divide it into 8 equal pieces using a bench scraper or knife. Be gentle so you don’t deflate all that lovely air you’ve created!
5. SHAPE – Shape each piece into a ball by cupping your hands around it and gently rolling it on the surface. Place them on a baking sheet lined with parchment paper.
HANDY TIPS
- If you find the dough too sticky when shaping, dust your hands lightly with flour.
- For uniform rolls, use a scale to measure each piece if precision matters to you!
4. SECOND RISE AND BAKE
We’re almost there—let’s get these rolls baking!
6. COVER – Cover the shaped rolls with a kitchen towel and let them rise for another 30 minutes while you preheat your oven. This final proof helps them puff up even more!
7. PREHEAT – Preheat the oven to 450°F (232°C). This high temperature ensures that you’ll get that beautiful crust we crave when they bake!
8. BAKE – Bake the rolls for 25-30 minutes, or until they are golden brown and sound hollow when tapped on the bottom. You’ll know they’re done when they look irresistible!
HANDY TIPS
- To enhance crustiness, place an oven-safe dish filled with water on the bottom rack of your oven while baking.
- For extra flavor, consider sprinkling some coarse salt on top of each roll before baking.
5. COOLING
Let’s not rush this last part; cooling makes all the difference!
9. REMOVE – Once baked, remove the rolls from the oven and let them cool on a wire rack for at least 10 minutes before serving. This helps set their structure and keeps them from getting soggy.
Make these once, and I wager they will invade your dreams every night too! – Nagi x
FAQ – Easy No Knead German Crusty Rolls
🥖 How long will these rolls keep?
These rolls are best enjoyed fresh, but they can last for about 2-3 days at room temperature. On day one, they’re at their absolute peak — I’d say around 100% deliciousness! By day two, they’re still a solid 90%, but you might notice them getting a bit stale. If you wait until day three, they drop to about 80%. For the best texture, I recommend reheating them in the oven for a few minutes before serving.
⏰ Can I skip the first rise?
No, you cannot skip the first rise! Trust me on this one; I tested it multiple times and found that the dough needs those 12-18 hours to develop flavor and structure. The long fermentation not only enhances the taste but also creates those lovely air bubbles that give you that soft, airy interior. So, plan ahead and give your dough the time it deserves!
❄️ Can I freeze these rolls?
Absolutely! You can freeze the shaped but unbaked rolls. After shaping them into balls, place them on a baking sheet lined with parchment paper and freeze until firm. Then transfer them into an airtight container or freezer bag. When you’re ready to bake, simply take them out and let them rise at room temperature for about an hour before baking as directed. This way, you’ll always have fresh rolls on hand!
🌾 Can these rolls be made gluten-free?
I haven’t tested a gluten-free version of this recipe myself, but if you want to try it out, use a high-quality gluten-free all-purpose flour blend that contains xanthan gum. Keep in mind that gluten-free dough behaves differently; it might need additional moisture or adjustments in rising time. If you try it out please report back — I’d love to hear how it goes!
🔄 Can I substitute instant yeast with active dry yeast?
Yes, you can substitute instant yeast with active dry yeast in this recipe! However, you’ll need to activate the active dry yeast first by dissolving it in warm water (about 110°F) along with a pinch of sugar and letting it sit for about 5-10 minutes until frothy. Then mix it into your dry ingredients as instructed. Just remember that this may slightly alter the rising times.
🧐 Why do I need to let the dough rest for so long?
The long resting period is crucial for developing flavor and texture in your rolls. During this time, enzymatic activity breaks down starches into sugars while fermentation occurs due to yeast activity. This process creates those delightful flavors and textures we love in bread! Shortening this time results in denser rolls — not what we’re after here.
🍞 Can I add herbs or cheese to the dough?
Absolutely! You can customize your rolls by folding in herbs (like rosemary or thyme) or shredded cheese (such as cheddar or parmesan) after mixing your shaggy dough but before the first rise. Just be careful not to overmix; you still want that lovely airy texture inside! Adding these extras will create variations that are just as delightful as the original recipe.
🌡️ What happens if my kitchen is too cold for rising?
If your kitchen is on the chilly side (below 70°F), it might slow down the fermentation process significantly. To combat this, try placing your bowl of dough in a warm spot or creating a makeshift proofing box by turning on your oven for just a minute and then turning it off again — let your dough rise inside with the oven light on! If all else fails, patience is key; just allow more time for those bubbles to form!
Troubleshooting
I will continue to add more to this Troubleshooting section as I start seeing questions coming through from people who have made the recipe.
Troubleshooting tips
“My rolls came out flat! 😩”
- Your dough may not have risen enough during the first rise. If the dough hasn’t doubled in size and become bubbly, it may need more time.
- Alternatively, if you used too much warm water, your dough could have become too wet, preventing it from holding its shape when baked.
I bet they were still YUM though!
“The crust on my rolls is way too thick! 🔥”
- This could be due to an overly high oven temperature or baking them for too long. Make sure your oven is accurately calibrated to 450°F (232°C) and keep an eye on them towards the end of the baking time.
- Another reason could be that you didn’t let the rolls rise sufficiently during the second rise, causing them to bake denser than desired.
I bet they were still YUM though!
“My rolls are hard as rocks! 😱”
- You might have added too much flour when shaping your rolls or during the mixing process. It’s important to maintain a shaggy dough consistency; adding excess flour can result in dense rolls.
- If your water was not warm enough (below 110°F), it might have affected yeast activation, leading to insufficient rising time.
I bet they were still YUM though!
“My rolls are pale and not golden brown! 😒”
- If the rolls didn’t bake long enough, they might not develop that beautiful golden crust. Remember, they should bake for 25-30 minutes!
- Also, make sure you’re using an adequate amount of salt (1 tablespoon) since it can enhance browning; too little salt can lead to pale results.
I bet they were still YUM though!
Easy No Knead German Crusty Rolls
Ingredients
Method
- In a large mixing bowl, whisk together the flour, yeast, and salt until well combined.
- Add the warm water to the dry ingredients and stir until a shaggy dough forms.
- Cover the bowl with a kitchen towel and let the dough rise at room temperature for 12-18 hours, until it has doubled in size and is bubbly.
- After the dough has risen, turn it out onto a well-floured surface and divide it into 8 equal pieces.
- Shape each piece into a ball and place them on a baking sheet lined with parchment paper.
- Cover the rolls with a kitchen towel and let them rise for another 30 minutes.
- Preheat the oven to 450°F (232°C).
- Bake the rolls for 25-30 minutes, or until they are golden brown and sound hollow when tapped on the bottom.
- Remove the rolls from the oven and let them cool on a wire rack for at least 10 minutes before serving.