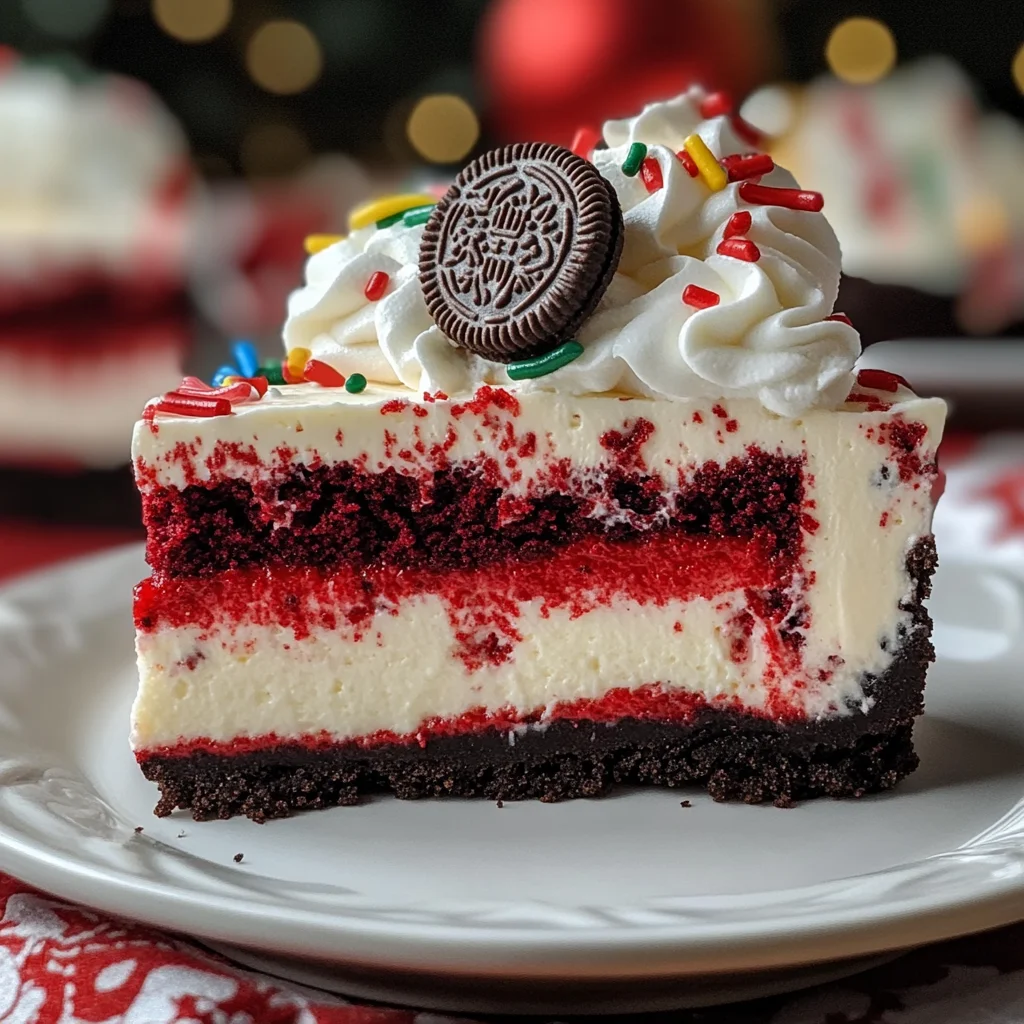
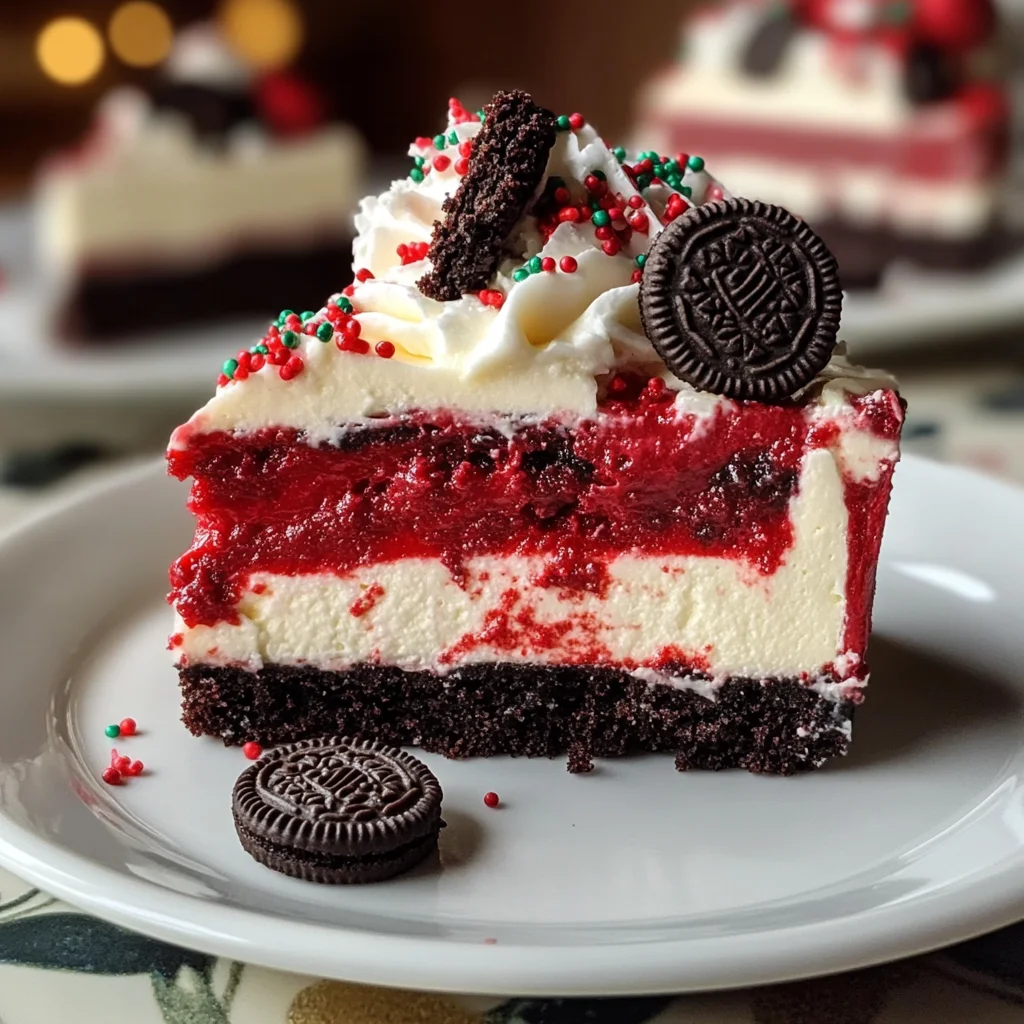
Christmas Red Velvet Cheesecake
Imagine a dessert that perfectly embodies the spirit of the holiday season: the rich, vibrant red, the pristine white, and a taste that is nothing short of pure indulgence. This isn’t just any cheesecake; it’s a festive masterpiece that brings together two beloved classics into one show-stopping creation. If you’re looking for a show-stopping dessert to impress your family and friends this holiday season, my Christmas Red Velvet Cheesecake will surely do the trick!
This cheesecake isn’t just for Christmas gatherings—it’s perfect for any occasion where you want to spread joy and sweetness. Whether it’s a cozy family dinner or a festive party with friends, this dessert is guaranteed to be the star of the table!
Why You’ll Love This Recipe
- Festive Appeal: The striking red and white layers make this cheesecake perfect for holiday celebrations.
- Easy Preparation: With straightforward steps, even novice bakers can create this stunning dessert.
- Family-Friendly: Kids and adults alike will adore the delicious flavors and fun decorations.
- Make-Ahead Convenience: Prepare it a day in advance, so you can relax and enjoy your festivities.
- Rich and Decadent Flavor: The combination of cream cheese and chocolate gives it an irresistible taste.
Ingredients You’ll Need
Let’s talk about the ingredients. This recipe uses simple, wholesome ingredients that come together beautifully. You probably have most of these items on hand already! Here’s what you’ll need:
For the Crust
- 24 Oreo cookies (about 2 cups crumbs)
- ⅓ cup butter, melted
For the Cheesecake Filling
- 4 (8-ounce) blocks cream cheese, softened to room temperature
- ½ cup white sugar
- 2 cups heavy whipping cream
- 1 teaspoon vanilla extract
- 2 tablespoons cocoa powder
- Red food coloring, as needed for desired shade
- ¼ cup Christmas sprinkles (for the filling)
For Topping
- Whipped cream
- Mini Oreos (for garnish)
- Extra Christmas sprinkles (for garnish)
Variations
One of the best things about this Christmas Red Velvet Cheesecake is how flexible it is! Feel free to get creative with these variations:
- Add a Layer of Fruit: Incorporate layers of raspberries or strawberries for a fruity twist.
- Go Chocolatey: Mix in some chocolate chips to enhance that rich chocolate flavor.
- Change Up the Garnish: Use crushed peppermint candies instead of sprinkles for a refreshing touch.
- Try Different Color Themes: Use different food coloring shades for occasions beyond Christmas!
How to Make Christmas Red Velvet Cheesecake
Step 1: Prepare Pan & Oven
Preheat your oven to 350°F (175°C). Wrap a 9-inch springform pan tightly with heavy-duty aluminum foil. This step is vital because it prevents any water from seeping into your cheesecake during baking.
Step 2: Make the Red Velvet Crust
Crush those Oreo cookies finely in a bowl. Combine them with melted butter and two tablespoons of sugar. Press this mixture firmly into the bottom of your prepared springform pan. Baking it for about 8-10 minutes not only sets up the crust but also brings out that delightful cookie flavor. Let it cool completely on a wire rack before adding the filling.
Step 3: Prepare Cheesecake Filling
In your mixer, beat softened cream cheese until smooth—this ensures your cheesecake will be creamy without lumps! Gradually add in half a cup of sugar, mixing until just combined. Stir in vanilla extract, cocoa powder, and red food coloring until you achieve that vibrant hue. In another bowl, whip one cup of heavy whipping cream until soft peaks form—this adds lightness to your filling! Gently fold in this whipped cream along with ¼ cup of Christmas sprinkles into your cream cheese mixture. Pour this luscious filling over your cooled crust.
Step 4: Bake the Cheesecake
Now, reduce your oven temperature to 325°F (160°C). Place your foil-wrapped springform pan inside a larger roasting pan. Carefully pour hot water into the roasting pan until it reaches halfway up the sides of the springform pan—a water bath helps keep your cheesecake moist while baking! Bake for 1 hour to 1 hour and 15 minutes or until edges are set but the center still jiggles slightly.
Step 5: Cool & Chill
Once done baking, turn off your oven but leave the cheesecake inside with the door ajar for an hour—this helps prevent cracks on top as it cools gradually. After an hour, remove it from both the oven and water bath; let it cool completely on a wire rack for about 2-3 hours. Once cooled, run a knife around the edge to loosen it before covering loosely with plastic wrap and refrigerating for at least 6-8 hours or overnight until set.
Step 6: Decorate & Serve
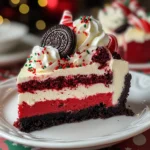
When you’re ready to serve, carefully remove the sides of your springform pan. Top off this beauty with whipped cream and garnish with mini Oreos and extra Christmas sprinkles! For clean slices, use a sharp knife dipped in hot water and wiped clean between cuts. Store any leftovers in the refrigerator—but trust me; they won’t last long!
Now you’re all set to wow everyone with your gorgeous Christmas Red Velvet Cheesecake! Enjoy every delicious bite!
Pro Tips for Making Christmas Red Velvet Cheesecake
Creating the perfect Christmas Red Velvet Cheesecake can be a delightful experience, and a few helpful tips can make all the difference!
- Use room temperature ingredients: Ensure your cream cheese and heavy whipping cream are at room temperature before mixing. This helps achieve a smooth, lump-free filling that incorporates air for a light texture.
- Don’t overmix: When folding in the whipped cream or adding ingredients, mix just until combined. Overmixing can lead to a dense cheesecake rather than the fluffy texture we’re aiming for.
- Water bath magic: Baking your cheesecake in a water bath (bain-marie) prevents cracking and ensures even cooking. It creates a gentle steam that helps maintain moisture throughout the baking process.
- Chill overnight: For the best flavor and texture, allow your cheesecake to chill overnight. This waiting period lets the flavors meld beautifully and results in a more solid structure when sliced.
- Warm knife for slicing: To get clean slices of cheesecake, run your knife under hot water and wipe it clean between cuts. This simple trick keeps your presentation looking pristine!
How to Serve Christmas Red Velvet Cheesecake
Presenting your Christmas Red Velvet Cheesecake in style is just as important as making it! Whether it’s for a festive gathering or an intimate family dinner, here are some delightful ways to serve this festive treat.
Garnishes
- Whipped cream: A generous dollop of freshly whipped cream adds an airy touch that balances the richness of the cheesecake.
- Mini Oreos: Placing mini Oreos on top not only enhances the visual appeal but also adds an extra cookie crunch that complements the creamy filling.
- Festive sprinkles: Sprinkle some extra Christmas-themed sprinkles over the whipped cream for a pop of color and holiday cheer.
Side Dishes
- Fresh fruit salad: A bright mix of seasonal fruits like pomegranate seeds, oranges, and berries provides a refreshing contrast to the richness of the cheesecake.
- Chocolate mint cookies: These cookies add a chocolatey crunch with a hint of mint that pairs wonderfully with the flavors of red velvet.
- Eggnog panna cotta: A silky eggnog-inspired panna cotta makes for an elegant pairing, offering creamy goodness that aligns perfectly with the holiday theme.
- Coffee or hot cocoa: Serving your cheesecake alongside warm beverages like coffee or hot cocoa adds comfort and enhances the overall dessert experience, especially on chilly nights.
Enjoy crafting this festive masterpiece and sharing it with loved ones during this magical season!
Make Ahead and Storage
This Christmas Red Velvet Cheesecake is perfect for meal prep, allowing you to enjoy the festive flavors without the last-minute rush. You can make it ahead of time and store it properly to savor its deliciousness throughout the holiday season.
Storing Leftovers
- Place any leftover cheesecake in an airtight container.
- Store it in the refrigerator for up to 5 days.
- Ensure that each slice is wrapped tightly if not kept in a container.
Freezing
- Wrap the cheesecake tightly in plastic wrap, followed by aluminum foil.
- Freeze for up to 2 months for best quality.
- When ready to enjoy, transfer it to the refrigerator to thaw overnight.
Reheating
- This cheesecake is best enjoyed chilled; no reheating is necessary.
- If desired, you can let it sit at room temperature for about 30 minutes before serving for a softer texture.
FAQs
Here are some common questions about making and enjoying this delightful dessert.
Can I make Christmas Red Velvet Cheesecake without cream cheese?
Yes! For a different flavor profile, you can substitute cream cheese with a dairy-free cream cheese alternative or use ricotta cheese blended until smooth.
How do I achieve the perfect red color for my Christmas Red Velvet Cheesecake?
To get a vibrant red hue, start with a small amount of red food coloring and gradually add more until you reach your desired shade. Be careful not to overdo it!
Can I use low-fat cream cheese in my Christmas Red Velvet Cheesecake?
While low-fat cream cheese can be used, it may alter the texture slightly. The cheesecake might not be as rich and creamy as when using full-fat cream cheese.
How long does Christmas Red Velvet Cheesecake need to chill?
It’s best to chill your cheesecake for at least 6-8 hours or preferably overnight. This helps it set properly and enhances its flavors!
Final Thoughts
This Christmas Red Velvet Cheesecake truly embodies the joy of the holiday season with its stunning colors and delightful taste. I hope you enjoy making this special dessert as much as I do. It’s perfect for sharing with loved ones or savoring as a treat just for yourself. Happy baking, and may your holidays be filled with sweetness!
Christmas Red Velvet Cheesecake
Indulge in the festive delight of Christmas Red Velvet Cheesecake, a stunning dessert that captures the essence of holiday celebrations. With rich red velvet layers and a creamy white filling, this cheesecake is perfect for gatherings with family and friends. Simple to prepare, it combines classic flavors with a touch of fun, making it an instant favorite. Whether you’re hosting a festive party or enjoying a cozy dinner at home, this cheesecake will be the star of your dessert table.
- Prep Time: 30 minutes
- Cook Time: 75 minutes
- Total Time: 1 hour 45 minutes
- Yield: Serves approximately 12 slices 1x
- Category: Dessert
- Method: Baking
- Cuisine: American
Ingredients
- 24 Oreo cookies
- ⅓ cup butter
- 4 (8-ounce) blocks cream cheese, softened
- ½ cup white sugar
- 2 cups heavy whipping cream
- 1 teaspoon vanilla extract
- 2 tablespoons cocoa powder
- Red food coloring, as needed for desired shade
- ¼ cup Christmas sprinkles for the filling
- Whipped cream for topping
- Mini Oreos for garnish
- Extra Christmas sprinkles for garnish
Instructions
- Preheat your oven to 350°F (175°C) and wrap a 9-inch springform pan in foil.
- Crush Oreo cookies and mix with melted butter and sugar to form the crust. Press into the pan and bake for 8-10 minutes. Let cool.
- Beat cream cheese until smooth; gradually add sugar, vanilla, cocoa powder, and red food coloring. Fold in whipped cream and sprinkles.
- Pour filling over cooled crust and bake in a water bath at 325°F (160°C) for 1 hour to 1 hour and 15 minutes.
- Cool in the oven for an hour, then refrigerate for 6-8 hours before serving.
- Decorate with whipped cream, mini Oreos, and more sprinkles before serving.
Nutrition
- Serving Size: 1 serving
- Calories: 380
- Sugar: 28g
- Sodium: 220mg
- Fat: 27g
- Saturated Fat: 16g
- Unsaturated Fat: 10g
- Trans Fat: 0g
- Carbohydrates: 32g
- Fiber: 1g
- Protein: 5g
- Cholesterol: 80mg