Chicken Romano
If you’re looking for a delicious and satisfying meal that’s easy to whip up any night of the week, you’ve come to the right place! This Chicken Romano recipe is one of my all-time favorites. It combines tender chicken breasts with a crispy, cheesy crust that’s bursting with flavor. Whether it’s a busy weeknight dinner or a gathering with family and friends, this dish never fails to impress.
Not only is Chicken Romano simple to make, but it also brings everyone together around the table. The delightful aroma fills your kitchen, inviting loved ones to enjoy a hearty meal. Trust me, once you try this recipe, it will become a staple in your home!
Why You’ll Love This Recipe
- Quick and Easy: This recipe comes together in just 40 minutes, making it perfect for those busy evenings.
- Family-Friendly: With its crispy coating and cheesy flavor, even the pickiest eaters will love this dish.
- Make-Ahead Option: You can prep the chicken in advance, making weeknight dinners a breeze.
- Flavor Explosion: The combination of Romano cheese and spices creates an irresistible taste that will have everyone asking for seconds.
- Versatile Serving Options: Pair it with pasta, salad, or your favorite sides for a complete meal.
Ingredients You’ll Need
Let’s gather some simple and wholesome ingredients for our Chicken Romano! These staples are likely already in your kitchen or easy to find at the store. Here’s what you need:
For the Chicken
- 4 boneless, skinless chicken breasts
- ½ cup all-purpose flour
- 2 large eggs
- ¼ cup milk
- 1 cup grated Romano cheese
- 1 cup Italian-style breadcrumbs
For Seasoning
- ½ teaspoon salt
- ½ teaspoon black pepper
- ½ teaspoon garlic powder
- ½ teaspoon paprika
For Cooking
- ¼ cup olive oil (for frying)
- 2 tablespoons unsalted butter
For Garnish
- Fresh parsley, chopped (for garnish)
- Lemon wedges (for serving)
Variations
One of the best things about Chicken Romano is how flexible it can be! Here are some fun ways to switch it up:
- Swap the protein: Use turkey or even tofu for a vegetarian option that still delivers on flavor.
- Change up the cheese: Experiment with parmesan or mozzarella for different cheesy goodness!
- Add some heat: Sprinkle in some red pepper flakes if you like a little kick to your dish.
- Try different breadcrumbs: Use panko for an extra-crispy texture or seasoned breadcrumbs for added flavor.
How to Make Chicken Romano
Step 1: Prepare the Chicken
Start by laying out your chicken breasts on a cutting board. Pat them dry with paper towels; this helps the coating stick better. If they are thick, consider pounding them gently to ensure even cooking. Season both sides with salt and pepper—it’s essential for enhancing the flavors!
Step 2: Set Up Your Dredging Station
In three separate bowls, set up your dredging station: one with flour, one with whisked eggs and milk combined, and the last one filled with a blend of grated Romano cheese, breadcrumbs, garlic powder, and paprika. This three-step process adds layers of flavor and texture to our chicken.
Step 3: Coat the Chicken
Take each piece of chicken and dip it first into the flour—shake off any excess. Next, dip it into the egg mixture before finally coating it thoroughly in the breadcrumb mixture. Press firmly so that every inch is covered; this ensures that lovely crispy texture when frying!
Step 4: Fry Until Golden Brown
In a large skillet over medium heat, add olive oil and butter. Once hot (but not smoking), carefully place each breaded chicken breast into the pan. Fry them for about 5-7 minutes on each side until they’re golden brown and cooked through. Cooking them at medium heat helps achieve that beautiful crust without burning.
Step 5: Serve and Enjoy!
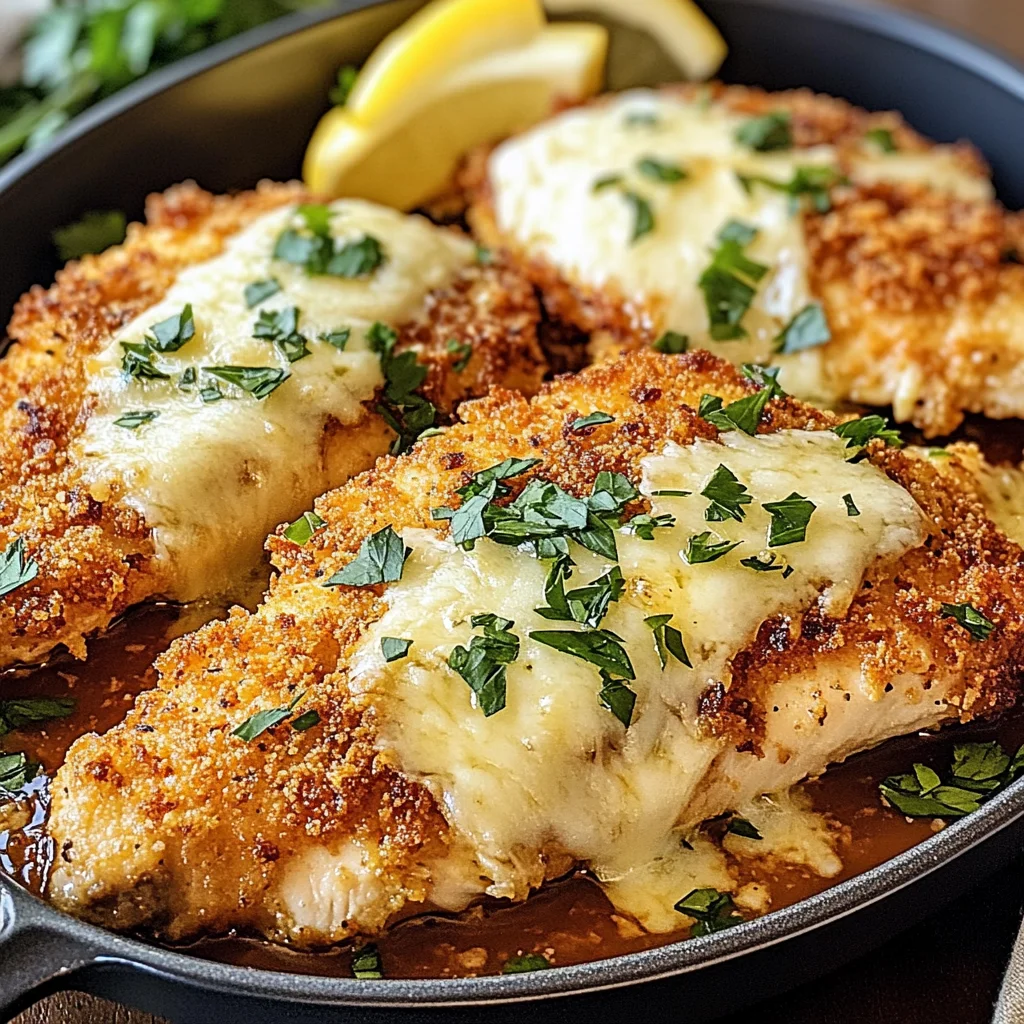
Once cooked through (you can check with a meat thermometer—it should read 165°F), remove them from the skillet and let them rest on paper towels briefly to absorb any excess oil. Serve hot with fresh parsley sprinkled on top and lemon wedges on the side for squeezing over your chicken. Enjoy every bite of your homemade Chicken Romano!
Pro Tips for Making Chicken Romano
Cooking Chicken Romano can be a delightful experience, and with a few handy tips, you can make it even more delicious!
-
Use fresh ingredients: Fresh chicken and high-quality cheese will enhance the flavor of your dish significantly. Freshness often translates to better taste and texture.
-
Pound the chicken breasts: Gently pound the chicken to an even thickness before coating. This ensures that they cook evenly and stay juicy inside while achieving that perfect crispy exterior.
-
Double-dip for extra crunch: For an extra crispy coating, try double-dipping the chicken. After dipping in flour, eggs, and breadcrumbs once, repeat the process. This creates a thicker crust that holds up beautifully during cooking.
-
Don’t rush the frying: Fry the chicken on medium heat rather than high heat. This allows for a golden-brown crust while ensuring that the inside cooks through without burning.
-
Let it rest: After frying, let the chicken rest on a wire rack for a few minutes before serving. This helps maintain its crispiness by preventing steam from making it soggy.
How to Serve Chicken Romano
Presenting your Chicken Romano can elevate your dining experience! Here are some ideas to make it look as good as it tastes.
Garnishes
- Fresh parsley: Chopped fresh parsley adds a pop of color and freshness to your plate.
- Lemon wedges: A squeeze of lemon enhances the flavors of the dish and adds brightness.
- Extra Romano cheese: A light sprinkle of additional grated cheese just before serving can make your dish visually appealing and indulgent.
Side Dishes
- Garlic mashed potatoes: Creamy mashed potatoes infused with garlic complement the crispy chicken beautifully and add comfort to your meal.
- Steamed asparagus: Lightly steamed asparagus offers a crunchy texture and vibrant color, creating a balanced plate alongside your Chicken Romano.
- Mixed green salad: A simple salad with mixed greens, cherry tomatoes, and a light vinaigrette provides a refreshing contrast to the richness of the chicken.
- Roasted vegetables: Seasonal roasted veggies like bell peppers, zucchini, or carrots add both flavor and nutrition to round out your dinner plate perfectly.
With these serving suggestions in mind, you’re all set to impress at your next dinner gathering! Enjoy every bite of your delightful Chicken Romano!

Make Ahead and Storage
This Chicken Romano recipe is perfect for meal prep, allowing you to enjoy delicious, homemade meals throughout the week with minimal fuss.
Storing Leftovers
- Allow the Chicken Romano to cool completely before storing.
- Place leftovers in an airtight container.
- Store in the refrigerator for up to 3 days.
- For best results, reheat only the portions you plan to eat.
Freezing
- Wrap each piece of Chicken Romano tightly in plastic wrap.
- Place wrapped chicken in a freezer-safe bag or container.
- Freeze for up to 2 months.
- Thaw overnight in the refrigerator before reheating.
Reheating
- Preheat your oven to 350°F (175°C).
- Place the chicken on a baking sheet and cover with foil to prevent drying out.
- Heat for about 15-20 minutes or until warmed through.
- Alternatively, reheat in a skillet over medium heat until warmed.
FAQs
Have questions about making Chicken Romano? Here are some common inquiries!
Can I use chicken thighs instead of breasts for Chicken Romano?
Absolutely! You can substitute boneless, skinless chicken thighs for a juicier option. Just be sure to adjust cooking times as needed.
How do I make Chicken Romano gluten-free?
To make this recipe gluten-free, substitute all-purpose flour and breadcrumbs with gluten-free alternatives. There are plenty of options available that work wonderfully!
What can I serve with Chicken Romano?
Chicken Romano pairs beautifully with a fresh salad, steamed vegetables, or even over pasta for a heartier meal. Don’t forget some lemon wedges for that extra zing!
Can I prepare Chicken Romano ahead of time?
Yes! You can bread the chicken and store it in the refrigerator until you’re ready to cook. This makes dinner prep a breeze!
Final Thoughts
I hope you find as much joy in making this Chicken Romano as I do! It’s not just a recipe; it’s a warm hug on a plate that brings comfort and satisfaction. Enjoy the delightful flavors and textures, and feel free to share your experience! Happy cooking!
Chicken Romano

Enjoy a delicious Chicken Romano that’s simple to make and perfect for meal prep. Try this flavorful dish today and delight your family at dinner!
- Prep Time: 15 minutes
- Cook Time: 15 minutes
- Total Time: 30 minutes
- Yield: Serves 4
- Category: Main
- Method: Frying
- Cuisine: Italian
Ingredients
- 4 boneless, skinless chicken breasts
- ½ cup all-purpose flour
- 2 large eggs
- ¼ cup milk
- 1 cup grated Romano cheese
- 1 cup Italian-style breadcrumbs
- ¼ cup olive oil (for frying)
- 2 tablespoons unsalted butter
- Fresh parsley, chopped (for garnish)
- Lemon wedges (for serving)
- ½ teaspoon salt
- ½ teaspoon black pepper
- ½ teaspoon garlic powder
- ½ teaspoon paprika
Instructions
- Prepare the chicken by patting it dry and seasoning both sides with salt and pepper.
- Set up your dredging station with three bowls: one for flour, one for whisked eggs and milk, and one for a mixture of breadcrumbs, grated Romano cheese, garlic powder, and paprika.
- Coat each chicken breast by dipping it into the flour, then the egg mixture, followed by the breadcrumb mixture.
- In a large skillet over medium heat, heat olive oil and butter. Fry each breaded chicken breast for about 5-7 minutes on each side until golden brown and cooked through.
- Serve hot with chopped parsley on top and lemon wedges on the side.
Nutrition
- Serving Size: 1 chicken breast (130g)
- Calories: 350
- Sugar: 2g
- Sodium: 600mg
- Fat: 18g
- Saturated Fat: 5g
- Unsaturated Fat: 12g
- Trans Fat: 0g
- Carbohydrates: 27g
- Fiber: 1g
- Protein: 24g
- Cholesterol: 90mg