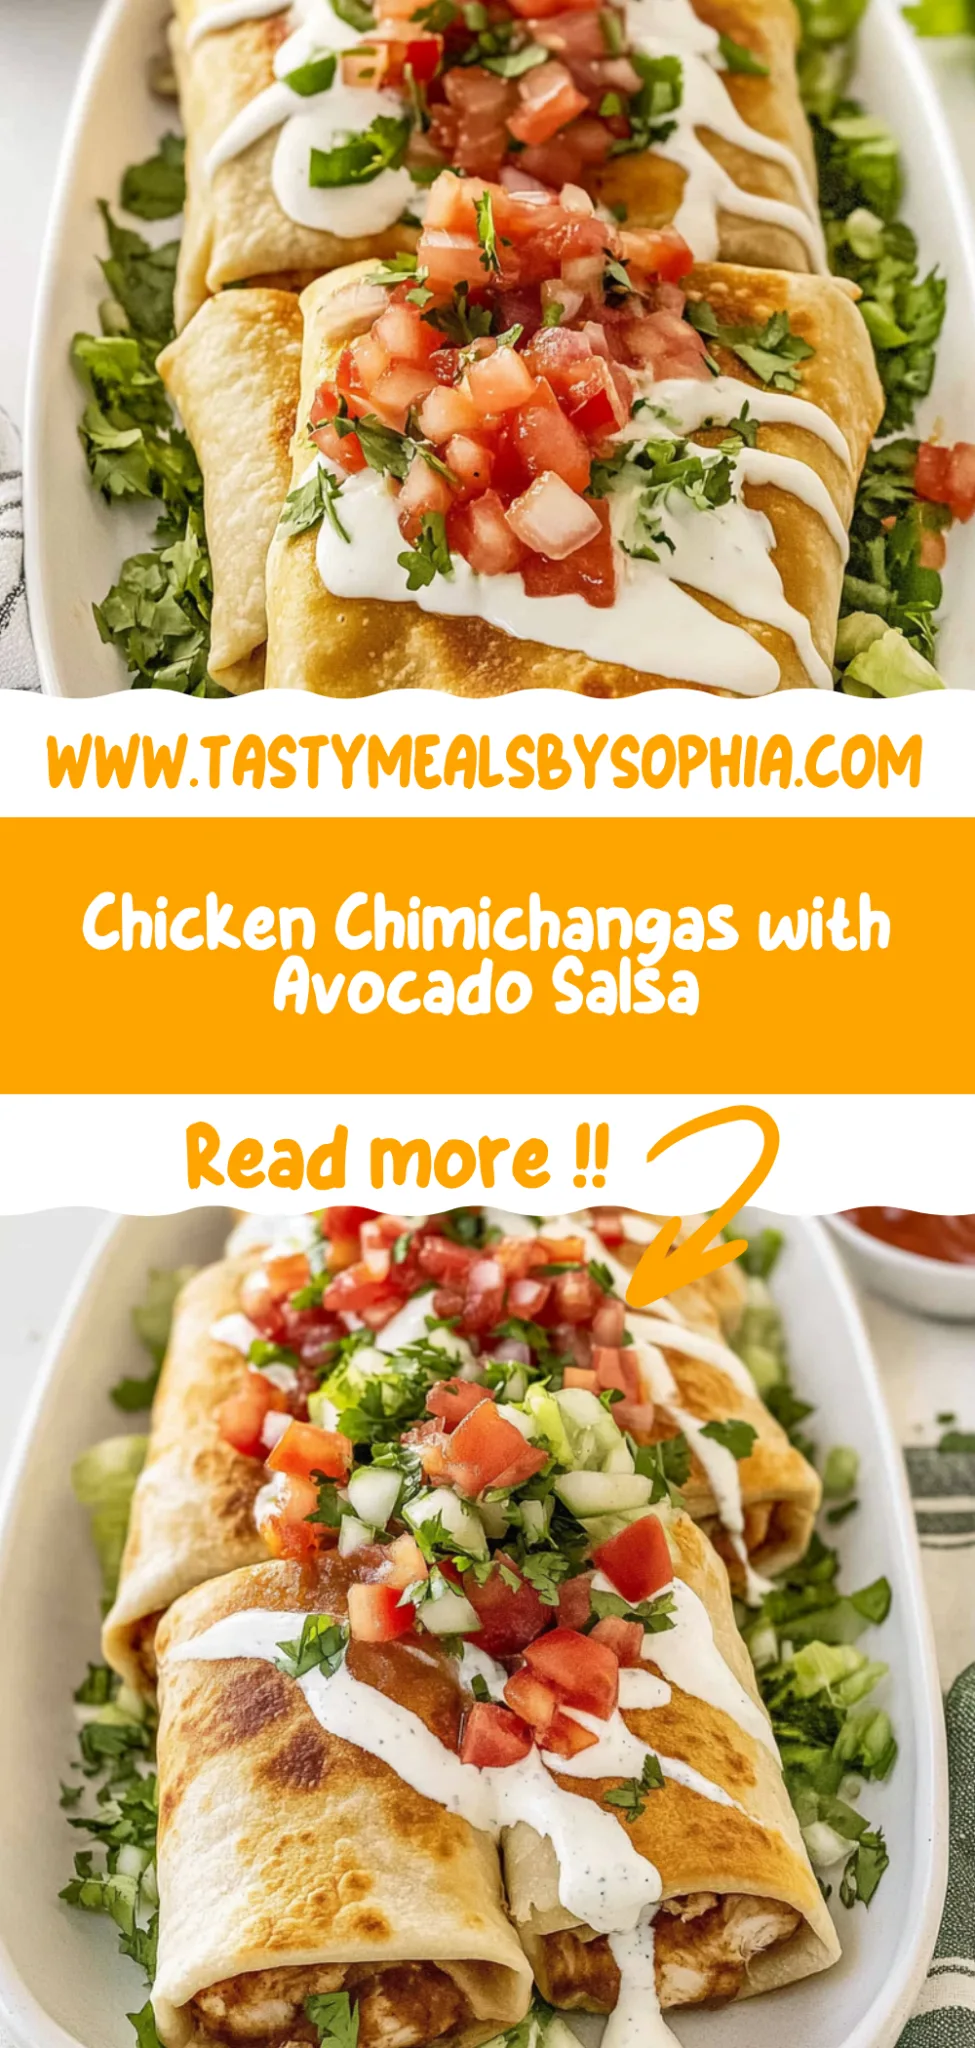
Chicken Chimichangas: Crispy Comfort Food Magic at Home
I’ll never forget the first time I had Chicken Chimichangas at this little hole-in-the-wall Mexican restaurant. It was one of those places where the walls are plastered with colorful murals, and the air is filled with the intoxicating aroma of spices. I was on a quest for comfort food, and those crispy, deep-fried burritos filled with seasoned chicken, cheese, and spices instantly stole my heart (and stomach!). After that unforgettable meal, I thought, why not recreate this magic at home? I mean, who wouldn’t want to whip up this deliciousness without breaking the bank or waiting in line?
Let me tell you, perfecting my Chicken Chimichangas was no small feat. I lost count after my fifth attempt (or was it sixth?), each time trying to get that golden-brown crunch just right without turning my kitchen into a grease trap. I experimented with different fillings, spices, and frying techniques—there were some epic fails along the way too! Like the time I thought it would be brilliant to add jalapeños to the filling; let’s just say my taste buds were not ready for that level of heat. With each iteration, I aimed for that perfect balance of crispy exterior and gooey inside, hoping to impress not just myself but also anyone lucky enough to share in the feast.
But oh boy, when I finally nailed it—the moment those Chicken Chimichangas emerged from the fryer like golden treasures—I knew every failed attempt had been worth it. The texture was incredible: crunchy on the outside while oozing with cheesy, spicy goodness inside. Dipped in fresh salsa and creamy guacamole, each bite is an explosion of flavor that dances on your tongue. Trust me when I say you’re going to want to make these again and again! So grab your apron and let’s dive into making these crispy delights; your taste buds will thank you later!
These Chicken Chimichangas are….
….the ultimate comfort food, bursting with flavor and crunch that’ll make your taste buds dance!
1. They deliver an explosion of flavor with every bite, thanks to the seasoned chicken filling. The combination of cumin, chili powder, garlic powder, and onion powder infuses the chicken with a depth that elevates these chimichangas beyond the ordinary, creating a taste experience that’s both authentic and satisfying.
2. Expect a perfectly crispy texture on the outside while enjoying a warm, gooey filling inside. The secret lies in using large flour tortillas that allow for generous wrapping; when deep-fried in vegetable oil, they achieve that golden-brown crust that contrasts beautifully with the soft interior filled with melted cheddar cheese and hearty refried beans.
3. A key technique in this recipe is ensuring the chicken is well-seasoned before it’s combined with cheese and beans. This step enhances the overall taste profile and ensures every bite is packed with flavor, making each chimichanga irresistibly delicious and memorable.
4. These chimichangas offer great value, as you can easily whip up a batch at home for a fraction of the cost of takeout. With just a few simple ingredients like cooked chicken, shredded cheese, and refried beans, you can create restaurant-quality fare that feeds a crowd without breaking the bank.
PS These Chicken Chimichangas are generously sized—perfect for sharing or enjoying all to yourself!
Ingredients for the Chicken Chimichangas
Each ingredient in this dish plays an essential role in flavor and texture. Here’s what you’ll need:
Chicken Filling
2 cups cooked chicken (shredded): This provides a hearty, savory base filled with juicy goodness.
1 cup cheddar cheese (shredded): Melts beautifully to add richness and a creamy texture.
1 cup refried beans: Contributes creaminess and helps bind the filling together.
1 teaspoon cumin: Infuses warm, earthy notes that elevate the overall flavor profile.
1 teaspoon chili powder: Adds a mild heat and depth of flavor to the filling.
1 teaspoon garlic powder: Enhances the dish with a subtle garlicky aroma.
1 teaspoon onion powder: Brings sweetness and complexity to the chicken mixture.
1 tablespoon olive oil (for cooking): Aids in sautéing while adding a touch of richness.
Chimichanga Wrapping
4 large flour tortillas: Serve as the perfect vessel to hold all the delicious fillings.
2 cups vegetable oil (for frying): Creates that irresistible crispy texture on the outside.
Toppings
1 cup salsa (for serving): Offers a zesty kick that complements the fried chimichangas.
1 cup guacamole (for serving): Adds creaminess and a fresh burst of flavor.
1/2 cup sour cream (for serving): Provides a cool contrast to the warm, spicy filling.
1/4 cup fresh cilantro (chopped, for garnish): Brightens up the dish with its fresh herbal notes.
You’ve got to cook the filling first. Trust me!
I know, I know—cooking the chicken filling before wrapping up those chimichangas adds a bit of time and effort to the process. I thought I could skip it, but after a few sad attempts with raw filling—let’s just say that was a learning experience I won’t repeat! There’s nothing worse than biting into a chimichanga that’s soggy and undercooked inside.
Cooking the filling not only ensures that your chicken is safe to eat, but it also allows all those delicious spices—like cumin and chili powder—to bloom and infuse the chicken, cheese, and refried beans with maximum flavor. Think of it like marinating your protein; if you skip this step, you’re essentially serving bland burritos instead of those crispy, flavor-packed treasures you’ve been dreaming about!
What does cooking the filling do?
- Flavor: The spices have a chance to develop and meld together while cooking, resulting in a rich, savory filling that elevates each bite.
- Texture: Cooking the mixture creates a cohesive texture; the cheese melts slightly and binds everything together rather than leaving you with rogue chunks.
- Moisture: By cooking out some moisture in the filling, you prevent your chimichangas from becoming soggy during frying.
- Safety: It ensures that the chicken is fully cooked through—no one wants to bite into an undercooked burrito!
- Color: A cooked filling gives a more appetizing appearance when you cut into the finished chimichangas; vibrant colors from spices come alive.
Different cooking times
- 1 minute (poor) — The filling is still cold and flavors haven’t developed; you’ll taste more raw than anything else.
- 3 minutes (acceptable) — Some spices begin to release their oils, but the chicken may still be dry and uninspiring.
- 5 minutes (good) — This is where you start to hit flavor pay dirt; chicken is warmed through and spices are blooming beautifully.
- ⭐️ 7–10 minutes⭐️ — Best results! Full flavors are present, and everything melds together perfectly for a satisfying bite.
Don’t even think about skipping this step or rushing it. The most common mistake I see is people trying to use cold or leftover chicken without heating it properly, thinking they can just wrap it up as-is. Trust me—you want that seasoning mingling with warm chicken for optimum flavor!
How to make Chicken Chimichangas
Are you ready to see how straightforward it is to make the Chicken Chimichangas of your dreams??
1. PREPARE THE FILLING
Let’s kick off by creating that delicious chicken filling!
1. Combine – In a large mixing bowl, combine the shredded chicken, cheddar cheese, refried beans, cumin, chili powder, garlic powder, and onion powder. Mix well until all ingredients are evenly distributed; this will ensure every bite is packed with flavor!
2. Cook – Heat the olive oil in a skillet over medium heat. Add the chicken mixture and cook for about 5 minutes, stirring occasionally until heated through and fragrant. This helps meld those spices into the chicken for maximum flavor!
HANDY TIPS
- Use leftover rotisserie chicken for added convenience and flavor.
- Feel free to add more spices according to your taste—perhaps a pinch of cayenne for heat!
2. ASSEMBLE THE CHIMICHANGAS
Now we’ll wrap up that scrumptious filling and get ready for frying!
3. Place – Take a tortilla and lay it flat on a clean surface. Spoon about 1/2 cup of the chicken filling onto the center of the tortilla—don’t be shy; you want it nice and full!
4. Fold – Fold the sides of the tortilla over the filling, then roll it up tightly from the bottom to the top. If needed, secure with toothpicks to keep everything snug during frying!
HANDY TIPS
- Warm your tortillas slightly before assembling; this makes them more pliable and easier to roll.
- Experiment with different types of tortillas like whole wheat or corn for varying flavors!
3. FRY THE CHIMICHANGAS
It’s time to bring that golden crunch into play!
5. Heat – In a deep fryer or a large pot, heat vegetable oil to 350°F (175°C). This temperature is crucial for achieving that perfect crispy exterior while cooking the filling thoroughly inside! ⚠️ Keep an eye on the oil temperature using a thermometer for best results.
6. Fry – Carefully place the chimichangas in the hot oil, a few at a time, and fry for 4-5 minutes or until they are golden brown and crispy on all sides—this is where they transform into crunchy delights! 🥳 Be cautious not to overcrowd as it can lower the oil temperature too much.
7. Drain – Remove with tongs and drain on paper towels to absorb excess oil—this keeps them crispy longer!
HANDY TIPS
- If you’re making these in larger batches (like 50), keep cooked ones warm in an oven set to low while frying more.
- For less mess, use a deep-fryer basket if available!
4. SERVE
Let’s get ready to enjoy these delicious chimichangas!
8. Serve – Present your chimichangas hot topped with salsa, guacamole, sour cream, and freshly chopped cilantro for that burst of color and flavor—trust me; this is where it gets fun!
That’s it—your homemade Chicken Chimichangas are ready to impress family and friends (or just yourself!). Make these once, and I wager they will invade your dreams every night too! – Nagi x
FAQ – Chicken Chimichangas
🍗 How long do chicken chimichangas last in the fridge?
Chicken chimichangas can be stored in the refrigerator for up to 3 days. However, their quality will gradually decrease, and by day 3, they may only be about 80% as good as when freshly made. To keep them tasting their best, store them in an airtight container to prevent them from drying out or absorbing odors from other foods.
⏰ Can I skip cooking the filling before assembling the chimichangas?
No, you cannot skip cooking the filling! Cooking the filling not only melds the flavors together but also ensures that any raw spices are properly incorporated. I found that sautéing the chicken mixture for about 5 minutes helps bring out the richness of the spices and makes for a more flavorful chimichanga.
❄️ Can I freeze chicken chimichangas?
Absolutely! To freeze, assemble the uncooked chimichangas and wrap each one tightly in plastic wrap followed by aluminum foil. They will keep well in the freezer for up to 3 months. When you’re ready to enjoy them, simply thaw in the refrigerator overnight and fry straight from there—no need to defrost completely. Just expect a slightly longer frying time!
🌾 Are these chicken chimichangas gluten-free?
While traditional flour tortillas contain gluten, you can easily make this recipe gluten-free by using gluten-free tortillas instead. Many brands offer delicious alternatives that hold up well during frying. Just be sure to check labels carefully to ensure they meet your dietary needs.
🧀 What can I substitute for cheddar cheese in this recipe?
If you’re looking to switch things up or have dietary restrictions, mozzarella cheese works great as a substitute due to its melty texture. Alternatively, you can use pepper jack for a spicy kick or vegan cheese if you’re aiming for a dairy-free option. Just keep in mind that different cheeses will alter the flavor profile slightly!
🔥 Why do I need to heat the oil to 350°F (175°C) before frying?
Heating the oil to 350°F (175°C) is crucial because it creates that perfect crispy exterior while ensuring that the inside of your chimichangas is cooked through without becoming greasy. If your oil isn’t hot enough, you risk ending up with soggy wraps instead of crunchy goodness! Use a thermometer if you have one—it makes all the difference.
🥑 Can I customize my chimichanga filling?
Definitely! The filling is highly customizable according to your taste preferences. You can add black beans for extra fiber, corn for sweetness, or even diced bell peppers for a crunch. Feel free to mix in some chopped jalapeños if you want more heat—just remember not to overfill those tortillas!
Troubleshooting
I will continue to add more to this Troubleshooting section as I start seeing questions coming through from people who have made the recipe.
Troubleshooting tips
“My chimichangas are too flat! 😩”
- You might have overfilled your tortillas. If they’re packed too tightly, they won’t roll properly and can flatten out when frying.
- Alternatively, if you used smaller tortillas than specified, it can lead to a similar problem. Always use large flour tortillas for the best shape!
- I bet they were still YUM though!
“The filling is too dry! 🤨”
- If you didn’t add enough refried beans or cheese, the filling could turn out dry. These ingredients help keep everything moist and creamy.
- Cooking the chicken mixture for too long can also dry it out. Aim for just 5 minutes in the skillet until heated through!
- I bet they were still YUM though!
“My chimichangas are way too dark! 🔥”
- If your oil temperature is too high (over 350°F/175°C), they’ll brown quickly on the outside while remaining undercooked inside.
- Also, if you don’t monitor them closely while frying, they can easily go from golden to dark brown in seconds. Keep an eye on them!
- I bet they were still YUM though!
“They look wonky and misshapen! 😅”
- This could be due to not rolling them tightly enough, which can cause them to open up during frying. Make sure to roll firmly from bottom to top!
- Using tortillas that are too thick can also contribute to a wonky appearance. Stick to large, soft flour tortillas for best results!
- I bet they were still YUM though!