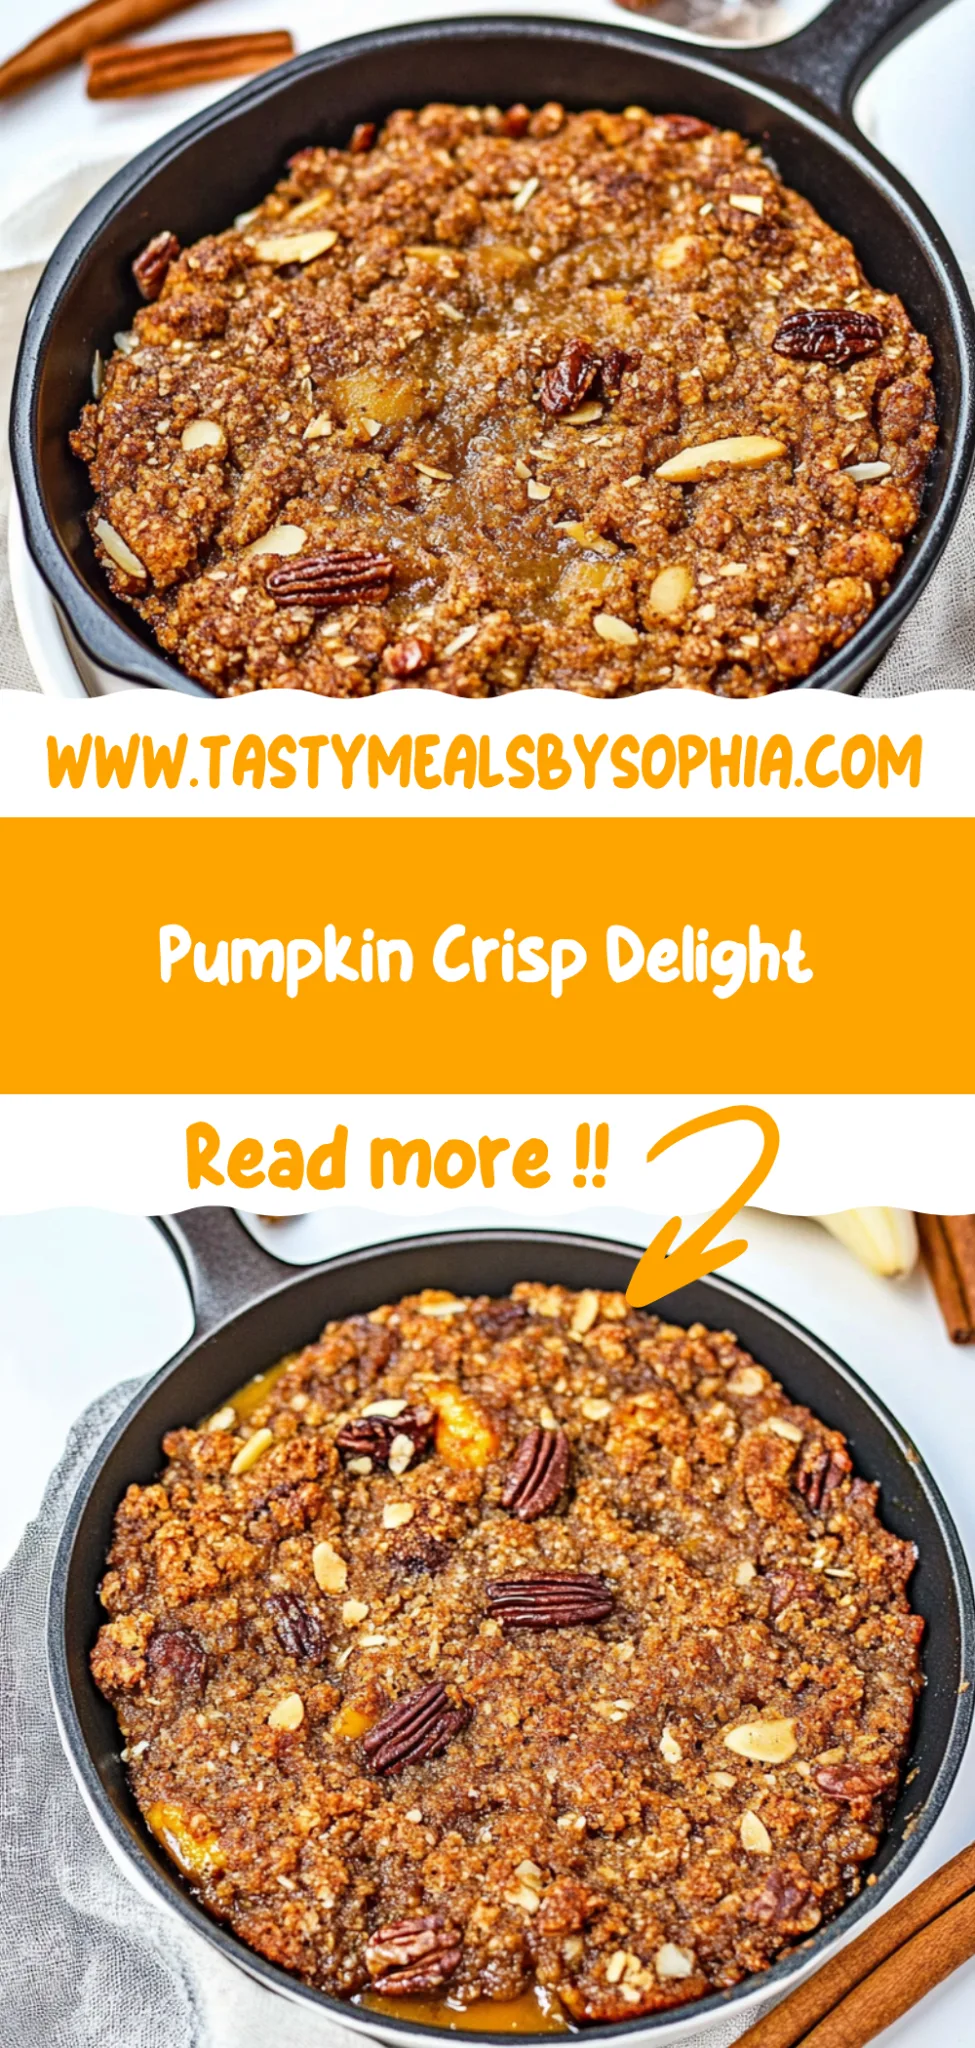
Pumpkin Crisp: A Cozy Fall Dessert Delight
I first stumbled upon the idea for this Pumpkin Crisp during a cozy autumn visit to my favorite little café. Their version was a warm hug in dessert form, with an irresistibly spiced pumpkin filling that practically sang with flavor, all topped with a crunchy oat and brown sugar crumble. I couldn’t shake the craving for it, but let’s face it—going out for dessert every time I wanted it wasn’t exactly budget-friendly. So, I decided to challenge myself to recreate this fall favorite at home, hoping to make it even better than the original!
After what felt like an endless series of kitchen experiments (I lost count after five attempts), I finally nailed down my version of Pumpkin Crisp. Each iteration was a bit of a comedy of errors; there were too many spices one time, not enough crunch another, and I even had a ‘disaster’ batch that was more soup than crisp. But through all the flops and flavor misfires, I learned what truly makes this dish sing: the perfect balance of spices and that golden-brown crunch on top that gives you a delightful contrast to the creamy pumpkin filling.
Let me tell you, all those testing trials were worth every minute because the final result is nothing short of magical. Imagine sinking your spoon into a bowl of warm spiced pumpkin filling, perfectly nestled beneath a crispy oat and brown sugar topping that’s just begging to be devoured. It’s got that delightful texture contrast between creamy and crunchy, plus an intoxicating aroma that fills your kitchen as it bakes. I can’t wait for you to try this Pumpkin Crisp—it’s like autumn on a plate!
These Pumpkin Crisp are….
….the ultimate cozy dessert that will have you dreaming of fall with every bite!
1. They deliver an irresistible spiced flavor that brings warmth and nostalgia to your palate. The combination of cinnamon, nutmeg, and ginger creates a symphony of autumn spices that perfectly complements the creamy pumpkin filling, making each bite a comforting hug for your taste buds.
2. Delightfully textured – a perfect harmony of creamy and crunchy. The smooth pumpkin filling contrasts beautifully with the crispy oat topping, ensuring you experience both a melt-in-your-mouth softness and satisfying crunch in every spoonful.
3. The secret lies in my careful layering technique that elevates this dish beyond ordinary pumpkin desserts. By pouring the spiced pumpkin mixture directly beneath the crisp topping just before baking, I ensure the flavors meld beautifully while maintaining the topping’s delightful crunch.
4. A budget-friendly homemade treat that rivals any café version! With simple pantry staples like canned pumpkin puree and oats, this Pumpkin Crisp is not only easy to whip up at home, but it also saves you money without sacrificing flavor or quality compared to store-bought desserts.
PS This Pumpkin Crisp yields enough to serve a crowd, making it perfect for gatherings or cozy family dinners!
Ingredients for the Pumpkin Crisp
Each ingredient in this dish plays an essential role in flavor and texture. Here’s what you’ll need:
- 1 can pumpkin puree (15 oz): Provides a rich, creamy base with a natural sweetness.
- 1 cup granulated sugar: Balances the spices and enhances the overall sweetness.
- 1 teaspoon cinnamon: Infuses warm, aromatic flavors that complement the pumpkin.
- 1/2 teaspoon nutmeg: Adds a hint of earthiness and depth to the filling.
- 1/2 teaspoon ginger: Offers a zesty kick that brightens the pumpkin flavor.
- 1/4 teaspoon salt: Enhances all the other flavors for a well-rounded taste.
- 2 large eggs: Acts as a binding agent, giving structure to the filling.
- 1/2 cup evaporated milk: Contributes creaminess and richness to the texture.
- 1 cup old-fashioned oats: Creates a hearty and chewy crisp topping.
- 1/2 cup brown sugar (packed): Adds moisture and a caramel-like sweetness to the crumble.
- 1/2 cup all-purpose flour: Helps bind the topping ingredients for a perfect crumble texture.
- 1/2 cup unsalted butter (melted): Brings richness and helps achieve that crispy finish.
- 1/2 teaspoon salt: Balances sweetness and enhances the overall flavor profile.
Whisk Until Smooth — Don’t Skip This Step!
I have a confession: I tried to rush this step and thought I could get away with just a quick stir. Spoiler alert: it didn’t work! The filling ended up lumpy and uneven, which was an absolute tragedy for my beloved Pumpkin Crisp. After a few rounds of testing (and some embarrassment), I learned that properly whisking the filling is non-negotiable for achieving that silky, luscious texture.
So why is whisking until smooth so crucial? Think of it like blending a smoothie — if you don’t mix it well, you’re left with chunks instead of a creamy delight. For our Pumpkin Crisp, thoroughly combining the pumpkin puree, sugar, spices, eggs, and evaporated milk ensures every spoonful is perfectly balanced in flavor and texture. Trust me, your taste buds will thank you!
What does whisking do?
- Flavor — Whisking evenly incorporates all the spices and sugar into the pumpkin puree, ensuring every bite is packed with that warm, spiced goodness.
- Texture — A well-whisked filling yields a smooth consistency that bakes beautifully without lumps or air pockets.
- Even Baking — Proper mixing ensures that the eggs are fully integrated, helping the filling set evenly in the oven without any surprises.
- Color — A smooth mixture creates a uniform color throughout the filling, enhancing its visual appeal when baked.
- Moisture Distribution — Whisking allows for even distribution of evaporated milk throughout the filling, preventing dry spots during baking.
Different whisking times
- 10 seconds (poor) — Barely mixed; results in lumps and uneven flavor distribution.
- 30 seconds (fair) — Somewhat blended; still sees bits of unincorporated ingredients leading to a grainy texture.
- 1 minute (good) — Mostly smooth; minor lumps may remain but generally bakes alright in terms of flavor.
- 2 minutes (great) — Silky-smooth filling with even flavor distribution; this is where you want to be for optimal results.
Be warned: not whisking your pumpkin filling thoroughly enough is the most common mistake you can make here. If you skip this step or cut corners thinking it doesn’t matter, you’ll end up with an unevenly baked dessert that’s more sad than satisfying. Don’t let your Pumpkin Crisp fall victim to this rookie error!
How to make Pumpkin Crisp
Are you ready to see how straightforward it is to make the Pumpkin Crisp of your dreams??
1. PREPARE THE PUMPKIN FILLING
Let’s kick things off with that luscious pumpkin filling!
Preheat – Start by preheating your oven to 350°F (175°C). This temperature is perfect for creating that warm, cozy atmosphere while your dessert bakes.
Combine – In a mixing bowl, combine the pumpkin puree, granulated sugar, cinnamon, nutmeg, ginger, salt, eggs, and evaporated milk. Using a whisk, mix everything together until smooth and well combined. You want a uniform texture that will bake beautifully!
HANDY TIPS
- Make sure your pumpkin puree is well stirred before measuring to avoid any lumps in your filling.
- If you prefer a spicier profile, feel free to adjust the amount of cinnamon and nutmeg according to your taste.
2. MAKE THE CRISP TOPPING
Now for that delightful crispy topping that adds texture!
Mix – In another bowl, mix together the old-fashioned oats, packed brown sugar, all-purpose flour, and salt until evenly distributed. This combination provides a lovely balance of sweetness and crunch.
Add Butter – Pour in the melted butter and stir until the mixture becomes crumbly. The butter is essential here as it helps bind everything together while creating that satisfying crisp texture on top.
HANDY TIPS
- For an extra layer of flavor in your topping, consider adding chopped nuts or coconut flakes!
- Ensure the butter is not too hot when adding it to the dry ingredients; this helps maintain the crumbly texture.
3. ASSEMBLE AND BAKE
Let’s bring it all together for baking perfection!
Spread – In a greased baking dish, pour the prepared pumpkin filling and spread it evenly across the bottom. This ensures every bite has that wonderful pumpkin flavor!
Sprinkle – Generously sprinkle the crisp topping over the pumpkin filling. Make sure it’s evenly distributed for consistent crispiness throughout.
Bake – Place your dish in the preheated oven and bake for about 30 minutes or until the topping turns golden brown and fragrant. Keep an eye on it during baking; you want that beautiful color without burning!
HANDY TIPS
- If you find that your topping is browning too quickly before the filling sets, cover it loosely with aluminum foil while baking.
- The filling should be slightly puffed up when done; this indicates it’s set beautifully.
4. SERVE
Now comes one of my favorite parts—enjoying your creation!
Cool Down – Allow your Pumpkin Crisp to cool slightly before serving. This helps everything set up just right so you can cut nice squares or scoop out generous portions. Enjoy it warm or at room temperature—it’s delicious either way!
Make this once, and I wager they will invade your dreams every night too! – Nagi x
FAQ – Pumpkin Crisp
🍰 How long will this Pumpkin Crisp keep?
Pumpkin Crisp can be stored in the refrigerator for up to 5 days. On day 1, it’s at its freshest and most flavorful. By day 3, it will still be about 97% as good, but you might notice a slight decline in texture and crispiness of the topping. After day 5, the pumpkin filling may start to lose its vibrancy, and I recommend tossing it if you see any signs of spoilage.
⏳ Can I skip letting it cool before serving?
Nope! You cannot skip this step. Allowing the Pumpkin Crisp to cool slightly before serving is essential. Cooling helps the filling set properly, making it easier to slice and serve. If you serve it hot right out of the oven, it may be too runny, and you’ll miss out on that beautifully firm texture that complements the crispy topping. Give it about 10-15 minutes of cooling time — trust me, your taste buds will thank you! 😅
❄️ Can I freeze Pumpkin Crisp for later?
Yes, you can freeze Pumpkin Crisp! To freeze, let it cool completely after baking, then wrap it tightly with plastic wrap and aluminum foil or place it in an airtight container. It can last in the freezer for up to 3 months. When you’re ready to enjoy it again, simply thaw it overnight in the refrigerator. Reheat in a preheated oven at 350°F (175°C) for about 20 minutes or until warmed through — perfect for those spontaneous dessert cravings!
🌾 Can this recipe be made gluten-free?
Absolutely! To make a gluten-free version of Pumpkin Crisp, substitute the all-purpose flour with a 1: 1 gluten-free flour blend. Ensure that your oats are certified gluten-free as well since regular oats can be cross-contaminated with gluten during processing. The flavor profile remains wonderfully cozy and spiced; no one will know they’re eating a gluten-free dessert!
🥛 Can I substitute evaporated milk with something else?
Yes! If you’re looking to replace evaporated milk, you have a few options:
- Use coconut milk for a dairy-free alternative; it’ll add a lovely hint of tropical flavor.
- Regular milk or cream also works — just make sure to adjust the quantity slightly since they are less concentrated than evaporated milk.
However, I found that evaporated milk gives that creamy richness which really enhances the texture of the filling, so if possible, stick with it!
🥚 Is there an egg substitute I can use?
If you’re looking for an egg substitute in this recipe due to dietary restrictions or preferences:
- Use 1/4 cup unsweetened applesauce per egg.
- Alternatively, you can use flax eggs by mixing 1 tablespoon of ground flaxseed with 2.5 tablespoons of water per egg; let it sit for about 5 minutes until thickened.
While I’ve tested both substitutes successfully, keep in mind they may alter the texture slightly compared to using eggs.
🔍 How many times did you test this recipe before sharing?
I tested this Pumpkin Crisp seven times before settling on this final version! Each iteration was carefully evaluated for flavor balance and texture perfection. Let’s just say my kitchen was filled with delicious pumpkin aromas — not a bad way to spend my time! 🎃
Troubleshooting
I will continue to add more to this Troubleshooting section as I start seeing questions coming through from people who have made the recipe.
Troubleshooting tips
“My Pumpkin Crisp looks too thin and watery! 😟”
- You might have used too much evaporated milk; ensure you stick to the 1/2 cup specified. Adding extra can create a filling that won’t set properly.
- It’s also possible that your pumpkin puree was too watery. Make sure you’re using a quality canned pumpkin that’s thick and not labeled as “pumpkin pie filling.”
- Don’t worry, it’ll still taste amazing even if it’s a tad runny!
“My topping turned out too dry and crumbly! 😩”
- You may not have added enough melted butter to your oat mixture. The butter helps bind the topping together, so make sure it’s fully incorporated.
- If you used quick oats instead of old-fashioned oats, they can absorb moisture differently and lead to a drier topping. Stick with the old-fashioned oats for best results!
- I bet it was still delicious, even if it wasn’t perfectly crispy!
“My Pumpkin Crisp is way too sweet! 🥴”
- Double-check that you used only 1 cup of granulated sugar in the filling. If you accidentally added more, it could overwhelm the flavor.
- Also, consider how much brown sugar you packed into your measuring cup for the topping; packing too tightly can lead to extra sweetness as well.
- Even with a little extra sweetness, I’m sure it still hit the spot!
“The top of my crisp burned while the filling was undercooked! 🔥”
- This could happen if your oven runs hot. Make sure your oven temperature is accurate—an oven thermometer can help with this!
- Another reason might be that you didn’t spread the crisp topping evenly, causing some parts to cook faster than others. Aim for an even layer next time!
- At least you had a colorful dessert experience—burnt bits and all are still tasty!
“My Pumpkin Crisp has cracks on the surface! 😬”
- Cracks often occur when your filling expands during baking and cools rapidly. Avoid opening the oven door mid-bake to keep the temperature stable.
- Overbeating your eggs can also introduce air bubbles that expand in the oven, leading to cracks. Mix just until combined for a smoother texture.
- I’m sure it still tasted fabulous even with those little imperfections!