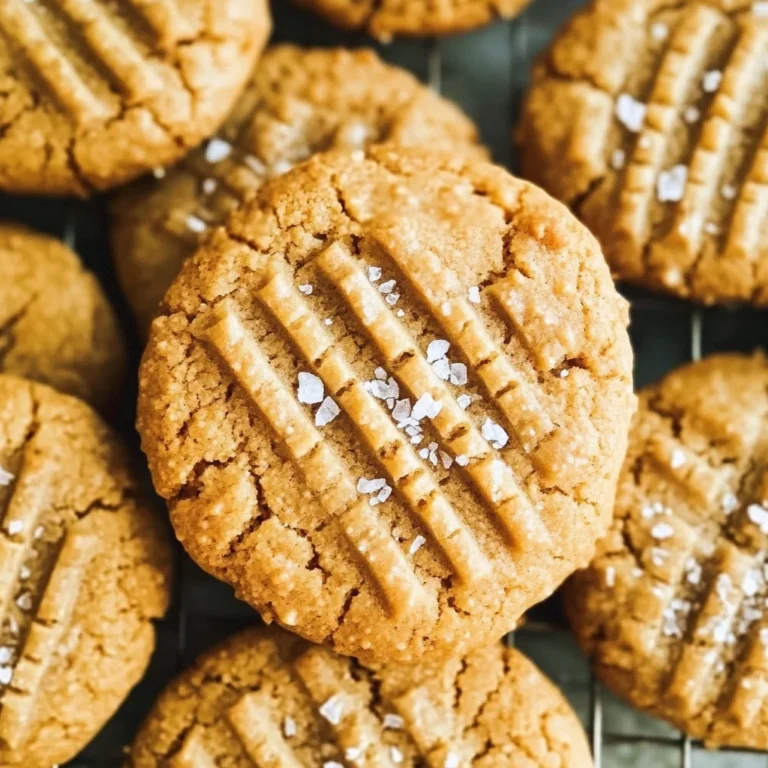
Thick Espresso Chocolate Chip Cookies: Chewy and Decadent
I’ve always had a soft spot for cookies, especially those thick, chewy ones that seem to defy gravity. A while back, I stumbled upon a café that boasted the most decadent espresso chocolate chip cookies I’d ever tasted. They were so good that I found myself daydreaming about them at odd hours of the day, but let’s be real—spending a small fortune on cookies every week just wasn’t in my budget. So, I decided it was time to bring that café magic into my own kitchen and create my own version of Thick Espresso Chocolate Chip Cookies.
Now, let me tell you, perfecting this recipe was quite the adventure! I lost count of how many batches I baked—probably around ten or so—and each one was an experiment in cookie science gone wrong. The first few attempts were either too flat or way too dry, and I might have even created a few hockey pucks along the way. But with every failure, I learned something new about balancing the rich espresso flavor with just the right amount of chocolate chips and achieving that glorious thickness that makes a cookie truly irresistible.
After all that testing, I can confidently say it was worth every single misadventure! The final result? Thick Espresso Chocolate Chip Cookies that are gloriously chewy, bursting with deep espresso flavor, and studded with melty chocolate chips. They’re the kind of cookies that will have you sneaking back for “just one more” long after dinner is over. So grab your apron and get ready to indulge; these cookies are a game changer and I can’t wait for you to try them!
These Thick Espresso Chocolate Chip Cookies are….
….the ultimate indulgence for coffee and chocolate lovers alike!
1. They deliver a bold espresso flavor that elevates the traditional cookie experience. With 2 tablespoons of espresso powder dissolved in hot water, the rich coffee notes infuse every bite, creating a depth of flavor that is simply irresistible. This combination not only enhances the chocolate but also provides an aromatic kick that wakes up your taste buds!
2. Expect a perfectly chewy texture with a thick, satisfying bite. The generous amount of softened unsalted butter and the precise balance of dry ingredients create cookies that have a crisp exterior and a delightfully chewy center. This is achieved by using 2 cups of all-purpose flour, which provides the structure needed for those enviable thick cookies.
3. The technique of dissolving espresso powder in hot water is a game-changer. This simple step ensures that the coffee flavor is fully integrated into the dough, rather than just sprinkled on top. It enhances the overall consistency and richness of the dough, making each cookie burst with flavor rather than just hinting at it.
4. An incredible value for homemade treats – these Thick Espresso Chocolate Chip Cookies can be made with pantry staples without breaking the bank. With just common ingredients like brown sugar and semi-sweet chocolate chips, you can whip up a batch that rivals any café cookie for a fraction of the price, plus they’re fresher too!
PS These cookies yield about 12 large cookies, making them perfect for sharing (or keeping all to yourself!).
Ingredients for the Thick Espresso Chocolate Chip Cookies
Each ingredient in this dish plays an essential role in flavor and texture. Here’s what you’ll need:
2 cups all-purpose flour: Provides the structure and chewiness of the cookies.
1 teaspoon baking soda: Acts as a leavening agent to create a light, fluffy texture.
1 teaspoon salt: Enhances the overall flavor and balances the sweetness.
1 cup unsalted butter (softened): Contributes richness and moisture for a tender cookie.
3/4 cup brown sugar (packed): Adds depth of flavor with a hint of caramel notes.
1/4 cup granulated sugar: Sweetens the cookies while helping them spread perfectly.
1 large egg: Binds the ingredients together and adds moisture for a chewy texture.
1 teaspoon vanilla extract: Introduces warmth and enhances the chocolate flavor.
2 tablespoons espresso powder (dissolved in 1 tablespoon hot water): Infuses a robust coffee flavor that complements the chocolate.
1 cup semi-sweet chocolate chips: Brings bursts of rich chocolatey goodness in every bite.
You Must Let the Dough Rest. No Exceptions!
I tried to skip this step, thinking I could whip up these Thick Espresso Chocolate Chip Cookies in record time. Spoiler alert: I was wrong. After several rounds of testing, I found that letting the dough rest is absolutely non-negotiable if you want those cookies to achieve their ultimate chewy, thick perfection.
So, why is resting the dough so crucial? Think of it like giving a good steak time to rest after cooking — it helps the juices redistribute for maximum flavor and tenderness. In cookie-making, resting allows the flour to hydrate fully and gives the sugars time to dissolve better, which leads to a richer flavor and improved texture. Skipping this step means you risk ending up with dry, crumbly cookies instead of the delightful chewy bites we all crave.
What Does Resting the Dough Do?
- Flavour enhancement — The resting period allows the flour to absorb moisture from the wet ingredients, leading to a more complex flavor profile that no amount of extra chocolate chips can replicate.
- Texture improvement — By allowing gluten strands to relax during resting, you get a softer, chewier interior that contrasts beautifully with the crisp edges.
- Better spread control — When you rest the dough, it helps regulate how much cookies spread in the oven, resulting in thicker and sturdier cookies rather than flat discs.
- Moisture retention — The hydration of flour during resting ensures that your cookies stay fresh longer, preventing them from drying out too quickly.
- Enhanced browning — With sugars properly dissolved and distributed through resting, your cookies develop a beautiful golden color as they bake.
Different Resting Times
- 30 minutes (fair) — This is a bare minimum; you’ll get decent cookies but they’ll be noticeably less chewy and flavorful compared to those rested longer.
- 1 hour (good) — A step up from 30 minutes; you’ll notice an improvement in texture but still lack that deep flavor complexity.
- ⭐️ 2 hours⭐️ (very good) — This is where magic starts happening; flavors deepen significantly, and you get a lovely balance between chewy and crispy.
- ⭐️ 12 hours⭐️ (best) — The base recipe shines! Expect pure cookie nirvana with rich flavors and perfect texture.
- Beyond 24 hours (diminishing returns) — While still good, there’s a higher risk of drying out as time goes on.
Don’t fall into the trap of thinking you can rush this step! The most common mistake is underestimating just how important resting is for achieving those thick and chewy cookies. Trust me; your future self will thank you when you’re biting into that rich espresso-infused goodness!
How to make Thick Espresso Chocolate Chip Cookies

Are you ready to see how straightforward it is to make the Thick Espresso Chocolate Chip Cookies of your dreams??
1. PREPARE THE DOUGH
Let’s get those cookies rolling!
1. Preheat – Preheat your oven to 350°F (175°C). This step is crucial because a properly heated oven ensures that your cookies bake evenly and achieve that perfect golden-brown color on the edges.
2. Whisk – In a mixing bowl, whisk together the all-purpose flour, baking soda, and salt until well combined. This not only mixes the dry ingredients but also aerates the flour, which contributes to a lighter texture in your cookies.
3. Cream – In another bowl, beat the softened unsalted butter, brown sugar, and granulated sugar using an electric mixer until creamy. You’re looking for a light and fluffy consistency here; this process helps to incorporate air into the mixture, making your cookies thick and chewy.
4. Combine – Add in the large egg, vanilla extract, and dissolved espresso powder to the butter mixture and mix until fully combined. The espresso powder adds a rich depth of flavor while keeping the dough moist.
5. Mix – Gradually add the dry ingredients to the wet ingredients, mixing gently until just combined. Be careful not to overmix; this helps prevent tough cookies!
6. Fold – Fold in the chocolate chips using a spatula. This ensures an even distribution of those gooey chocolate morsels throughout your dough for melty bites in every cookie.
HANDY TIPS
- For extra flavor, consider using dark chocolate chips alongside semi-sweet ones!
- If you prefer a more intense coffee flavor, you can increase the espresso powder slightly—just be cautious not to overpower the sweetness.
2. BAKE THE COOKIES
Now comes the exciting part—let’s bake those beauties!
7. Scoop – Scoop out tablespoon-sized portions of dough and place them onto a baking sheet lined with parchment paper, spacing them about 2 inches apart. This spacing allows room for spreading as they bake—no one wants a cookie blob!
8. Bake – Bake in the preheated oven for 10-12 minutes or until the edges are golden brown and the centers are set but still soft. Keep an eye on them—every oven is different! You want that perfect balance between chewy centers and crisp edges.
9. Cool – Remove from the oven and let the cookies cool on the baking sheet for 5 minutes before transferring them to a wire rack to cool completely. This resting period allows them to firm up just enough so they won’t break apart when moved.
HANDY TIPS
- For smaller cookies, simply roll into balls instead of discs; they work great baked for about 12-14 minutes.
- Want cookie logs? Roll your dough into a big log, refrigerate for about 12 hours, then cut into thick slices before baking!
Making these Thick Espresso Chocolate Chip Cookies is a delightful journey from start to finish! With their rich espresso flavor and gooey chocolate chips, they’re bound to become a favorite in your household—just like they are in mine! Make these once, and I wager they will invade your dreams every night too! – Nagi x
FAQ – Thick Espresso Chocolate Chip Cookies
How long will these cookies keep?
These cookies will stay fresh for about a week when stored properly in an airtight container at room temperature. After day 3, they might start to lose some of their chewy texture, being about 97% as good on day 3 and down to 90% by day 5. If you want to extend their shelf life, you can refrigerate them, which will keep them fresher for up to two weeks. Just make sure to let them come back to room temperature before enjoying!
❄️ Do I really have to chill?
No, you don’t have to chill the dough for this recipe! I’ve tested these cookies both with and without chilling, and while chilling can enhance the flavor slightly due to resting time, it’s not crucial for achieving those thick, chewy results. Just mix the ingredients well, scoop the dough onto your baking sheet, and pop them straight into the oven. Easy peasy!
🥶 Can I freeze these cookies?
Absolutely! You can freeze these cookies both before and after baking. To freeze unbaked dough: scoop tablespoon-sized portions onto a parchment-lined tray and freeze until solid. Then transfer them to a zip-top freezer bag and store for up to 3 months. When you’re ready to bake, simply place the frozen dough on a baking sheet (no need to thaw) and bake for an extra 1-2 minutes. If you’re freezing baked cookies, just let them cool completely before sealing them in an airtight container or freezer bag.
🌾 Can these be made gluten free?
Yes! You can make these cookies gluten-free by using a high-quality gluten-free all-purpose flour blend that includes xanthan gum (if your blend doesn’t contain it already). I recommend testing with about 1 ¾ cups of gluten-free flour instead of the full 2 cups of regular flour since gluten-free flours tend to absorb more moisture. The texture may differ slightly, but they should still be deliciously thick and chewy!
Can I reduce the sugar or substitute with sweeteners?
No, you cannot reduce the sugar — I’ve tried reducing it multiple times during testing (and yes, it was painful!). Sugar is critical not only for sweetness but also for achieving that perfect chewy texture. If you’re looking for alternatives, consider using coconut sugar instead of brown or granulated sugar; however, keep in mind that it may slightly alter the flavor and texture.
Why do we dissolve espresso powder in hot water?
Dissolving espresso powder in hot water before adding it to the mixture helps activate its rich flavor in the cookie batter. This step ensures that you don’t end up with clumps of espresso powder that could lead to an uneven taste throughout your cookies. It’s all about equal distribution of that beautiful coffee flavor! Plus, trust me—I’ve made many batches where I skipped this step just to test it out… and let’s just say my taste buds were not pleased!
What if I want to customize my mix-ins?
Feel free to get creative with your mix-ins! You can swap out semi-sweet chocolate chips for dark chocolate chunks or even white chocolate chips if that’s more your jam. I’ve also enjoyed adding chopped nuts like walnuts or pecans for an extra crunch factor. Just remember not to exceed 1 cup total of added mix-ins so it doesn’t interfere with the cookie structure—otherwise they’ll spread too much while baking!
Troubleshooting
I will continue to add more to this Troubleshooting section as I start seeing questions coming through from people who have made the recipe.
Troubleshooting tips
“My cookies were not as thick as yours!” 😭
- You may have used too much flour, which can happen if you scooped it directly from the container. This compacts the flour, leading to a denser dough that spreads too much while baking.
- Alternatively, if you didn’t chill your dough before baking, the cookies can spread out too much in the oven.
I bet they were still YUM though!
“My cookies came out wonky!” 🍪
- If your dough was mixed too long after adding the dry ingredients, it could develop gluten, leading to uneven shapes and textures.
- Also, if you didn’t use a cookie scoop to portion out your dough evenly, you’ll end up with some cookies larger than others.
I bet they were still YUM though!
“The surface of my cookies split and had massive crevices!” 😱
- This might be due to overmixing your dough after adding the wet ingredients, which can cause air bubbles that expand in the oven and create those unsightly cracks.
- If your oven temperature is too high, it can also cause rapid rising and cracking before the centers set properly.
I bet they were still YUM though!
“My cookies came out tough and dry!” 🥴
- If you accidentally added too much flour or didn’t measure your brown sugar correctly (it should be packed), this could lead to a dry texture.
- Overbaking is another common culprit; even a minute too long can dry out those delicious cookies!
I bet they were still YUM though!