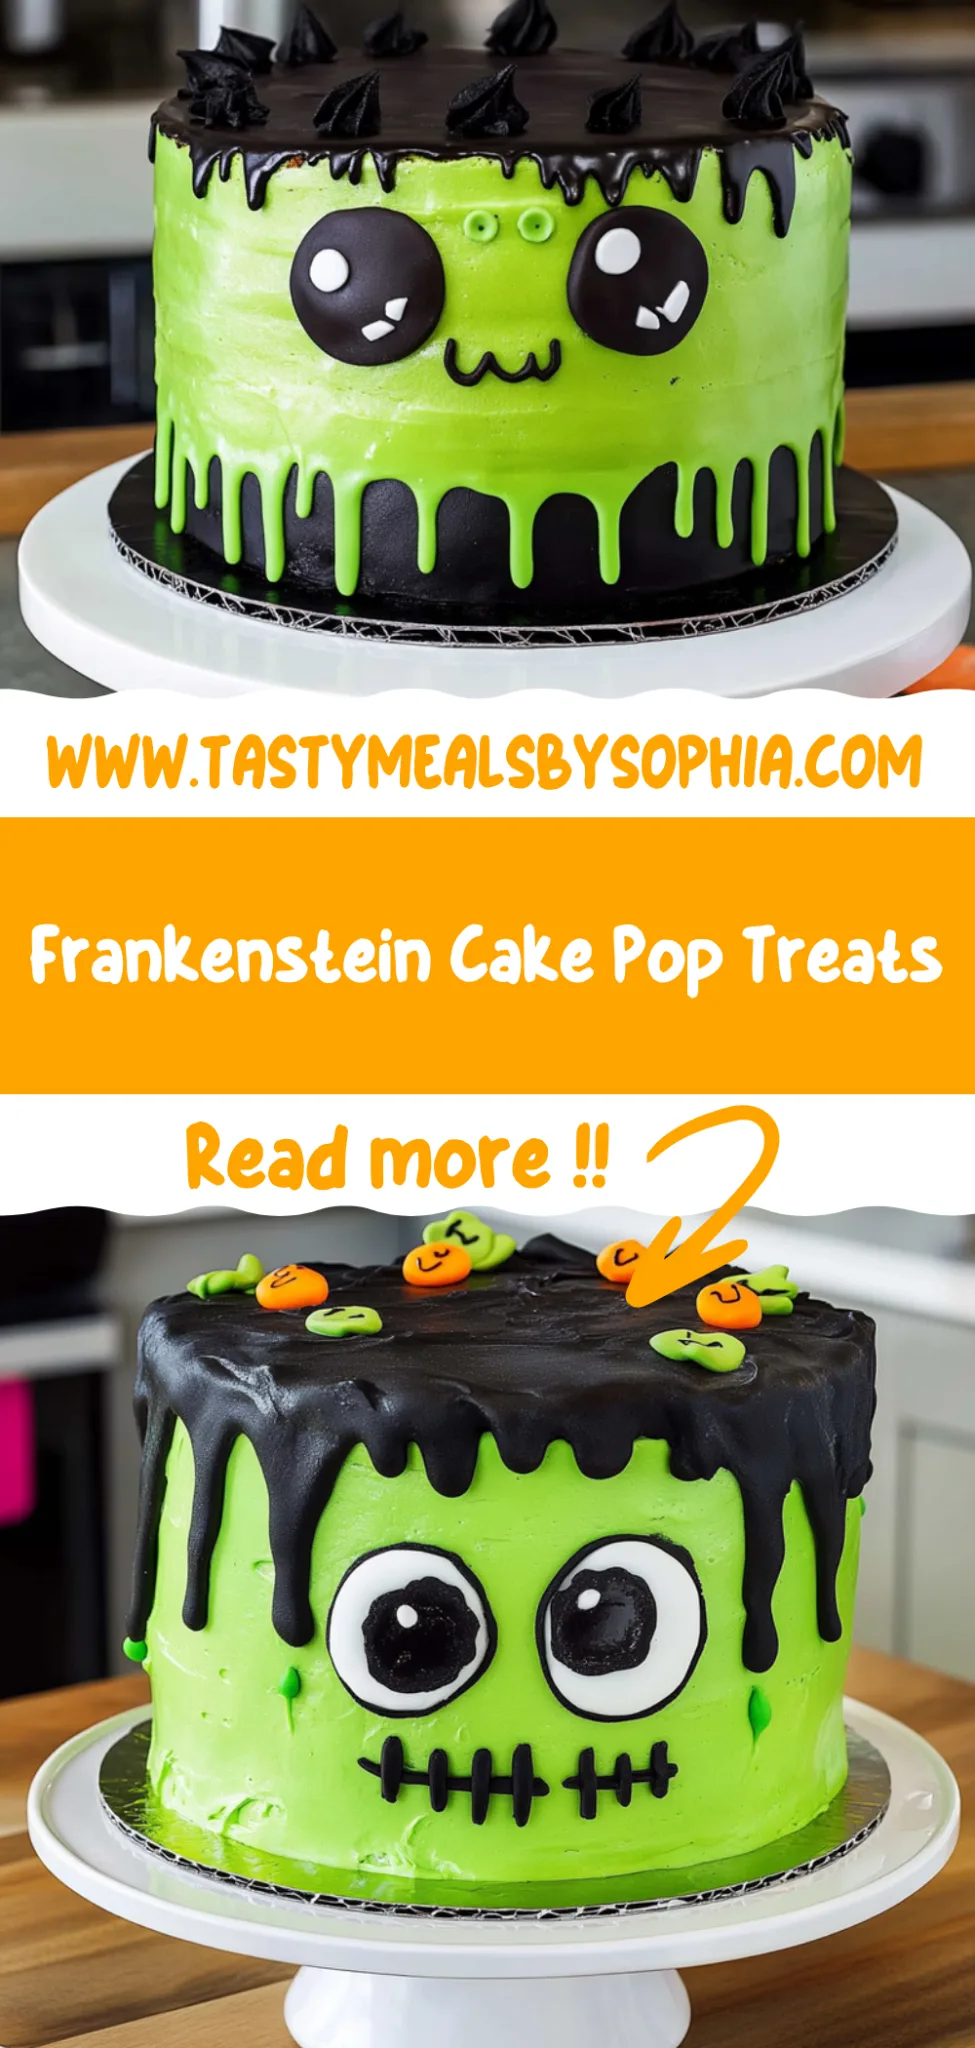
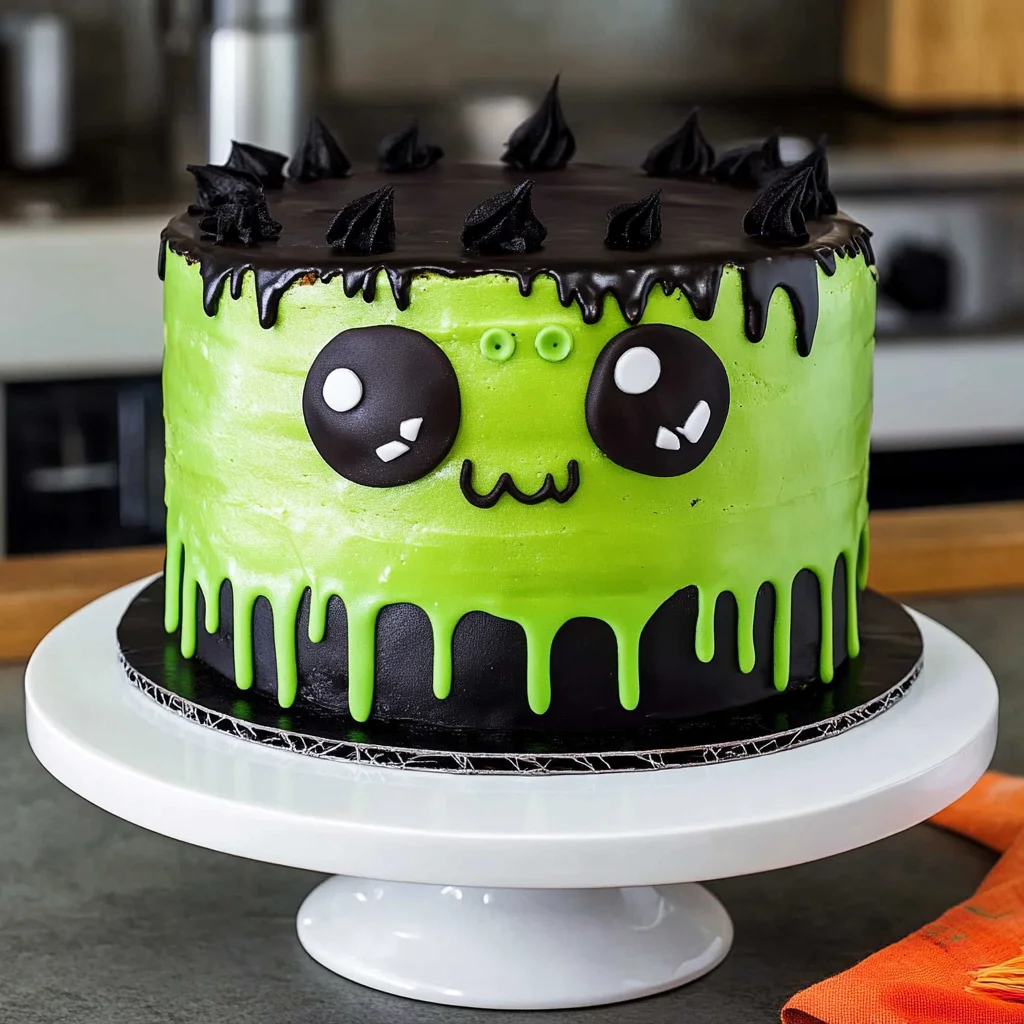
Frankenstein Cake: Spooktacularly Fun and Delicious Treat
I first stumbled upon the idea for this Frankenstein Cake while scrolling through social media one Halloween season. I came across a whimsical bakery that had whipped up a monstrous delight, complete with vibrant green frosting and chocolate features that screamed fun and spooky. Instantly, I was inspired! The thought of recreating this cake at home tickled my baking bones—after all, why should I settle for store-bought when I can craft something even better (and way more delicious) in my own kitchen? Plus, it’s a fantastic way to impress friends and family during those festive gatherings without breaking the bank.
Let me tell you, perfecting this Frankenstein Cake was no small feat. I lost count after my fifth attempt—let’s just say my kitchen looked like a scene from a horror movie! Each version had its own unique quirks; one was too dry, another too sweet, and the frosting? Well, let’s just say I had some epic battles with achieving that perfect shade of monster green. But with each attempt, I learned more about balancing flavors and textures until I finally nailed it. Who knew baking could be so much trial and error?
But oh boy, was it worth every messy moment! The final result is a showstopper: a moist chocolate cake cloaked in vibrant green frosting that looks like it jumped right out of a Halloween classic. It’s not just visually impressive; the combination of rich chocolatey goodness and creamy frosting creates an irresistible flavor explosion in every bite. Trust me, once you slice into this Frankenstein Cake, you’ll want to celebrate Halloween every day! So grab your mixing bowls and let’s bring this spooky creation to life—I can’t wait for you to try it!
These Frankenstein Cake are….
….the ultimate Halloween showstopper that will impress your family and friends!
1. They deliver a delectable chocolate flavor that is both rich and indulgent, thanks to the unsweetened cocoa powder. This ingredient not only adds depth of flavor but also creates a beautiful contrast against the vibrant green frosting, making each bite a delightful experience.
2. The moist and tender texture of the cake is achieved by using a combination of vegetable oil and milk, which keeps it soft and fluffy. This ensures that every slice is incredibly satisfying, perfect for pairing with the thick, creamy frosting that adds an extra layer of decadence.
3. A key baking technique in this recipe is the careful blending of dry ingredients before incorporating the wet ones. This method helps to evenly distribute the baking powder and soda, ensuring that the cake rises beautifully without any dense spots, resulting in a perfectly fluffy Frankenstein Cake.
4. This recipe offers great value as it uses accessible ingredients found in most pantries, making it easy to whip up for any occasion. Plus, with a generous yield from just one recipe, you can easily serve a crowd or save some slices for later enjoyment.
PS These Frankenstein Cakes are layered and generously frosted, so be prepared for a fun decorating session that will delight both kids and adults alike!
Ingredients for the Frankenstein Cake
Each ingredient in this dish plays an essential role in flavor and texture. Here’s what you’ll need:
- 2 cups all-purpose flour: Provides the structure and base for the cake.
- 1.5 cups granulated sugar: Sweetens the cake while enhancing moisture.
- 0.5 cups unsweetened cocoa powder: Infuses rich chocolate flavor and color.
- 1 tbsp baking powder: Acts as a leavening agent for a light, airy texture.
- 1 tsp baking soda: Helps the cake rise and adds to its fluffiness.
- 1 tsp salt: Balances sweetness and enhances overall flavor.
- 1 cup milk (can substitute with almond milk): Adds moisture and richness to the batter.
- 0.5 cups vegetable oil: Keeps the cake tender and moist.
- 2 large eggs: Binds ingredients together and contributes to texture.
- 2 tsp vanilla extract: Adds a warm, aromatic flavor that enhances sweetness.
Let the Cake Cool Completely. Trust Me!
I get it; waiting is hard! I tried to rush this part, thinking, “What’s a little warm cake going to do?” Spoiler alert: everything! I learned the hard way that skipping this step leads to a sad, squished mess of frosting and cake rather than the adorable Frankenstein creation you envisioned. So please, don’t be like me!
Cooling your cake completely is non-negotiable because it allows the structure to set properly. Think of it like letting a pizza cool before slicing—it’s a gooey disaster if you cut into it too soon. For our Frankenstein Cake, cooling ensures that the layers are firm enough to hold up under the weight of all that vibrant green frosting without sliding apart or turning mushy.
What does cooling the cake do?
- Texture — A properly cooled cake has a more stable crumb, preventing it from becoming gummy or falling apart when you frost and slice it.
- Flavor — Cooling allows flavors to develop fully; warm cakes can taste slightly off or overly sweet as they haven’t had time to settle.
- Frosting adherence — When the cake is fully cooled, frosting sticks better, creating a smooth and even surface for decorating your spooky masterpiece.
- Decoration integrity — A cooled cake maintains its shape and structure, giving you those perfect edges needed for your Frankenstein face features.
- Moisture retention — If you frost while warm, steam escapes and can make your frosting runny; cooling helps retain moisture in both the cake and frosting.
Different cooling times
- 30 minutes (good) — The outside feels cool but the inside is still warm; great for quick assembly but risky for stability.
- 1 hour (better) — The cake is mostly cool; decent firmness but still may have slight warmth in the center which could affect frosting.
- 2 hours (best) — Perfectly cool throughout; layers are firm enough to hold up well under frosting and decoration.
- ⭐️ 4 hours or overnight ⭐️ — Ultimate stability! The longer cooling time allows flavors to deepen and ensures no risk of melting your frosting.
Don’t make my mistake: rushing the cooling process is a recipe for disaster! If you frost too soon, not only will your beautiful Frankenstein face suffer, but you’ll also end up with a messy situation that may leave you weeping over your hard work. Trust me on this one—let it cool completely!
How to make Frankenstein Cake
Are you ready to see how straightforward it is to make the Frankenstein Cake of your dreams??
1. PREPARE THE CAKE
Let’s kick things off by baking those spooky cake layers!
1. Preheat – Start by preheating your oven to 350°F (175°C). This ensures that the cakes bake evenly and rise beautifully. While you’re at it, grease and flour two 9-inch round cake pans to prevent any sticking later on.
2. Combine Dry Ingredients – In a mixing bowl, combine 2 cups of all-purpose flour, 1.5 cups of granulated sugar, 0.5 cups of unsweetened cocoa powder, 1 tablespoon of baking powder, 1 teaspoon of baking soda, and 1 teaspoon of salt. Mixing these dry ingredients first helps distribute the leavening agents for an even rise.
3. Mix Wet Ingredients – Add in 1 cup of milk (you can substitute with almond milk if desired), 0.5 cups of vegetable oil, 2 large eggs, and 2 teaspoons of vanilla extract to the dry mix. Stir until smooth and well combined; this will create a rich batter that’s full of flavor!
4. Divide Batter – Pour the batter evenly into the prepared pans. Make sure they’re level so that your cake layers bake evenly.
5. Bake – Place the pans in the oven and bake for 25 minutes or until a toothpick inserted in the center comes out clean. You’ll know they’re done when they look slightly domed and smell incredible!
6. Cool Cakes – Once baked, allow the cakes to cool in the pans for about 10 minutes before transferring them to a wire rack to cool completely. This step helps prevent soggy bottoms!
HANDY TIPS
- If you’re using almond milk, ensure it’s unsweetened for balanced sweetness.
- For extra moist cakes, consider adding a tablespoon of yogurt to the wet ingredients.
2. MAKE THE FROSTING
Time to whip up some vibrant green frosting that really brings Frankenstein to life!
7. Beat Butter – In a mixing bowl, beat 1 cup of softened unsalted butter until creamy and fluffy—this creates a luxurious base for your frosting.
8. Add Sugar & Milk – Gradually add in 4 cups of powdered sugar, alternating with 2 tablespoons of milk as you beat until fluffy and well-combined. The alternating method prevents clumps and ensures a smooth texture!
9. Color & Flavor – Finally, mix in 1 teaspoon of vanilla extract along with 1 tablespoon of green food coloring until you achieve your desired shade of spooky green! Adjust as necessary; you want it vibrant enough for Halloween!
HANDY TIPS
- Use gel food coloring for a more vibrant hue without altering consistency.
- If your frosting is too thick, add an extra splash of milk until it’s spreadable.
3. ASSEMBLE AND DECORATE
Now comes the fun part—transforming those cake layers into Frankenstein!
10. Layer Cakes – Once your cakes are completely cool, place one layer on a serving plate as your base.
11. Frost First Layer – Spread a generous layer of frosting on top of this first layer; this is where you can get creative with decorating!
12. Top Layer & Frost – Place the second layer on top and frost both the top and sides generously with your green frosting—make it look delightfully messy!
13. Decorate Features – Use chocolate chips to create eyes and mouth; then pipe on additional facial features with black icing for that classic monster look!
14. Chill Cake – Chill the decorated cake in the fridge for about 30 minutes to set everything before serving—it helps firm up those adorable features!
HANDY TIPS
- For extra spooky vibes, consider adding crushed oreos on top or around the base!
- If creating intricate designs feels daunting, keep it simple with just eyes and mouth—it’ll still be super cute!
What an exciting journey we’ve just taken together! Your Frankenstein Cake is now ready to steal the show at any Halloween gathering! I can’t wait for you to enjoy this whimsical creation—it’s deliciously spooktacular! – Nagi x
FAQ – Frankenstein Cake
🎃 How long will this Frankenstein Cake keep?
Your Frankenstein Cake will stay fresh for about 3-4 days when stored properly at room temperature. After that, it starts to lose its fluffiness and flavor — I’d say it’s around 85% as good on day 5, and by day 7, I wouldn’t recommend eating it unless you’re feeling brave! To keep it fresh, make sure to cover it with plastic wrap or store it in an airtight container.
⏲️ Can I skip chilling the cake after frosting?
No, you can’t skip chilling the cake after frosting! Chilling for at least 30 minutes is essential to help set the green frosting so that your Frankenstein features hold their shape. If you skip this step, you might end up with a melty monster instead of a spooky delight. Trust me, the chill is worth it!
❄️ Can I freeze the Frankenstein Cake?
Yes, you can freeze the Frankenstein Cake! To do so, wrap it tightly in plastic wrap and then in aluminum foil to prevent freezer burn. You can freeze both unfrosted and frosted cakes. When you’re ready to enjoy it again, simply thaw it in the refrigerator overnight or at room temperature for a few hours. Just be aware that if it’s frosted, some condensation may form — which is normal!
🌾 Can I make this cake gluten-free?
Absolutely! To make a gluten-free version of the Frankenstein Cake, simply substitute the 2 cups of all-purpose flour with a gluten-free all-purpose flour blend that contains xanthan gum. This usually works great for maintaining texture and moisture. I’ve tested this substitution multiple times and found that most blends yield delicious results without compromising taste!
🍯 Can I reduce the sugar in the cake?
Nope, you cannot reduce the sugar in this recipe — I’ve tried various experiments reducing the sugar down to 1 cup and even less, but trust me when I say: it just doesn’t work! The cake ends up too dry and crumbly without enough moisture balance from the sugar. The 1.5 cups of granulated sugar are vital for achieving that perfect softness and sweetness.
🥛 What can I use instead of milk in the batter?
You can substitute 1 cup of milk with almond milk or any other non-dairy milk like oat milk or soy milk if needed. Just ensure you’re using an unsweetened variety to keep the flavor profile intact. In my experience, almond milk gives a slightly nuttier flavor but still pairs wonderfully with chocolate!
🎨 How can I customize my Frankenstein Cake decorations?
Get creative! You can add different candies or sprinkles for eyes or even use colored icing for more vibrant facial features. If you’re feeling adventurous, try adding gummy worms or edible eyeballs for a fun touch! The world is your monster canvas here—go wild with your Halloween spirit!
Troubleshooting
I will continue to add more to this Troubleshooting section as I start seeing questions coming through from people who have made the recipe.
Troubleshooting tips
“My cake turned out too flat! 😩”
- You may not have added the right amount of baking powder. Using too little can prevent the cake from rising properly, leading to a flat texture.
- It’s possible that your oven temperature is inaccurate. If it’s not hot enough, the cake won’t rise as expected. A quick check with an oven thermometer can help!
- If you didn’t mix your batter long enough, it might not have incorporated enough air, which is essential for a fluffy cake.
I bet it was still YUM though!
“The texture of my cake is way too dry! 😢”
- Overbaking is a common culprit for dry cakes. If you left it in the oven even a minute too long, it could lead to dryness. Always keep an eye on the timer!
- Using too much flour can also result in a dry texture. Make sure to measure accurately—spoon and level your flour for best results!
- Not using enough liquid, like milk or oil, can make your cake dry as well. Double-check that you used the correct amounts specified in the recipe.
I bet it was still YUM though!
“My frosting is too runny and won’t hold its shape! 🤦♀️”
- If your butter was too soft or melted when you started making the frosting, it can cause a runny consistency. Try using slightly firmer butter next time!
- Adding too much milk while mixing can also lead to a frosting that’s too thin. Remember to add liquid gradually and stop once you reach your desired consistency!
- If you used less powdered sugar than called for, this could also affect the thickness of your frosting. Make sure to measure accurately for that perfect spreadability!
I bet it was still YUM though!
“My cake layers are uneven and misshapen! 😱”
- If you didn’t divide your batter evenly between the pans, one layer may bake taller than the other. Use a kitchen scale for precise measurements if you’re aiming for perfection!
- Not leveling your cake layers after they cool can also result in uneven stacking when assembling. A serrated knife works wonders here!
- It’s possible your oven has hot spots causing uneven baking; rotating the pans halfway through baking can help ensure even cooking all around!
I bet it was still YUM though!
Frankenstein Cake
Ingredients
Method
- Preheat the oven to 350°F (175°C). Grease and flour two 9-inch round cake pans.
- In a mixing bowl, combine flour, sugar, cocoa powder, baking powder, baking soda, and salt.
- Add milk, vegetable oil, eggs, and vanilla extract to the dry ingredients and mix until smooth.
- Divide the batter evenly between the prepared pans.
- Bake for 25 minutes or until a toothpick inserted in the center comes out clean.
- Allow the cakes to cool in the pans for 10 minutes, then transfer to a wire rack to cool completely.
- In a mixing bowl, beat the softened butter until creamy.
- Gradually add powdered sugar, alternating with milk, and beat until fluffy.
- Mix in vanilla extract and green food coloring until well combined.
- Once the cakes are completely cool, place one layer on a serving plate.
- Spread a layer of frosting on top of the first cake layer.
- Place the second layer on top and frost the top and sides of the cake with the green frosting.
- Use chocolate chips to create eyes and mouth, and black icing for additional facial features.
- Chill the cake for 30 minutes to set the frosting before serving.