Dill Pickle Chex Mix: A Tangy Snack Sensation You’ll Love
I stumbled upon the idea for this Dill Pickle Chex Mix: A Tangy Snack Sensation during one of my late-night snack raids. I’d just come home from a friend’s gathering where someone had brought the most addictive dill pickle-flavored pretzels. Those little nuggets of tangy goodness were so good that I found myself sneaking away more than my fair share. The craving hit hard, and I knew I had to recreate that bold flavor in a snack mix at home—mostly because my wallet couldn’t handle the late-night takeout runs, and let’s be honest, homemade is often way better!
After several attempts that ranged from “this is surprisingly decent” to “what on earth was I thinking?”, I finally nailed it! It took me five rounds of tweaking recipes, adjusting ratios, and probably consuming far too many calories in the process (but who’s counting?). Each iteration was a lesson learned—whether it was dialing back on the dill seasoning or finding that perfect balance between crunch and tanginess. Let’s just say, if you could have seen my kitchen during testing week, you’d understand why I’m not opening a restaurant anytime soon!
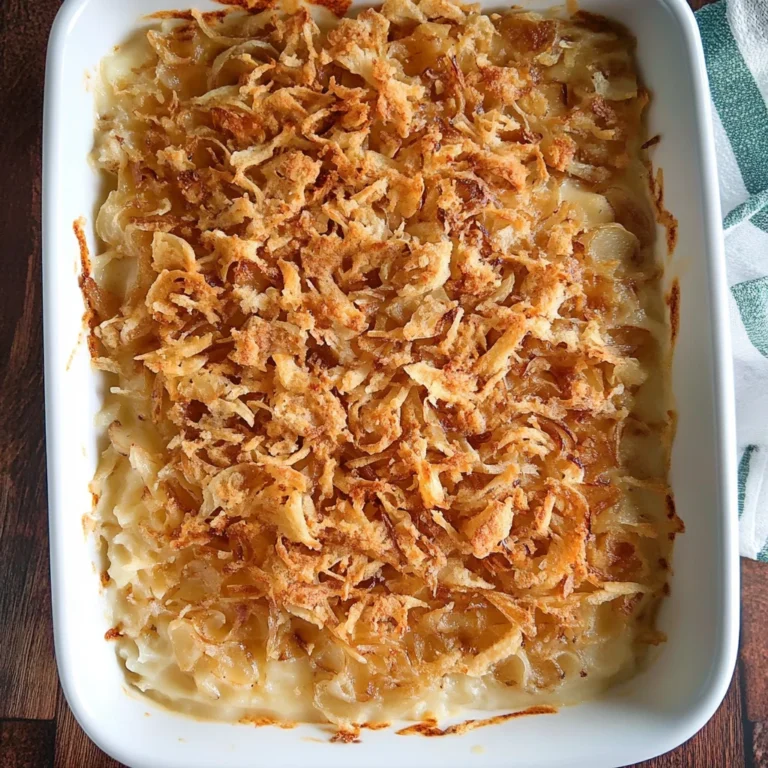
But oh boy, was it worth every moment! The final result is a crunchy, tangy snack mix featuring Chex cereal, pretzels, and that zesty dill pickle flavor that’ll have your taste buds dancing. It’s got the perfect bite with an irresistible crunch and an addictive flavor that’s just begging to be snacked on. So grab your favorite bowl and get ready to dive into this delightful Dill Pickle Chex Mix: A Tangy Snack Sensation—I can’t wait for you to try it!
These Dill Pickle Chex Mix: A Tangy Snack Sensation are…
…an irresistible blend of flavors and textures that will have you reaching for more!
1. They deliver an explosion of tangy flavor that’s simply unforgettable, thanks to the generous splash of dill pickle juice. This unique ingredient infuses each piece with a zesty punch, transforming ordinary snack time into a bold taste adventure that keeps your taste buds delighted.
2. Enjoy an incredible crunch from the combination of Chex cereal, pretzel sticks, and bagel chips. Each bite offers a satisfying snap that makes it hard to stop munching; the diverse shapes and sizes create a delightful contrast that elevates the entire eating experience.
3. The simple seasoning technique ensures that every piece is evenly coated in flavor without overwhelming the base ingredients. By combining olive oil with garlic powder, onion powder, and dill weed, I create a savory blend that amplifies the natural crunchiness of the cereal base while keeping it light and addictive.
4. This mix is a cost-effective crowd-pleaser—perfect for parties or game day. With versatile ingredients like Chex cereal and pretzels, you can whip up a generous batch without breaking the bank, making it an easy go-to snack compared to pricey store-bought options.
PS This Dill Pickle Chex Mix yields about 10 cups—enough to share (or not!) during your next gathering!
Ingredients for the Dill Pickle Chex Mix: A Tangy Snack Sensation
Each ingredient in this dish plays an essential role in flavor and texture. Here’s what you’ll need:
3 cups Chex cereal (any variety, rice or corn preferred): Provides a crunchy base that holds all the flavors together.
1 cup pretzel sticks: Adds a satisfying saltiness and extra crunch to the mix.
1 cup bagel chips (broken into pieces): Contributes a hearty texture with a delightful toasty flavor.
1/2 cup dill pickle juice (from jarred dill pickles): Infuses the mix with tangy brightness and zesty pickle flavor.
1 tablespoon olive oil: Helps the seasonings adhere while adding richness to the overall taste.
1 teaspoon garlic powder: Delivers a savory depth that enhances the dill pickle notes.
1 teaspoon onion powder: Adds subtle sweetness and complexity, rounding out the flavors.
1 teaspoon dill weed (dried): Intensifies the fresh dill flavor for an authentic pickle experience.
1 cup peanuts (or mixed nuts): Introduces a nutty crunch that complements the other textures beautifully.
1 cup cheddar cheese crackers: Offers a cheesy bite that balances the tanginess of the pickles.
Preheating the Oven is Non-Negotiable! Trust Me!
I know, I know—preheating the oven feels like one of those annoying steps that adds extra time to your snack-making. I tried skipping it once, thinking I could save myself a few minutes, and let’s just say, the results were less than appetizing. So here I am, confessing that you absolutely need to preheat that oven for this Dill Pickle Chex Mix!
When you preheat the oven to 250°F (120°C), you’re creating the ideal environment for your snack mix to bake evenly and develop that irresistible crunch. Think of it like warming up before a workout; if you dive right in without preparing your muscles, you might end up with a half-hearted performance. The same goes for our — Cereal Base —; when the Chex cereal, pretzels, and bagel chips hit the hot air at just the right temperature, they toast perfectly and soak up all that zesty dill pickle flavor beautifully.
What does Preheating the Oven do?
- Even Cooking — Preheating ensures all components bake uniformly, so each Chex piece is equally crunchy.
- Flavor Development — The heat activates flavors in the seasoning, allowing garlic powder and dill weed to bloom and infuse every bite.
- Texture Enhancement — A hot oven helps achieve that coveted crispiness in both Chex cereal and pretzels while preventing sogginess.
- Color Improvement — Proper preheating promotes a golden-brown color on your snack mix, making it visually appealing.
- Shelf Life Extension — The right temperature helps seal in freshness by evaporating excess moisture, ensuring your mix stays crunchy longer.
Different Preheating Times
- No Preheat (poor) — Snack mix may turn out unevenly cooked; some pieces will be chewy instead of crispy.
- 5 minutes (fair) — Better than nothing, but still not optimal; results are hit-or-miss with texture.
- 10 minutes (good) — A decent start; some parts will bake nicely while others may lag behind in crispness.
- 15 minutes (great) — Most pieces achieve an even golden color and better overall texture.
- 20 minutes or more (⭐️best⭐️) — Ideal! Everything bakes uniformly, achieving maximum crunch and flavor infusion.
Be warned: Skipping the preheating step is a common mistake that can ruin your Dill Pickle Chex Mix. If you throw everything into a cold oven, you risk ending up with a sad mix of chewy treats instead of the crunchy snack sensation you crave. Don’t make my mistake—preheat like your snacking depends on it!
How to make Dill Pickle Chex Mix: A Tangy Snack Sensation

Are you ready to see how straightforward it is to make the Dill Pickle Chex Mix: A Tangy Snack Sensation of your dreams??
1. PREPARE THE OVEN
Let’s get that oven ready for some crunchy goodness!
Preheat – Preheat the oven to 250°F (120°C). This low temperature ensures that the flavors meld beautifully without burning, allowing your Chex Mix to become perfectly crispy.
2. MIX THE INGREDIENTS
Now for the fun part: mixing all those delicious components together!
Combine – In a large mixing bowl, combine 3 cups of Chex cereal, 1 cup of pretzel sticks, and 1 cup of broken bagel chips. Make sure everything is evenly distributed for optimal snacking!
Whisk – In a separate bowl, whisk together 1/2 cup of dill pickle juice, 1 tablespoon of olive oil, 1 teaspoon of garlic powder, 1 teaspoon of onion powder, and 1 teaspoon of dill weed. This zesty mixture will be the star seasoning for your Chex Mix!
Pour & Stir – Pour the seasoning mixture over the cereal mixture and stir until everything is evenly coated. Each piece should have that tangy flavor infusion you’re craving!
Add-In (Optional) – If you’re using them, add in 1 cup of peanuts and/or 1 cup of cheddar cheese crackers. Gently mix to combine as these additions bring extra crunch and flavor.
HANDY TIPS
- Chex Variety: Feel free to mix different varieties of Chex cereals for added texture and taste!
- Crunch Factor: If you want more crunch, consider adding a bit more bagel chip pieces; they really enhance the overall texture!
3. BAKE THE MIXTURE
Time to bake your creation into a tasty snack mix!
Spread – Spread the mixture evenly on a baking sheet. Ensure it’s not overcrowded so that each piece gets nice and crispy during baking.
Bake – Bake in the preheated oven for about 20 minutes, stirring every 10 minutes to ensure even baking. You’ll know it’s done when it’s fragrant and slightly golden—perfectly toasted!
Cool Down – Remove from the oven and let cool completely before serving. This step is crucial because it allows every piece to firm up nicely!
HANDY TIPS
- Batch Size: If you want a larger batch for parties or game nights, simply double or triple the ingredients while keeping an eye on the baking time!
- Storage: Store your cooled Dill Pickle Chex Mix in an airtight container at room temperature; it will stay fresh for about a week—if it lasts that long!
Make this once, and I wager they will invade your dreams every night too! – Nagi x
FAQ – Dill Pickle Chex Mix: A Tangy Snack Sensation
🥒 How long will Dill Pickle Chex Mix keep?
Dill Pickle Chex Mix can be stored in an airtight container for up to 2 weeks at room temperature. After the first week, I find it’s still about 90% as good; however, the crunchiness might start to fade slightly. Keep it away from humidity and heat sources to ensure maximum freshness. For optimal taste, try to consume it within the first week!
⏳ Can I skip baking the mixture?
No, you cannot skip baking the mixture! Baking helps meld all those delightful flavors together and gives that extra crunch that makes this snack mix so irresistible. I’ve tested this numerous times, and letting it cool without baking results in a soggy mess instead of the tangy, crunchy perfection we’re after. Trust me on this one—your taste buds will thank you!
❄️ Can I freeze Dill Pickle Chex Mix for later?
Yes, you can freeze Dill Pickle Chex Mix! To do so, place it in a freezer-safe bag or container after it has completely cooled. When you’re ready to enjoy it again, simply thaw it in the fridge overnight or at room temperature for a few hours. Just remember that while freezing will keep it safe for months, the texture may not be quite as crispy as when freshly made—aim to eat within 1-2 months for best results!
🌾 Is there a gluten-free option for this recipe?
Absolutely! To make this Dill Pickle Chex Mix gluten-free, use certified gluten-free Chex cereal (rice or corn varieties work wonderfully) and replace pretzel sticks with gluten-free pretzels. Additionally, check your bagel chips to ensure they are gluten-free as well. With these simple swaps, you’ll have a tangy snack sensation that everyone can enjoy!
🔄 What can I substitute if I don’t have dill pickle juice?
If you don’t have dill pickle juice on hand, you can substitute it with apple cider vinegar mixed with a bit of water (1: 1 ratio) and add some extra dill weed for flavor enhancement. While it’s not identical in taste—dill pickle juice has that unique briny zing—it works surprisingly well in a pinch! Just remember to adjust the saltiness since pickle juice is typically salted.
🤔 Why do we need to whisk the seasoning separately?
Whisking the seasoning separately ensures that all ingredients blend evenly before hitting your snack mix. If you were to just dump everything together, you’d end up with clumps of garlic powder or dill weed rather than a uniformly flavored mix. This step might seem small but trust me; it makes a big difference in flavor distribution!
🍴 Can I customize this mix with other add-ins?
Definitely! One of my favorite things about this Dill Pickle Chex Mix is how versatile it is. You can easily swap out or add in your favorite snacks like crispy chickpeas, popcorn, or even spicy nuts for an extra kick. Just keep in mind that if you’re adding something salty or flavorful, you may want to adjust the seasoning accordingly so everything balances perfectly.
😋 Did you really test this recipe multiple times?
Yes, I really did test this recipe more times than I’d like to admit! Each batch brought me closer to perfecting that tangy flavor profile and crunchy texture we crave in snack mixes. My kitchen has seen quite a few variations—some were an absolute disaster (let’s not talk about those) but eventually led me here to share this delightful version with you!
Troubleshooting
I will continue to add more to this Troubleshooting section as I start seeing questions coming through from people who have made the recipe.
Troubleshooting tips
“My Chex Mix is too dry and crunchy! 😩”
- You may have used too much Chex cereal compared to the wet ingredients. It’s important to stick to the 3 cups of Chex cereal specified; using more can lead to an overly dry mix.
- If you didn’t stir it enough during baking, some areas might not have absorbed the seasoning mixture properly, resulting in dry patches.
I bet it was still YUM though!
“The seasoning isn’t sticking properly! 😕”
- You might not have mixed the seasoning and cereal thoroughly. Make sure that every piece of cereal, pretzel, and bagel chip is well-coated in the seasoning mix before baking.
- If you skipped adding olive oil or didn’t use enough, this can prevent the seasoning from adhering properly. The oil helps everything stick together beautifully!
I bet it was still YUM though!
“My Chex Mix turned out way too salty! 😳”
- Using a dill pickle juice that’s particularly salty can lead to an overly salty flavor in your mix. Make sure to taste your pickle juice before adding it, as brands vary quite a bit.
- If you added optional ingredients like peanuts or cheese crackers that are already salted, that could amplify the saltiness of the final product.
I bet it was still YUM though!
“It looks unevenly baked and some parts are darker than others! 🔥”
- If your baking sheet was overcrowded with the mixture, it may not bake evenly. Spread it out as much as possible on the sheet for uniform cooking.
- Not stirring every 10 minutes could also cause some sections to brown more than others. Remember that stirring helps distribute heat and ensures even baking!
I bet it was still YUM though!