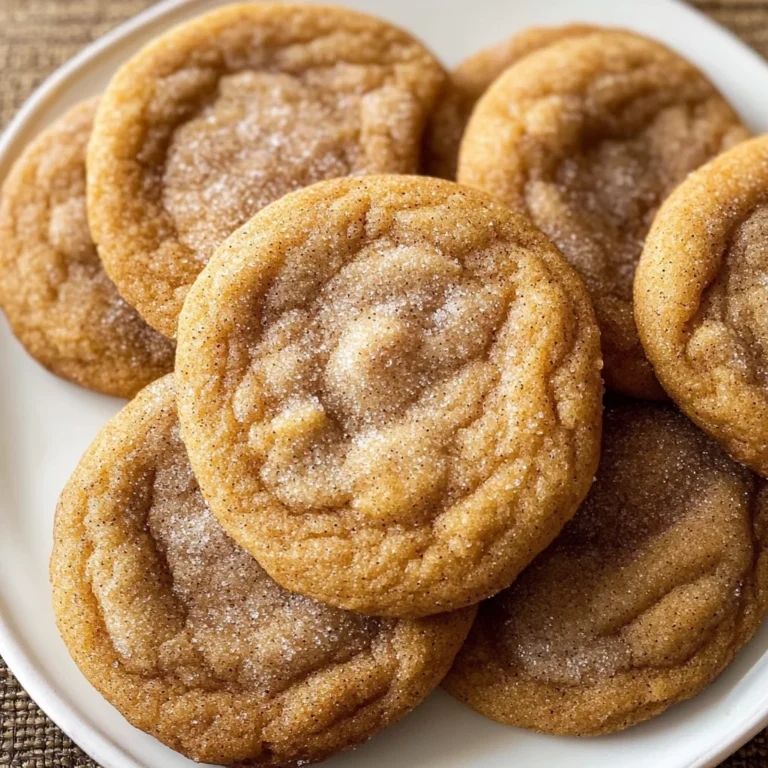
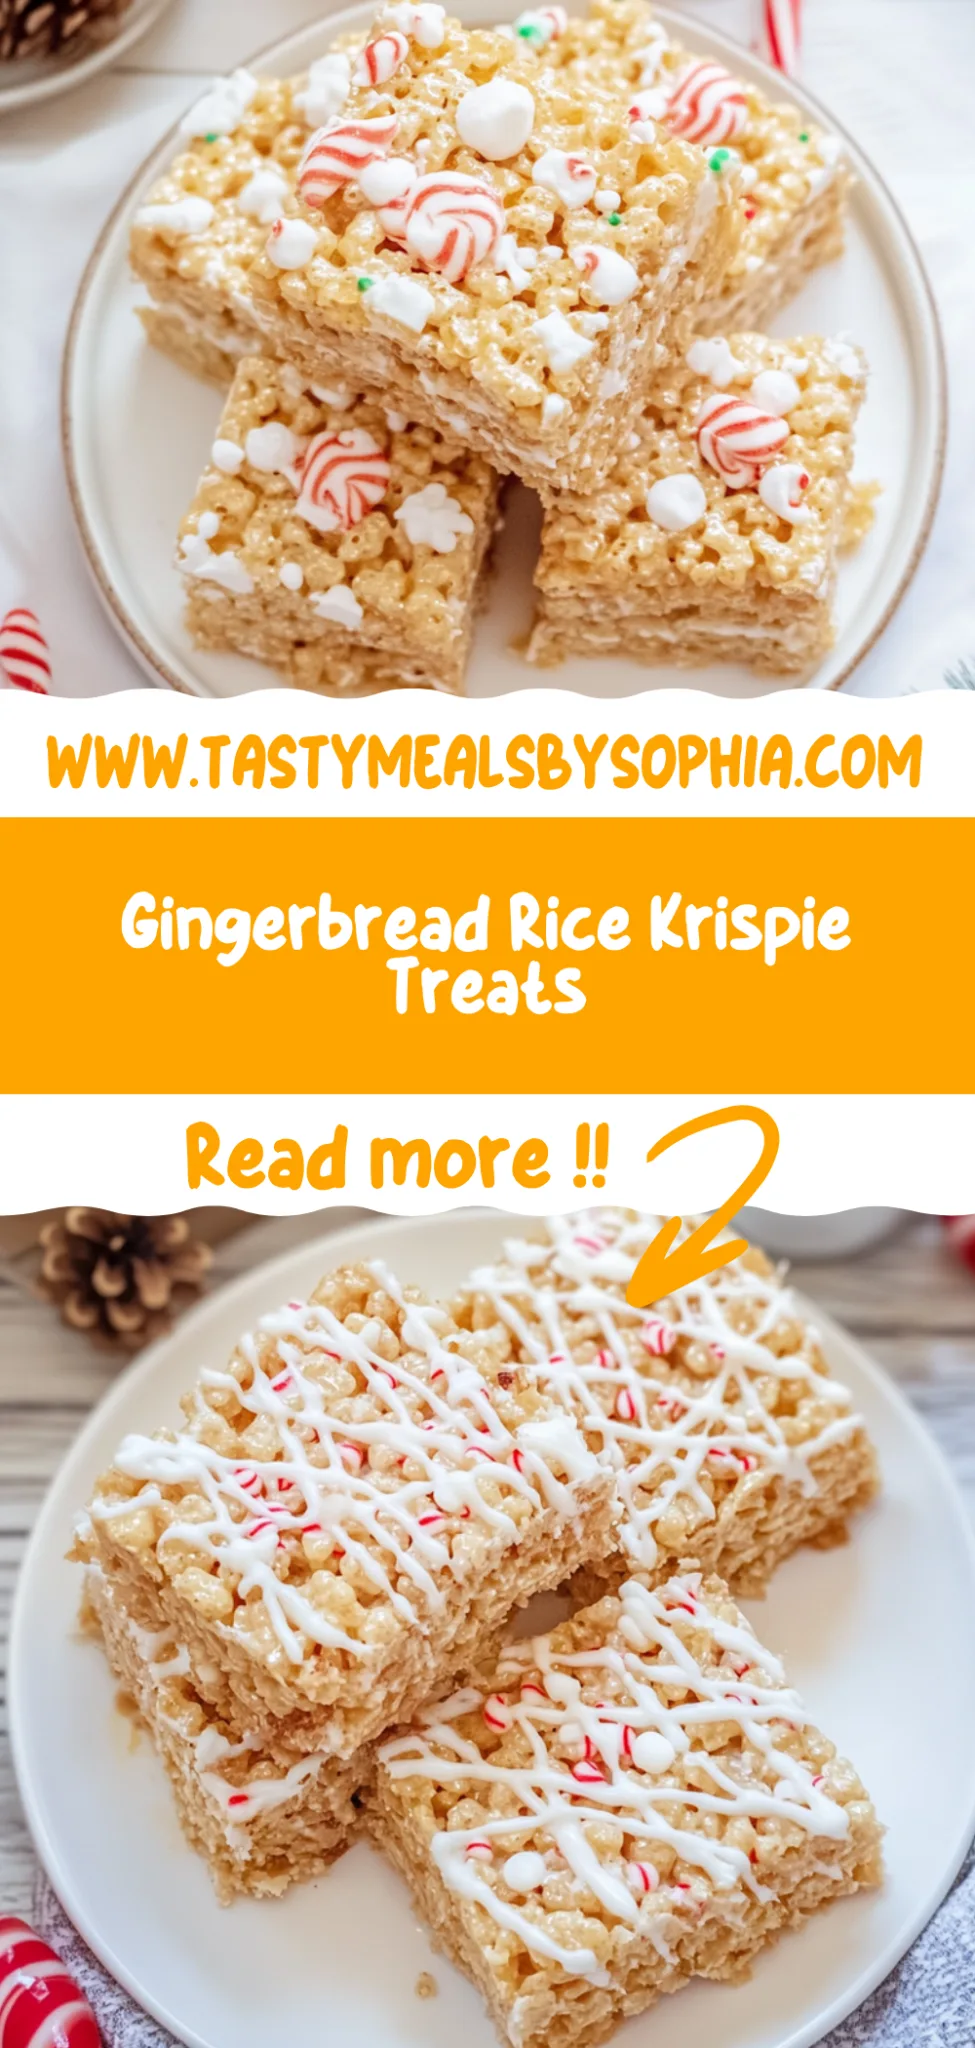
Gingerbread Rice Krispie Treats: A Festive Delight
I first stumbled upon the idea of Gingerbread Rice Krispie Treats during a holiday outing at a local café, where they served these magical little squares that tasted like Christmas wrapped in a bite. The cozy vibe of the place and the nostalgia of childhood treats sparked a craving in me—one I just couldn’t shake. I knew I had to recreate them at home, not only because they were such a festive delight but also because, let’s face it, homemade always beats store-bought, and I wanted to put my own spin on this classic treat without breaking the bank.
After several rounds of experimentation—seriously, I lost count after the fifth attempt—I finally nailed the recipe! Each iteration was a comical disaster in its own right; from overly sticky messes that could’ve double as glue to gingerbread flavors that were more “meh” than merry. With each attempt, I aimed for that perfect balance of crunchy and chewy texture while infusing just the right amount of warm spices to make you feel all snuggly inside. It turns out, making these delightful treats is both an art and a science—and let’s just say I’ve developed a newfound respect for snack science!
But oh boy, was it worth every sticky finger and crumb-filled countertop! The final result is nothing short of spectacular: these Gingerbread Rice Krispie Treats are crispy yet chewy, with an irresistible blend of cinnamon, nutmeg, and ginger that fills your kitchen with holiday cheer. They’re not just treats; they’re little squares of joy that keep well for days (if you can resist devouring them all at once). So grab your spatula and let’s dive into this festive adventure together—I promise you won’t regret it!
These Gingerbread Rice Krispie Treats are….
….the ultimate festive indulgence that will have you dreaming of holiday cheer!
1. They deliver a warm, spiced flavor that captures the essence of gingerbread. The combination of ground ginger, cinnamon, and nutmeg creates a delightful aroma that fills your kitchen, making these treats an instant holiday classic. Each bite is a cozy reminder of winter festivities.
2. Perfectly crispy texture – these treats strike the ideal balance between crunch and chewiness. The Rice Krispies add a satisfying snap, while the melted marshmallows provide just the right amount of gooeyness, ensuring every bite is both exciting and comforting.
3. A key technique I found crucial is melting the butter and marshmallows together before adding the spices. This method allows the flavors to meld beautifully, creating a cohesive taste throughout the treats rather than just on the surface, elevating them from ordinary to extraordinary.
4. The value is unbeatable — this recipe is not only easy to make but also budget-friendly! With just a handful of simple ingredients like butter and marshmallows, you can whip up a batch that rivals store-bought versions without breaking the bank or sacrificing quality.
PS These Gingerbread Rice Krispie Treats are cut into generous squares, making them perfect for sharing at holiday gatherings or gifting to friends and family!
Ingredients for the Gingerbread Rice Krispie Treats
Each ingredient in this dish plays an essential role in flavor and texture. Here’s what you’ll need:
- 3 tablespoons unsalted butter (melted): Provides richness and helps bind the treat together.
- 1 package marshmallows (10 oz): Creates that classic gooey texture that holds everything in place.
- 1/2 teaspoon ground ginger: Infuses a warm, spicy note reminiscent of traditional gingerbread.
- 1/2 teaspoon ground cinnamon: Adds comforting warmth and enhances the holiday flavor profile.
- 1/4 teaspoon ground nutmeg: Contributes a subtle depth and earthiness that rounds out the spices.
- 1/4 teaspoon salt: Balances sweetness and enhances all the flavors in the treat.
- 6 cups Rice Krispies cereal: Provides the delightful crunch and airy structure of the treats.
You Must Melt the Marshmallows Just Right — No Shortcuts!
I’ll admit it: I tried to cut corners with this recipe. I thought, “How bad could it be if I just tossed in the Rice Krispies while the marshmallows were still a bit chunky?” Well, spoiler alert: it was a disaster! The mixture didn’t bind properly, and my festive Gingerbread Rice Krispie Treats turned into a sad pile of mush. Trust me, you don’t want to skip this step!
The reason you need to melt the marshmallows thoroughly is simple: it’s all about creating that perfect gooey texture that holds everything together. When marshmallows are melted just right, they become a silky, elastic mixture that envelops each Rice Krispie like a warm hug. This ensures every bite is loaded with flavor and creates a delightful chewiness that contrasts beautifully with the crunch of the cereal.
What does melting the marshmallows do?
- Texture — Properly melted marshmallows create a sticky, cohesive mixture that binds the Rice Krispies together. If they’re not melted enough, your treats will crumble apart.
- Flavor Integration — When the marshmallows melt fully, they allow spices like ginger, cinnamon, and nutmeg to infuse evenly throughout the mixture for a harmonious holiday flavor.
- Even Distribution — A smooth marshmallow base allows for easier mixing of ingredients, ensuring every bite is consistent in taste and texture.
- Appearance — Melted marshmallows give your treats a glossy sheen that looks appetizing and festive, especially when topped with white chocolate.
- Shelf Life — The right melting technique helps maintain moisture within the treats, keeping them fresh longer without becoming hard or stale.
Different melting times
- 1 minute (good) — Marshmallows are starting to melt but still have chunks; results in uneven texture and potential crumbling.
- 2 minutes (better) — Marshmallows are mostly melted but may leave some lumps; still not ideal for binding properly.
- 3 minutes (great) — Smooth and creamy mixture; perfect for blending spices and coating Rice Krispies evenly.
- 4 minutes (best) — Fully melted and elastic; creates an ultra-smooth texture that makes for perfectly chewy treats.
Most common mistake? Underestimating how important it is to completely melt those marshmallows. Don’t rush it! If they’re not fully smooth before adding the Rice Krispies, you’ll end up with crumbly treats instead of the chewy, gooey goodness you’re after.
How to make Gingerbread Rice Krispie Treats
Are you ready to see how straightforward it is to make the Gingerbread Rice Krispie Treats of your dreams??
1. PREPARE THE MIXTURE
Let’s kick things off with that delicious, spiced base!
1. MELT – In a large pot over medium heat, melt the butter. This step is crucial as it creates a rich base for your treats. Once the butter is melted, add the marshmallows and stir continuously until they are completely melted and form a smooth mixture. You’ll know it’s ready when it’s glossy and free of lumps!
2. SPICE IT UP – Stir in the ground ginger, cinnamon, nutmeg, and salt until well combined. These spices will infuse your mixture with that delightful gingerbread flavor that makes these treats festive! ❓ Why does this matter? Because the warmth of these spices is what turns a classic treat into a holiday sensation!
3. ADD CEREAL – Remove the pot from heat and quickly stir in the Rice Krispies cereal until everything is evenly coated. This step requires a bit of speed, so don’t dawdle—get those crispy bits mixed in well!
HANDY TIPS
- For an extra flavor kick, you can adjust the spices slightly by adding more cinnamon or ginger based on your preference!
- If you want to make a larger batch, simply double the ingredients and use a bigger baking pan.
2. SHAPE AND COOL
Now it’s time to shape our mixture into something beautiful!
4. TRANSFER – Transfer the mixture to a greased 9×9 inch baking pan. Use a spatula to press down firmly and evenly create a solid layer. Make sure it’s packed well; this will help your treats hold together once cut! ⚠️ Pressing too lightly may result in crumbly squares later on.
5. COOL – Allow to cool for about 10 minutes at room temperature. This cooling period helps set your treats before you dive into cutting them.
HANDY TIPS
- If you’re short on time, placing them in the fridge can speed up the cooling process—just keep an eye on them so they don’t get too hard!
- For even squares, use a sharp knife or pizza cutter when cutting into portions.
3. ADD TOPPINGS
Let’s make these treats extra special with some festive toppings!
6. DRIZZLE & GARNISH – If desired, drizzle melted white chocolate over the top of your cooled treats for an added layer of sweetness and decoration. Then sprinkle with crushed gingerbread cookies for that perfect crunch!
7. SET – Let the chocolate set for a few minutes before cutting into squares. This will give your treats that professional look while also ensuring they hold their shape beautifully when served.
HANDY TIPS
- If you prefer dark chocolate over white, feel free to substitute!
- For a fun presentation, consider using cookie cutters to shape them differently after they’ve set.
Making these Gingerbread Rice Krispie Treats only takes about 20 minutes total—and I promise they will be gone in no time! That’s just how irresistible they are! Make these once, and I wager they will invade your dreams every night too! – Nagi x
FAQ – Gingerbread Rice Krispie Treats
🍬 How long will these treats keep?
These Gingerbread Rice Krispie Treats will stay fresh for about 3 to 5 days when stored properly. I recommend keeping them in an airtight container at room temperature. On day 3, they’re still about 97% as good, but by day 5, they may start to lose their delightful chewiness and flavor. If you notice them getting hard, just pop them in the microwave for a few seconds to revive that gooey goodness!
❄️ Do I really have to cool the mixture before cutting?
Yes, you should definitely let the mixture cool for about 10 minutes at room temperature before cutting. This step allows the treats to firm up slightly, making them easier to cut into squares without falling apart. I’ve tried skipping this step and ended up with a sticky mess instead of neat pieces — trust me, it’s worth the wait!
🥶 Can I freeze these Gingerbread Rice Krispie Treats?
Absolutely! To freeze, wrap the cooled treats tightly in plastic wrap and then place them in an airtight freezer bag. They can be frozen for up to 2 months. When you’re ready to enjoy them, simply thaw them in the refrigerator overnight or at room temperature for a few hours. Just note that while they’ll still taste great after freezing, they might lose a bit of their original texture.
🌾 Are these treats gluten-free?
Yes! The base ingredients used in this recipe — marshmallows and Rice Krispies — are naturally gluten-free. However, always double-check that your specific brand of Rice Krispies is labeled gluten-free just to be safe! If you’re looking for a completely gluten-free experience, skip the crushed gingerbread cookie topping unless you can find gluten-free options.
🍯 Can I substitute honey or maple syrup for the sugar?
No, you cannot replace the marshmallows with honey or maple syrup. I’ve tested this extensively (yes, I really made 20 batches!), and unfortunately, it doesn’t work because marshmallows provide structure and that classic chewy texture we love in Rice Krispie treats. Stick with the marshmallows if you want that perfect consistency!
🔍 Why do I need to stir quickly when adding the cereal?
Stirring quickly is crucial because marshmallows can cool down rapidly once removed from heat, making it difficult to coat all your Rice Krispies evenly. If you take too long, you’ll end up with clumps instead of beautifully coated cereal! It’s a bit of a race against time, but it’s totally worth it for those perfectly blended treats.
🎉 Can I add other mix-ins or flavors?
Definitely! You can customize these treats by adding other festive ingredients like mini chocolate chips, crushed candy canes, or even dried fruits like cranberries for a tart contrast. Just be mindful not to overwhelm the mixture; keep your total add-ins around 1 cup so that everything holds together nicely. It’s all about making it your own — get creative!
Troubleshooting
I will continue to add more to this Troubleshooting section as I start seeing questions coming through from people who have made the recipe.
Troubleshooting tips
“My Rice Krispie treats turned out too thin! 😱”
- You may not have pressed the mixture down firmly enough in the baking pan. This causes them to spread out more than intended, creating a thinner treat. Make sure to really pack it in!
- If you used a larger pan than the specified 9×9 inch, the mixture will be spread out more, resulting in thinner treats. Stick with the recommended pan size for best results.
- I bet they were still YUM though!
“These are way too sticky and falling apart! 😩”
- If your marshmallows weren’t melted completely smooth, they will leave clumps that make the treats sticky instead of cohesive. Be patient and stir until it’s all melted!
- You might have added too few Rice Krispies compared to the marshmallow mixture. It’s important to stick to the 6 cups for optimal texture.
- I bet they were still YUM though!
“My treats are hard as a rock! 😳”
- Overheating the butter and marshmallows can cause them to cook too long, leading to a tough texture. Make sure to melt them over medium heat and remove from heat as soon as they’re smooth.
- Not adding enough marshmallows can also lead to overly dry treats since they provide moisture. Always use a full 10 oz package!
- I bet they were still YUM though!
“The top of my treats is cracking! 😬”
- Pressing down too hard on the mixture can create cracks on the surface due to compacting it too much. Try pressing gently but evenly next time.
- If your mixture was too dry because you didn’t add enough marshmallows or Rice Krispies, this could also lead to a cracking surface when cooled.
- I bet they were still YUM though!